Before using this information and the product it supports, read
the information in Notices.
First Edition (October 2011)
This edition applies to version 7.5.1 of IBM Rational Asset
Manager and to all subsequent releases and modifications until otherwise
indicated in new editions.
Copyright International Business Machines Corporation 2007, 2011. US Government Users Restricted Rights -- Use, duplication or disclosure restricted by GSA ADP Schedule Contract with IBM Corp.
Installing Rational Asset
Manager with the embedded WebSphere Application Server
Follow this outline to consider installation options for IBM® Rational® Asset Manager and
to install it with WebSphere® Application Server.
About this task
The embedded WebSphere Application Server,
version 7.0,
that you install with IBM Installation Manager is
not intended for a large-scale deployment of Rational Asset Manager.
You do not have complete access to the WebSphere administrative console
and accordingly will not be able to fully manage application, security,
and performance settings.
For larger deployments, consider using
a dedicated WebSphere Application Server or WebSphere Application Server Network-Deployment
cluster of servers.
Restriction:To
create and use a cluster
of application servers, you must have IBM WebSphere Application Server Network
Deployment (ND), which is not bundled with IBM Rational Asset Manager.
Procedure
Install a database application for Rational Asset Manager:
Rational Asset Manager requires
a database for storing assets and associated data. If you do not have
one of the supported database applications installed, you can install IBM DB2® Enterprise Server Edition, version 9.7 from
the Rational Asset Manager launchpad.
To
improve performance, the database server typically resides on a computer
that is physically separate from the application server and on its
own dedicated disk.
To configure the database tables and schema,
you must have database administrator privileges.
Use Installation
Manager to
install the Rational Asset Manager server
setup application. On the Features page of the Install wizard, select Packaged
Embedded WebSphere Application Server.
This is the easiest method for installing Rational Asset Manager server.
The Rational Asset Manager server
setup application is browser-based application that works like a wizard
to help you deploy application files, set up databases, configure
users and security, and adjust repository settings.
Configure the server environment
settings.
Additional configuration steps are required
on Linux, AIX®, and Linux for zSeries®:
If you are an administrator, ensure the best possible performance
for users, regardless of the number of concurrent users or the number
of assets in the repository.
You can install the Rational Asset Manager Eclipse
client by the following methods:
If a supported Eclipse integrated
development environment (IDE)
is installed on your computer, use Eclipse update manager to find
and install the Rational Asset Manager Eclipse
client plug-ins from a Rational Asset Manager server.
To install the client plug-in, follow the Eclipse update process (Help > Software Updates > Find and Install).
If
an Eclipse IDE is not installed on your computer, install the
Eclipse client from the Rational Asset Manager installation
media. You can also install the Eclipse client into an existing Eclipse
V3.3.2 IDE by this method.
Installing Rational Asset
Manager to a WebSphere Application
Server by using Installation Manager
Follow this outline to plan the installation of IBM Rational Asset Manager to
an IBM WebSphere Application Server by
using IBM Installation Manager.
Procedure
To install Rational Asset Manager to
a WebSphere Application Server:
Install a database application for Rational Asset Manager:
Rational Asset Manager requires
a database for storing assets and associated data. If you do not have
one of the supported database applications installed, you can install IBM DB2 Enterprise Server Edition, version 9.7 from
the Rational Asset Manager launchpad.
To
improve performance, the database server typically resides on a computer
that is physically separate from the application server and on its
own dedicated disk.
To configure the database tables and schema,
you must have database administrator privileges.
To
distribute license keys to clients, Rational Asset Manager server
requires the IBM Rational License Server.
Create a backup of your server configuration by using the WebSphere_install_location/bin/backupConfig.bat command. For more information, see the WebSphere Application Server documentation.
Use IBM Installation
Manager to install the Rational Asset Manager server
setup application on a WebSphere Application Server.
On the Features page of the Install wizard, select WebSphere
Application Server.
The Rational Asset Manager server
setup application is browser-based application that works like a wizard
to help you deploy application files, set up databases, configure
users and security, and adjust repository settings.
Configure the server environment
settings.
Additional configuration steps are required
on Linux, AIX, and Linux for zSeries:
If you are an administrator, ensure the best possible performance
for users, regardless of the number of concurrent users or the number
of assets in the repository.
You can install the Rational Asset Manager Eclipse
client by the following methods:
If a supported Eclipse integrated
development environment (IDE)
is installed on your computer, use Eclipse update manager to find
and install the Rational Asset Manager Eclipse
client plug-ins from a Rational Asset Manager server.
To install the client plug-in, follow the Eclipse update process (Help > Software Updates > Find and Install).
If
an Eclipse IDE is not installed on your computer, install the
Eclipse client from the Rational Asset Manager installation
media. You can also install the Eclipse client into an existing Eclipse
V3.3.2 IDE by this method.
Installing Rational Asset
Manager on an Apache Tomcat server
You can install
and configure IBM Rational Asset Manager manually
on Tomcat. Follow this outline plan to install Rational Asset Manager and
to configure it on an existing Apache Tomcat server.
Procedure
Install a database application for Rational Asset Manager:
Rational Asset Manager requires
a database for storing assets and associated data. If you do not have
one of the supported database applications installed, you can install IBM DB2 Enterprise Server Edition, version 9.7 from
the Rational Asset Manager launchpad.
To
improve performance, the database server typically resides on a computer
that is physically separate from the application server and on its
own dedicated disk.
To configure the database tables and schema,
you must have database administrator privileges.
If you are an administrator, ensure the best possible performance
for users, regardless of the number of concurrent users or the number
of assets in the repository.
You can install the Rational Asset Manager Eclipse
client by the following methods:
If a supported Eclipse integrated
development environment (IDE)
is installed on your computer, use Eclipse update manager to find
and install the Rational Asset Manager Eclipse
client plug-ins from a Rational Asset Manager server.
To install the client plug-in, follow the Eclipse update process (Help > Software Updates > Find and Install).
If
an Eclipse IDE is not installed on your computer, install the
Eclipse client from the Rational Asset Manager installation
media. You can also install the Eclipse client into an existing Eclipse
V3.3.2 IDE by this method.
Upgrading Rational Asset
Manager
The following topics explain how to upgrade IBM Rational Asset
Manager to the current version from any previous version.
Upgrading from a previous version on WebSphere Application Server
Use this guide to upgrade from an earlier version of IBM Rational Asset Manager on IBM WebSphere Application Server.
Before you begin
Important:
If you
are upgrading from Rational Asset Manager,
Version 7.1.1.1 or earlier, you must install IBM Rational Team Concert,
which requires its own application server instance - you cannot install Rational Team Concert to
a cluster - and an additional database.
You
must upgrade your license server and file a request for updated license
keys. For more information about the required version of Rational License Server, see Installing Rational License
Key Server.
You will also have to stop and restart
your application server several times.
You can also configure
an existing Rational Team Concert server
to work with Rational Asset Manager.
The server setup application handles the configuration. You must know
the user name and password for the Rational Team Concert server
administrator.
If you have Internet access, you can use IBM Installation Manager to
locate and install the updates directly from the IBM update repository for Rational Asset Manager.
Important:When Rational Asset Manager installs,
the location of its update repository is automatically embedded in
Installation Manager. For Installation Manager to search the default
update repository, the Search the linked repositories during
installation and updates preference on the Repositories
preferences page must be selected; this preference is selected by
default.
To install the fix pack from a different repository
location (for example, if the update is on a shared drive or HTTP
or HTTPS server), add the repository location in Installation Manager.
To add a repository location, see Setting installation repository preferences in Installation
Manager.
This outline shows what you must do to upgrade to the latest
version of Rational Asset
Manager:
Prepare to upgrade by making backups and configuring your application
server: steps 1-6.
If you are using a WebSphere Application
Server Network Deployment cluster and you are upgrading from V7.1.1.1
or earlier, create a stand-alone application server instance on your
cluster for Rational Team Concert™: step 7.
If you are using Oracle, copy the additional JDBC .jar files:
steps 8-9.
Install the required interim fix pack on your WebSphere Application Server or cluster
V7.0:
step 10.
If you are using the embedded WebSphere Application
Server, stop the server: step 11.
Upgrade your license server to Rational Common
Licensing V8.1.2:
step 12.
Retrieve the application files for the latest version of Rational Asset Manager and
deploy the server setup application: steps 13-14.
Use the server setup application to update the other Rational Asset Manager applications: steps 15-18.
If you are upgrading from V7.1.1.1 or earlier and you need Rational Team Concert,
deploy Rational
Team Concert to your server and create a database: steps 20-24.
On Linux, AIX, or Linux for zSeries, increase the number of file descriptors
a process might have open at once to at least 3072:
To view the current number of descriptors that can be
open at once, in the command line type: ulimit -n
If the limit is not at least 3072,
increase the limit with the following command: ulimit -n 3072
If you have modified your theme or email
messages, before you update the Rational Asset Manager server,
download the current theme and mail message files (on the Administration > Tools page) and then, after you have updated the server,
reapply the theme and your messages.
Configure the application security and authentication settings
for WebSphere Application Server:
In a web browser, log in to the WebSphere Application Server administrative
console. By default, this is located
at:
For embedded WebSphere Application Server: http://localhost:13060/ibm/console .
The default user name is admin and the default
password is admin.
For WebSphere Application Server: http://localhost:9060/ibm/console
Click Security.
Click Global security.
In the Administrative Security section, if the Enable
administrative security check box is selected, select
the Enable application security check box.
In the Authentication section, click Web
and SIP security.
Click General settings.
In the Web Authentication Behavior section, select the Use
available authentication data when an unprotected URI is accessed check
box if it is not already selected.
Click Apply.
In the Messages window, click Save directly
to the master configuration.
Stop, and then restart the server.
If you are using Rational Asset Manager,
version 7.0.0.2 or earlier, verify that the job server is enabled.
To enable the job server:
Log in to the Rational Asset Manager web
client as a repository administrator.
Click Administration.
In the Repository Administration sidebar, click Tools.
In the address bar of the browser, replace tools.faces with advancedConfiguration.faces and
go to that address. For example, http://example.com:9080/com.ibm.ram.repository.web/admin/repository/advancedConfiguration.faces
On the Advanced Settings page, in the Job Options section,
select Enable job server.
Click Save.
Restart the application server.
Verify that all of the repository
servers are set to the same current date, time, and time zone.
If you are upgrading from version
7.1.1.1 or earlier and use a WebSphere Application Server cluster
and you need to install Rational Team Concert,
you must create a stand-alone application server instance on your
cluster for Rational Team Concert.
To do so, see Creating
an application server instance for Rational Team Concert
on a WebSphere Application Server distributed server cluster. If you are not using a cluster, you do not have to do this; Rational Team Concert and Rational Asset Manager can
be installed on the same application server.
If you are using Oracle, copy the
additional JDBC .jar files to the WebSphere_install_directory/profiles/profile_name/config/cells/cell_name/ram_jdbc directory
for your application server:
Table 1. JDBC .jar files by WebSphere Application Server and Oracle versions
WebSphere Application Server version
Oracle version
JDBC .jars
WebSphere Application Server version
6
Oracle version 10
ojdbc5 and ojdbc14
WebSphere Application Server version
7
Oracle version 11
odjbc6 and ojdbc14
You can download the appropriate .jar files from Oracle. If you are using Oracle 10g,
download a package for Oracle 11 to obtain the appropriate .jar files.
If you are using Oracle and you
are using AIX, Linux, or Linux for zSeries, set the appropriate
permissions for the new JDBC .jar file as described
in Enabling database connectivity for non-root users (Linux and AIX). The user who accesses the Oracle database
from Rational Asset Manager must
be given the appropriate privilege to complete the migration.
If you are using the RAMSCHEMA user,
grant CREATE VIEW privilege to RAMSCHEMA user.
Example: GRANT CREATE VIEW TO RAMSCHEMA
If you are using a different user, grant CREATE ANY
VIEW privilege to that user. Example: GRANT CREATE
ANY VIEW TO User
If you are not using the embedded WebSphere Application Server and
you are using WebSphere Application
Server V7.0,
you must install the interim fix to your server: http://www-01.ibm.com/support/docview.wss?uid=swg24023024. This interim fix prevents an issue where WebSphere Application Server is
unable to release connections with Rational Team Concert.
If you use the embedded WebSphere Application Server,
stop the embedded WebSphere Application Server.
Note:Do not stop your server if you are using a network deployment
cluster or if you installed onto an existing WebSphere Application Server.
If
issuing the Rational Asset Manager Stop
the server command does not stop the server, run the stopServer command
from a command line in the Install-directory\ram\ewas\bin directory,
and specify a server administrator user name and password by using
the -username and -password options.
Rational License
Key Server is included with the Rational Asset Manager installation
media. You can also retrieve the latest version of Rational License
Server through your Passport Advantage account, or through the Rational Download Center.
This
process requires that you shut down all applications that use Rational Licensing Server,
uninstall your existing Rational Licensing
Server, update your license files, and install Rational Common Licensing server. For Windows, see Configuring a license server for Windows; for AIX or Linux,
see Configuring a license server for UNIX.
For Linux for zSeries, continue to use Rational License Server for UNIX and Linux 7.0.0.1.
Retrieve the appropriate Rational Asset Manager applications:
If you use WebSphere Application Server and
you used Installation Manager to deploy Rational Asset Manager to
your server, use Installation Manager for the upgrade process. See
the instructions Installing Rational Asset
Manager server by using Installation Manager and
note these differences:
Start Installation Manager. On Windows Vista,
run Installation Manager as an administrator (Right-click the program
shortcut and select Run as administrator.
Installation Manager might need to update to a later version.
To configure Installation Manager so that it checks for updates: on
the Start page click File > Preferences; then click Updates. In the
Updates page, select Search for Installation Manager updates.
On the Start page of Installation Manager, click Update.
If a more recent version of Installation Manager is available,
a window appears that asks you to update. Click Yes.
Once the update process completes, click OK to
restart Installation Manager, then click Update again.
On the Update Packages page, select IBM Rational Asset
Manager; then click Next. Expand
and select the latest version of Rational Asset Manager server and
click Next.
Follow the instructions in the Update wizard.
On the Context Root page, Installation
Manager detects the context roots for your current Rational Asset Manager web
applications. Note the context root for Rational Asset
Manager Setup Server; you need the context root to access
the server setup application. Then click Next.
If application server security is enabled (it likely is) or the
security settings for WebSphere Application Server have
changed since you installed the product, on the Administrative
security page of the Features section, select Yes and
type the user name and password for the application server administrator.
Then click Next.
After the update process finishes:
If you use the embedded WebSphere Application Server,
the embedded WebSphere Application Server has
been updated to the appropriate fix pack level and the server setup
application .ear file has been updated. Start
the embedded WebSphere Application Server.
Go to step 15.
If you use an existing WebSphere Application Server,
the server setup application .ear file has been
updated. Go to step 15.
If you use an existing WebSphere Application Server ND
Cluster, go to step 15. If you are upgrading from version
7.5 or later and that was the first version of the product that you
installed, the server setup application has been updated on the application
server that you specified when you originally installed the product.
If you installed any version earlier than 7.5, the server setup application
will be updated on the Deployment Manager server for your cell.
If you deployed the Rational Asset Manager .ear and .war files
to your application server, retrieve the latest version of the Rational Asset Manager application
files. For more information, see Retrieving the
server application files directly from the installation
media.
After you have the application files, proceed to step 14.
Deploy the Rational Asset Manager server
setup application to your application server:
If you are using a WebSphere Application
Server cluster and deployed the server setup application to the Deployment
Manager server (this describes most environments on a cluster before
V7.5), you must use a script to uninstall the existing server setup
application, and then install the latest server setup application.
For more information about using the deployClusterSetup.py and UninstallSetup.py scripts,
see Deploying the server setup application to the Deployment Manager
on a WebSphere Application Server cluster. Alternatively, you can deploy the server setup application to the cluster instead
of directly to the Deployment Manager; you wont need to run a Jython
script if you deploy the application in this manner. After you deploy
the server setup application to the Deployment Manager, go to step 15.
If you have deployed the Rational Asset Manager server
setup application directly to an application server, update com.ibm.ram.repository.setup.web.ear to
the latest version that you retrieved:
Launch the WebSphere Application Server administrative
console and log in as an administrator.
Update the Rational Asset Manager server
setup application:
Click Applications > Application
types.
Click WebSphere enterprise applications.
Select com.ibm.ram.repository.setup.web.ear;
then click Update.
Browse to or type the path and file name of the Rational Asset Manager server
setup enterprise archive file (com.ibm.ram.repository.setup.web.ear).
On the next three pages, click Next.
On the Summary page, click Finish.
When the com.ibm.ram.repository.setup.web.ear file
installs, click Save to Master Configuration.
The server setup application is now updated and deployed. You use the server setup application to
update all the other applications. Go to step 15.
Note:If you used Rational Asset Manager 7.1.0.1
or earlier, the default context root for the server setup application
has changed from com.ibm.ram.repository.setup.web to ram.setup.
If you bookmarked the server setup application, your bookmark might
not work after you update the server setup application. For more information,
see the WebSphere Application
Server documentation on context roots for Web modules.
After you have deployed the most
recent version of the server setup application, in a web browser,
open the server setup application by using the URL: http://host:port/setup-server-context-root.
The default context root for the server setup application is ram.setup.
If security is enabled on the application server, type the user ID
and password for an application server administrator. For
the embedded WebSphere Application Server,
the default user ID and password are admin and admin.
In the Step 1: Locate Installation
Files section, click Provide the location of the files
on the server and type
the directory on the file system on the server that is running the
server setup application where the new web application files are located. If you used the Update wizard in Installation Manager, the files
are in the package_group_location\ram\apps\was directory.
These files must be in that directory:
com.ibm.ram.repository.web_runtime.ear
RTC-Server.zip
rlsclients_rlsibmratl_812.zip
ramhelp_war.ear
rmcabdgovernprocess_war.ear
If you deployed the server setup application
to an application server that is part of a cluster and you are accessing
that application server, to upload the files to the server that is
running the server setup application, click Upload the
files to the server; then click Browse and
select each of the required files.
To verify that all required application
files are in the directory, or to upload them to the server, click Verify
Location. If you uploaded the application files,
the server setup application saves them to a temporary directory.
A message verifies if all the required files are present.
Click Update. The server setup application updates all other Rational Asset Manager application
files to the latest versions and maintains their context roots, a
process that can take several minutes.
Next:
If you are upgrading from V7.1.1.1 or earlier, the Introduction
page opens; proceed to step 20.
If you are upgrading from V7.2 or later, the Summary page
opens; proceed to step 28.
Rational Team Concert is
required for the enhanced lifecycle process. Next:
If you need Rational Team Concert: Rational Asset Manager includes
a limited version that you can install.
On the Introduction page, from the Install Rational
Team Concert? list, select Yes, install a new
RTC server.
In the Deploy Rational Team Concert section,
confirm the application server in the Servers list
- you cannot deploy Rational Team Concert to
a cluster - and click Deploy Applications. The operation to deploy Rational Team Concert can
take several minutes. The Deploy Rational Asset Manager page
reopens when the process completes.
When the operation completes, click Next.
Create a database for asset lifecycles
for Rational Team Concert
For DB2:
The server setup application can create the database for you:
On the Create or Locate a Database for Rational Asset Manager page,
select You need to create the Lifecycle database and
click Next.
If you are installing
a new Rational Team Concert,
in the Create a database for Lifecycle Management field,
type a name for the lifecycle management database (for example, RTCDB).
If you are using an existing Rational Team Concert,
you do not need to create a new database.
Click Create database(s).
For Oracle or SQL Server: To create
the database manually, see Creating a database for asset lifecycles.
After you have created the database, select You have already
created both databases and want to modify the settings and
then click Next.
On the Configure Database page, enter and test the connection
to the database for lifecycle management:
In the Database name for Lifecycle field,
type the name of the database that you created in step 22.
To test the connection, click Test Connection.
If the connection succeeds, click Next.
Configure the Rational Team Concert database.
Under Step 6: Configure Rational Asset Manager Lifecycle
Database:
Click Populate the Database.
A message asks you to verify that you want to configure
the lifecycle database. Click OK.
After the process completes, click Next.
Continue
through the server setup application to configure or adjust your database
and application server settings until you get to Part 4: Configure
Lifecycle management settings.
On the page for Part 4:
Configure Lifecycle management settings, click Restart
the Server. You must enter the user ID and
password for the application server administrator. After
the server has stopped and restarted, the Configure Lifecycle management
settings page opens.
In the Configure Lifecycle management
settings page, type the path and login information for the Rational Team Concert application:
In Step 1, In the Rational Team Concert server field,
type the path to the Rational Team Concert location.
You must use a secure (https://) connection.
By default, this value is:
For the embedded WebSphere Application Server: https://localhost:13443/ramjazz
For an existing WebSphere Application Server: https://localhost:9443/ramjazz
For an external Rational Team Concert server: https://url:port/jazz
In Step 2, in the Jazz Administrator ID field,
type the user ID of the administrator for the Rational Team Concert server
(the default is admin); then, in the Password field,
type the password for that user (by default, this is admin). If you just installed the Rational Team Concert with
the server setup application, type the user name and password for
the application server administrator.
In Step 3, in the Project Area Name field,
type a descriptive name for the project area that will be created
for lifecycles (for example, Rational Asset Manager lifecycles).
Then, in the Project Area Administrator ID field,
type the user ID for the user that you want to be the project area
administrator. Then, type the Password for
that user. If you are using an external Rational Team Concert
server, the Project Area administrator will probably be a different
user from the Jazz server administrator. If you are installing a new
Rational Team Concert, the server setup application will suggest using
the Jazz Administrator ID as the Project Area Administrator ID.
Click Configure server. This
process might take a few minutes. After the configuration,
the Summary page appears.
On the Summary page, click Start
using Rational Asset Manager.
or click Finish. The web client
opens.
Migrate the Rational Asset Manager repository
to the newest version:
In a web browser, open the Rational Asset Manager web
client. The first time that you open the web client
after the upgrade, a message is displayed that indicates that you
must migrate the repository.
If necessary, log in with a user ID that has repository
administrator authority.
Note:For SQL Server, if an existing Rational Asset Manager database
does not have the collation set to a sequence that ends with _BIN2
(for example, Latin1_General_BIN2) then the Manual Configuration Required
page appears with a message. You can either recreate the database
and set the collation option to be case-sensitive to work correctly
with Rational Asset Manager or
you can accept that there might be unexpected case-sensitivity conflicts.
Click Migrate. On
large repositories, the migration might take several minutes; until
the migration is complete, some information about the repository might
not be available.
After the migration process completes, click Home.
After you migrate the
repository, stop and then restart your application server.
To upgrade, you must file a request for a new license key. You
must acquire a new server license and new user authorized licenses.
Go to the Rational License
Key Center: http://www-01.ibm.com/software/rational/support/licensing/ If you see an error about Rational License
Server, adjust your license configuration:
Click Administration
On the Administration page, click Configuration.
In the License and Version section, to select what type
of server license this repository uses, select either Standard
edition or Enterprise edition.
At the bottom of the page, click Save.
You might see the License Server error again. Click Retry
connection to license server.
After configuration is complete, manually
remap shared library references for the previous version of Rational Asset Manager to
the RAM1WebApplication (for example, for the integration
with IBM Rational ClearQuest® you
must run the integration steps again after upgrading to the new Rational Asset Manage server).
If you open the help application and
it shows an older version of the help or you see errors, clear the
cache for the Rational Asset Manager help
application. See the documentation for your application server for
instructions on clearing the cache. On a cluster, you must to stop
every application server and clear the cache for every node and server
in the cluster. For the embedded WebSphere Application Server,
to clear the cache:
Stop the server.
Delete this directory: Rational_Asset_Manager_install_location/ram/ewas/profiles/profile1/temp/node_name/server_name/ramhelp_war/.
Restart the server.
Update the Rational Asset Manager Eclipse
application by using the same method that you used to install it.
For more information about installing the Eclipse client, see Installing the Rational Asset
Manager Eclipse
client.
Note:Before you
install the latest version of the Rational Asset Manager Eclipse
client, uninstall the Rational Asset Manager Eclipse
client plug-in.
If you installed the Rational Asset Manager V7.0.0.2
Eclipse client into an existing Eclipse V3.3 application by using
Installation Manager, use Installation Manager to uninstall the client.
You cannot use the Eclipse Configuration Manager to uninstall Rational Asset Manager from
the Eclipse client.
If you installed the Rational Asset Manager Eclipse
client plug-ins by using the Eclipse update manager, before you install
the latest version of Rational Asset Manager,
use the Eclipse configuration manager to remove any features that
are named Rational Asset Manager.
To use the Eclipse configuration manager, in Eclipse, click Help > Software Updates > Manage Configuration.
What to do next
For Rational Asset Manager version
7.5.1, the URL for the internal Rational Team Concert server
changed from https://host:port/jazz to https://host:port/ramjazz.
If you are upgrading from a Rational Asset Manager release
earlier than 7.5.1, revise the URL references and tell your users
which changes they must make.
Update the
URLs in these locations:
The Rational Team Concert Eclipse
IDE repository connections that use the previous URL. To update a
repository connection:
Open the Team Artifacts view.
Expand Repository Connections.
Right-click the Rational Asset Manager connection
and select Properties.
Select Jazz repository connection.
In the URI location, change the URL to http://host_name/ramjazz.
Click OK.
The advanced properties in the Rational Team Concert server
that use the previous URL. To update the advanced properties:
Open Rational Asset Manager in
a web browser by using the revised URL: http://host_name/ramjazz/admin
Log on as the administrator.
Click Server > Configuration > Advanced Properties.
Update the properties that include the previous URL. For example: com.ibm.ram.repository.service.internal.RepositoryRemoteService
The Rational Asset Manager links
that are stored in bookmarks in web browsers.
Deploying and configuring application files by using the server
setup application The server setup application is a browser-based web application for IBM WebSphere Application Server that helps you deploy the other Rational Asset Manager applications and configure the database, security, performance, and repository settings. You can use the server setup application to later modify these settings instead of using the Administration pages within Rational Asset Manager web client.
Upgrading the embedded WebSphere Application Server to
a full installation of WebSphere Application Server
The embedded version of IBM WebSphere Application Server that
is packaged with IBM Rational Asset Manager is
a lightweight version of the application server. You might use this
version in small environments or for testing. If you have a larger
environment, you can upgrade to full version of WebSphere Application Server to
gain the extended functionality of the server.
To upgrade,
you capture the settings for the packaged embedded version of WebSphere Application Server.
Then, you enter those settings during the server setup of the full
version of WebSphere Application Server.
Before you begin
Capture the settings from the installed embedded WebSphere Application Server:
Start the Rational Asset Manager server
that runs on the embedded WebSphere Application Server.
In a web browser, type the URL of the server setup application.
For example: http://localhost:13080/ram.setup
Click Next until you reach the Summary
page, and then verify that the current installation has no issues.
If issues exist, correct them before you continue with the server
setup.
Click the Deployment link to return to
the beginning of the setup, and then click Previous to
return to the Introduction page.
Back up the configuration report.
Click Tools > View
configuration report.
Right-click the page and save the file locally.
Close the configuration report.
In the server setup application, review each page and note the
values that you defined for the embedded WebSphere Application Server installation.
Either write the selections or take screen captures of them. The following
table shows the selections to note on each page.
Table 2. Information to capture about the embedded WebSphere Application Server
Installation Manager page
Items to note
Introduction
Database vendor name
Authentication type
IBM Rational Team Concert server
Server or cluster for Rational Asset Manager:
You can choose to install a Rational Team Concert server or work with an existing server. If you select to not install a new server, then you will continue to use that server even when running on a full installation of WebSphere Application Server.
Deploy Rational Asset Manager
The installed applications and documentation:
Rational Asset Manager
Rational Team Concert
Help and user assistance
Asset-based development (ABD) process and governance
Configure Database: Part 2
Database connection properties:
Database vendor
Database server
Port
Database resources:
Database JAR files. Even if you have the JAR files, you might
be required to upload them again to the new server.
Rational Asset Manager core
database:
Name
User ID
Password
Rational Asset Manager lifecycle
database:
Name
User ID
Password
Users and Authentication
The values depend on the Authentication type
that was selected on the Introduction page.
You might capture
these values:
LDAP vendor
Server
Port
Bind user DN and password
Administrator ID
User search filter
User search base
Configure Rational Asset Manager Settings:
Part 1
Configure the license server:
License server or key
License type
Server address, such as http://host:13080
Configure
the paths:
Rational Asset Manager server
Web services
Help and user assistance
Asset Based Development Process and Governance
Configure Rational Asset Manager Settings:
Part 2
Disk storage settings
Persist folder
Local storage folder
Index folder
Configure Lifecycle management settings
Rational Team Concert path:
Server URL
Type
If you selected I need to install a new server for
the Rational Team Concert server
option on the Introduction page, the type is Internal.
If you selected I have an existing server for
the Rational Team Concert server
option on the Introduction page, the type is External.
Rational Team Concert -
User Management
Jazz™ Administrator ID
Password
Rational Team Concert -
Project Area Management
Project Area Name
Project Area Administrator ID
Password
Procedure
Install Rational Asset Manager on
the full WebSphere Application Server and
enter the values from the embedded WebSphere Application Server installation:
Stop the embedded WebSphere Application Server.
From the Rational Asset Manager launchpad,
click Install WebSphere Application Server 7.0 and
install the full version of WebSphere Application Server.
Return to the launchpad and click Install latest
Fix Pack for WebSphere Application Server 7.0 to
install the latest application server and SDK fix packs.
When the installation is complete, start WebSphere Application Server.
You must uninstall the existing version of Rational Asset Manager before you can install the new version.
Return to the launchpad and click Install Rational Asset Manager server to
install Rational Asset Manager on
the full version of WebSphere Application Server.
Launch the Rational Asset Manager server
setup.
In the setup details, enter the values that you captured
from the embedded WebSphere Application Server installation.
Important:
On the "Introduction" page: For the Rational Team Concert server,
you must select the same value that you entered for the embedded WebSphere Application Server.
Even if you created a server for the embedded WebSphere Application Server,
you must create a Rational Team Concert server
for the full installation of WebSphere Application Server.
If you chose to work with an existing Rational Team Concert server when prompted to install Rational Team Concert, then you must choose that option again now.
Your external Rational Team Concert server needs to be running and the server setup application will not install a new instance of Rational Team Concert.
On the "Configure Database: Part 1" page: Select You
have already created both databases and want to modify the settings.
If you chose to work with an existing Rational Team Concert server when prompted to install Rational Team Concert, then you must select "You have already created the database and want to modify the settings."
On the "Configure Rational Asset Manager settings"
page: The port for the server address changed to 9080. For example: http://host:9080
On the "Configure Lifecycle management settings" page: If you
chose I need to install a new server for the Rational Team Concert server
option on the Introduction page, the server address changes to https://host:9443/ramjazz,
as shown in the recommended value.
Complete the server setup and restart the server.
Verify that no errors are in the summary.
What to do next
For Rational Asset Manager version
7.5.1, the URL for the internal Rational Team Concert server
changed from https://host:port/jazz to https://host:port/ramjazz.
If you are upgrading from a Rational Asset Manager release
earlier than 7.5.1, revise the URL references and tell your users
which changes they must make.
If you chose to install a new Rational Team Concert server when prompted to install Rational Team Concert, then you must provide the new URL. If you chose to work with an existing Rational Team Concert server when prompted to install Rational Team Concert, then
you can continue to use the same URL and do not need to update it.
Update the
URLs in these locations:
The Rational Team Concert Eclipse
IDE repository connections that use the previous URL. To update a
repository connection:
Open the Team Artifacts view.
Expand Repository Connections.
Right-click the Rational Asset Manager connection
and select Properties.
Select Jazz repository connection.
In the URI location, change the URL to http://host_name/ramjazz.
Click OK.
The advanced properties in the Rational Team Concert server
that use the previous URL. To update the advanced properties:
Open Rational Asset Manager in
a web browser by using the revised URL: http://host_name/ramjazz/admin
Log on as the administrator.
Click Server > Configuration > Advanced Properties.
Update the properties that include the previous URL. For example: com.ibm.ram.repository.service.internal.RepositoryRemoteService
The Rational Asset Manager links
that are stored in bookmarks in web browsers.
Related tasks
Installing Rational Asset
Manager server by using Installation Manager You can install the IBM Rational Asset Manager server setup application to deploy all other applications by using IBM Installation Manager. You can install the server application with an embedded version of IBM WebSphere Application Server, version 7.0, on the full version of WebSphere Application Server you installed from the Rational Asset Manager media disk, or on an existing version of WebSphere Application Server you already had installed. You can install to a single node or to a cluster.
Installing WebSphere Application Server,
version 7.0 IBM Rational Asset Manager requires a server application. If you do not already have one of the supported database applications installed, then you can install WebSphere Application Server, version 7.0 which is included with the Rational Asset Manager installation media.
Use this guide to upgrade from an earlier version of IBM Rational Asset Manager on
Apache Tomcat.
Before you begin
Important:If you
are upgrading from Rational Asset Manager,
Version 7.1.1.1 or earlier, you must install IBM Rational Team Concert,
which requires an additional database and a secure certificate for
your Tomcat server.
You
must upgrade your license server and file a request for updated license
keys. For more information about the required version of Rational License Server, see Installing Rational License
Key Server.
You will also have to stop and restart
your application server several times.
You can improve the performance
and stability of Rational Asset Manager by
installing its web applications and the application files for the
included IBM Rational Team Concert on
separate Tomcat servers. Throughout this document, the installation
directory for the Tomcat server for Rational Asset Manager is
referred to as tomcat_install_directory.
The installation directory for the Tomcat server for Rational Team Concert is tomcat_for_rtc_install_directory.
If you are installing all the web applications on the same Tomcat
server, the directories are the same.
About this task
This outline shows what you must do to upgrade to the latest
version of Rational Asset Manager:
Prepare to upgrade and back up important files and databases:
steps 1-4.
Retrieve the application files for the latest version of Rational
Asset Manager: step 5.
If you are upgrading from V7.1.1.1 or earlier, create an additional
database: step 6.
Upgrade your license server to Rational Common Licensing 8.1.2: step 8.
Copy new shared library files for Rational Asset Manager and for
Rational Common Licensing 8.1.2 and
modify the Tomcat server startup files accordingly: steps 9-11.
Configure the Tomcat server for single sign-on: step 12.
Retrieve the current application files for the included Rational
Team Concert: steps 13-14.
If you are upgrading from V7.1.1.1 or earlier and you need Rational
Team Concert, install Rational Team Concert on your application server:
steps 17-24.
If you are upgrading from V7.1.1.1 or earlier, configure Rational
Team Concert: steps 25-31.
If you are upgrading from V7.2 or later, upgrade the included
Rational Team Concert: step 33.
Remove the existing application files for Rational Asset Manager
and install the new versions of the applications: steps 34-39.
Log in to Rational Asset Manager and migrate the repository: step 40.
If you are upgrading from V7.1.1.1 or earlier, configure Rational
Asset Manager to connect to Rational Team Concert: step 42.
Modify your settings to connect to your new Rational Common Licensing
server: step 43.
If you have modified your theme or email
messages, before you update the Rational Asset Manager server,
download the current theme and mail message files (on the Administration > Tools page) and then, after you have updated the server,
reapply the theme and your messages.
Verify that all of the repository
servers are set to the same current date, time, and time zone.
If you are using Rational Asset Manager,
version 7.0.0.2 or earlier, verify that the job server is enabled.
To enable the job server:
Log in to the Rational Asset Manager web
client as a repository administrator.
Click Administration.
In the Repository Administration sidebar, click Tools.
In the address bar of the browser, replace tools.faces with advancedConfiguration.faces and
go to that address. For example, http://example.com:9080/com.ibm.ram.repository.web/admin/repository/advancedConfiguration.faces
On the Advanced Settings page, in the Job Options section,
select Enable job server.
Rational License
Key Server is included with the Rational Asset Manager installation
media. You can also retrieve the latest version of Rational License
Server through your Passport Advantage account, or through the Rational Download Center.
This
process requires that you shut down all applications that use Rational Licensing Server,
uninstall your existing Rational Licensing
Server, update your license files, and install Rational Common Licensing server. For Windows, see Configuring a license server for Windows; for AIX or Linux,
see Configuring a license server for UNIX.
For Linux for zSeries, continue to use Rational License Server for UNIX and Linux 7.0.0.1.
Extract the shared library files to the \shared\lib folder
for your Tomcat servers:
Find and extract the archive_extract_location\apps\tomcat\sharedLib.zip file.
Copy the entire contents
of the extracted sharedLib.zip file to the tomcat_install_directory\shared\lib directory.
Extract the library files for Rational
Licensing Key Server V8.1.2 to
the tomcat_install_directory\shared\lib folder:
Important:If you are installing on Linux for zSeries,
do not complete this step
Find and extract the archive_extract_location\sharedLibs\rlsclients_rlsibmratl_812.zip file.
From the extracted .zip file, find the file rlsibmratl812.zip for
your operating system and architecture. For example, the file for
32-bit Windows is in the win32 directory.
Extract the contents of the appropriate rlsibmratl812.zip file.
Copy the entire contents of the extracted rlsibmratl812.zip file
to the tomcat_install_directory\shared\lib directory.
Modify the startup script for the
Tomcat server for Rational Asset Manager
Find the Tomcat
startup file and open it in a text editor. On Windows, this file is tomcat_install_directory\bin\startup.bat.
On Linux, AIX, or Linux for zSeries, it is tomcat_install_directory/bin/startup.sh.
Search for a line that includes JAVA_OPTS=.
If the JAVA_OPTS environmental variable is already set,
add the following option and value:
On the installation media, find the archive_extract_location/apps/tomcat/RTC-server.zip file.
Extract RTC-server.zip to
a location on your hard disk drive, which is referred to in these
instructions as rtc_install_dir.
Depending on your situation, either install and configure
or updateRational Team Concert:
If you are upgrading from V7.1.1.1 or
earlier: Install and configure the included Rational Team Concert.
Proceed to step 16.
If you are upgrading from V7.2 or later:
Update the included Rational Team Concert.
Proceed to step 33.
Depending on your situation,
either install and configure or only configure Rational Team Concert:
If you need to install and configure Rational Team Concert:
Proceed to step 17.
If you have an existing Rational Team Concert application
and want to configure it to work with Rational Asset Manager:
Proceed to step 25.
Find the rtc_install_dir/jazz/server/ramjazz_war.ear file
and extract it. To extract .ear files, you can
use a free utility, such as 7-Zip. From the extracted ramjazz_war.ear package,
copy the ramjazz.war file to the tomcat_for_rtc_install_directory/webapps/ directory.
Configure a secure port
on your Tomcat server for Rational Team Concert:
Create a security certificate that identifies your Tomcat
server for Rational Team Concert for
SSL connections. You can use the Java JDK keytool command
to create a self-signed certificate. Alternatively, you can request
a certificate that is signed by a trusted certificate authority.
For more information about creating self-signed certificates
with the keytool command, see the Oracle Java documentation.
You can create a self-signed certificate with the following example keytool command:
When
you run that command, you will be prompted for a password for the
keystore file. The default password is changeit,
but you should specify a different one. You will have to remember
that password to input it into the server.xml file
later.
If you are using an IBM JRE,
many versions include the IBM tool ikeyman in
the IBM_Java_JRE_install_location/jre/bin/ directory.
You can use this tool to create and manage security certificates on
the server. For more information about using the iKeyman tool, see iKeyman User's Guide.
We also include
a simple certificate in the rtc_install_dir/jazz/server/ folder;
the certificate file is ibm-team-ssl.keystore
In the tomcat_for_rtc_install_directory\conf\server.xml file,
find the <Connector> tag with the attribute scheme="https".
The default file includes an example <Connector> tag
for port 8443 that is commented out.
keystore_file is
the file name of your keystore file. It can be an absolute path, or
relative from the root directory of your Tomcat server (tomcat_for_rtc_install_directory).
If you used the simple command above, this will be .keystore.
If you use the included certificate, this will be rtc_install_dir/jazz/server/ibm-team-ssl.keystore .
keystore_password is
the password for the keystore file. If you use the included keystore
file, this is ibm-team .
keystore_protocol is
the protocol for the keystore. Most likely it is TLS or SSL_TLS.
If you use the included keystore file, this is SSL_TLS .
keystore_algorithm is
the X509 algorithm for the keystore. Most likely it is SunX509 or IbmX509,
depending on the source of the certificate. If you use the included
keystore file, this is IbmX509 .
You can change the port value to use a port
besides 8443 for the non-SSL connector (by
default, port 8080). If you change the port
value, change the value of the redirectPort attribute
to match your port number for the SSL connector.
Copy the appropriate .jar file
from your database provider:
Copy the ojdbc14.jar file
to the rtc_install_dir/jazz/server/oracle folder
(you might need to create the oracle folder).
You
can download the file from Oracle. If you are using Oracle 11, download
the package for Oracle 10g to find the ojdbc14.jar file.
Copy the following file to the rtc_install_dir/jazz/server/sqlserver folder
(you might need to create the sqlserver folder):
sqljdbc.jar (You can download this file from Microsoft.)
Configure the
Tomcat startup property settings:
Find the Tomcat startup
file and open it in a text editor. On Windows, this file is tomcat_for_rtc_install_directory\bin\startup.bat.
On Linux, AIX, or Linux for zSeries, the file is tomcat_for_rtc_install_directory/bin/startup.sh.
In the startup file, type the following text:
Replace each space character in the rtc_install_dir with %20:
set ORACLE_JDBC=oracle_jar_dirset SQLSERVER_JDBC=sqlServer_jar_dirset JAZZ_INSTALL_DIR=rtc_install_dir
set JAVA_OPTS=-Djava.awt.headless=true -Djava.library.path="tomcat_for_rtc_install_directory\shared\lib" -DSQLSERVER_JDBC="%SQLSERVER_JDBC%" -DORACLE_JDBC="%ORACLE_JDBC%" -DDB2I_JDBC="%DB2I_JDBC%" -DDB2Z_JDBC="%DB2Z_JDBC%" -Dorg.eclipse.emf.ecore.plugin.EcorePlugin.doNotLoadResourcesPlugin=true -DJAZZ_HOME=file:///%JAZZ_INSTALL_DIR%\jazz\server\conf -Dcom.ibm.team.repository.tempDir=%TEMP% -Xmx700M
rtc_install_dir is
the extracted directory of the RTC-server.zip file.
On Windows, replace each space character in rtc_install_dir with %20
oracle_jar_dir is
the directory for the ojdbc14.jar file (rtc_install_dir/jazz/server/oracle)
sqlServer_jar_dir is
the directory of the sqljdbc.jar file (rtc_install_dir/jazz/server/sqlserver)
tomcat_for_rtc_install_directory is
the installation directory for the Tomcat server
If you are installing Rational Asset Manager and Rational Team Concert on
the same application server, use this JAVA_OPTS system
variable to replace the one that you created when you configured the startup script for the Tomcat
server for Rational Asset Manager; this
declaration still includes the -Djava.library.path option.
Find and rename the appropriate the Jazz server properties file:
In the rtc_install_dir/jazz/server/conf/ramjazz/ directory,
find the teamserver.properties file and rename
it to teamserver.derby.properties.
Find the
appropriate file for your database server:
For DB2 on Windows: teamserver.db2.win32.properties
For DB2 on Linux, AIX, or Linux for
zSeries: teamserver.db2.linux.properties
teamserver.oracle.properties
teamserver.sqlserver.properties
Rename the file to teamserver.properties.
In a text editor, open the teamserver.properties file
and modify it as follows (for your database provider):
Edit the value of com.ibm.team.repository.db.jdbc.location for
your DB2 server location, and
the name of the database for lifecycles:
Replace localhost:50000 with the location
and port for the DB2 database.
Tip:In the DB2 command
window, type db2 get dbm cfg, and then find
the line that contains SVCENAME, which indicates the DB2 port name or number. If this command displays
a number, use it as the port number (in place of 50000 in the earlier
example). If the command returns a non-numeric name, determine what
port number was assigned for this name and use that port number. On Linux, the /etc/services file
contains the mapping between port names and numbers; on Windows, the C:\windows\system32\drivers\etc\services file
contains the mapping. For more information, ask your database administrator
or see the database documentation.
Replace JAZZ with the name of the database for lifecycles.
Replace db2admin with the user name for the DB2 database.
Note:The DB2 user must have permissions to create tables,
table spaces, and to modify the database configuration. DB2 users are created by the operating system.
In the com.ibm.team.repository.db.jdbc.password property,
specify the user password.
Note:Do not change the password={password} text
in the com.ibm.team.repository.db.jdbc.location property.
In the teamserver.properties file,
add the following properties:
Where:
unsecure_port is the unsecured port for your
Tomcat server (by default, 8080)
secure_port is the secure port number for your
Tomcat server (by default, 8443)
team_temp_dir is an absolute path to a directory
for storing temporary files
Edit the value of com.ibm.team.repository.db.jdbc.location for
your Oracle server location and the name of the database for lifecycles:
Replace jazzDBUser with the user name for the
Oracle database (for example, RAMSCHEMA.
Replace @localhost:1521 with the location and
port for the Oracle database. If the location is not localhost,
you must precede the location with two forward slashes (//);
for example, @//oracleserver.example.com:1521.
Replace ORCL with the name of the lifecycle database;
for example, rtcdb.
In the com.ibm.team.repository.db.jdbc.password property,
replace JazzDBpswd with the password for the Oracle
that user you specified earlier.
Note:Do not change the {password} text
in the com.ibm.team.repository.db.jdbc.location property.
In the teamserver.properties file,
add the following properties:
Where:
unsecure_port is the unsecured port for your
Tomcat server (by default, 8080)
secure_port is the secure port number for your
Tomcat server (by default, 8443)
team_temp_dir is an absolute path to a directory
for storing temporary files
Add a user named admin and
assign that user the admin, manager, and JazzAdmins roles. To add
this user, you can copy and paste the following text between the <tomcat-users> tags:
If
you are installing the applications on the same Tomcat server, add
the JazzAdmins role to the existing admin user.
For LDAP authentication: Configure the Tomcat server
for LDAP authentication, and then configure four LDAP groups with
the same names as the four previously mentioned roles. Alternatively,
you can associate existing LDAP groups to the Jazz server roles as described in the Tech Tip TN0030:
User Management in Tomcat. Follow steps 2-3 in the topic Configuring Rational Team Concert on Tomcat to use LDAP section.
Start the Tomcat
server for Rational Team Concert. To start Tomcat, run the following file:
tomcat_for_rtc_install_directory\bin\startup.bat
tomcat_for_rtc_install_directory/bin/startup.sh
Launch the Administrative web interface
of Rational Team Concert in
a web browser at https://machine_name:secure_port/jazz/admin/. Note the https; the connection must be secure.
Log in with the user
ID and password for the administrator of Rational Team Concert. If no one has logged in to Rational Team Concert before,
use the user ID and password for the administrator of the application
server.
If you are working with a new
installation of Rational Team Concert:
Configure the administrative user for Rational Team Concert:
If you see an error about "fetching server status information,"
shut down and restart both your database server and your application
server and log in again.
In the Rational Team Concert Administrative
web interface, click User Management. Ignore
any errors about an external registry not being configured.
Click Create User.
Enter the following details:
User Name: The user ID of the application
server administrator
User ID: The user ID of the application
server administrator
Email Address: A valid email address for
the application server administrator
In the Client Access License section,
select Rational Team Concert - Developer to
assign the developer license to that user.
Click Save.
Log out, and then log back in to the Administrative
web interface as the administrator of the application server.
Import the lifecycles process
template into Rational Team Concert:
In the Rational Team Concert Administrative
web interface, click Process Template Management. If you cannot see the Process Template Management link,
log out and then log back in to the Administrative web interface.
Click Import Template and browse
to the com.ibm.ram.lifecycle.zip file in the archive_extract_location/DatabaseScripts/ folder.
Then click OK. The RAM Lifecycle
template is displayed.
Create a project area in Rational Team Concert:
In the Rational Team Concert Administrative
web interface,
click Project Area Management. If
you cannot see the Project Area Management link,
log out and then log back in to the Administrative web interface.
Click Create Project Area.
Enter the following details about the project area:
Project name: RAM Lifecycle
Summary: Rational Asset Manager
Lifecycle control project area
Description: This area is used
to manage the lifecycles for Rational Asset Manager
Click Save.
Assign the appropriate memberships
and process roles for the project area:
On the Project Area Management page, click the RAM
Lifecycle project area.
In the Administrators section, click Add.
Search for and select the administrator user that you created. If
you are working with an existing Rational Team Concert application,
you can also select a different user to be administrator for this
project area.
In the Members section, click Add;
then search for and select the same user that you selected as the
administrator for the project area.
After you add the administrator, click the Process
Roles icon next to the administrator's name.
In the Edit Process Roles window, from the Available
Roles list, select Administration and
click Add.
Click Finish.
Click Save.
If you are upgrading from V7.1.1.1 or
earlier: Proceed
to step 34.
If you are upgrading from V7.2 or later,
upgrade the included Rational Team Concert:
From the installation media, extract
the RTC-Server.zip file to a new location on
your hard disk drive, which in these instructions is referred to as new_rtc_install_dir.
From the older rtc_install_dir/jazz/server/conf/jazz/ folder,
copy the file teamserver.properties to the new new_rtc_install_dir/jazz/server/conf/jazz/ folder.
You can find the existing rtc_install_dir location
in the Tomcat startup file. In the startup file, search for the line
that contains JAZZ_INSTALL_DIR=; the value
of the JAZZ_INSTALL_DIR variable is the location of the current Rational Team Concert files.
Find the Tomcat startup
file and open it in a text editor. On Windows, this file is tomcat_for_rtc_install_directory\bin\startup.bat.
On Linux, AIX, or Linux for zSeries, the file is tomcat_for_rtc_install_directory/bin/startup.sh.
In the Tomcat startup file, search for the line that
contains JAZZ_INSTALL_DIR=. Edit the value
per the following, where new_rtc_install_dir is
the extracted directory from step 33a:
(replace space characters in new_rtc_install_dir with %20):
set JAZZ_INSTALL_DIR=new_rtc_install_dir
:
JAZZ_INSTALL_DIR=new_rtc_install_dir
Start the Tomcat server.
In a web browser, enter the following URL: https://host:secure_port/jazz/admin?internal,
where host is your IP address or server name, and secure_port is
the secure port for your Tomcat server.
Log on as an application server administrator.
In the sidebar, under Internal Tools,
click Server reset.
Click Request server reset.
Stop, and then restart the Tomcat server. The included Rational Team Concert application
is updated.
Stop the Tomcat server for Rational Asset Manager.
Remove the old Rational Asset Manager .war
web application files that are installed on Tomcat:
Navigate to the tomcat_install_directory/webapps/ directory.
Note the folders and file names for any Rational Asset Manager web
applications. In previous versions of Rational Asset Manager,
the following names were suggested for those folders (in other words,
the context paths of the applications):
/com.ibm.ram.repository.web.tomcat_runtime
/com.ibm.ram.repository.web.ws.tomcat_runtime
/help/
/abdprocess/
Delete the following application files:
com.ibm.ram.repository.web.tomcat_runtime.war
com.ibm.ram.repository.web.ws.tomcat_runtime.war
ramhelp.war
rmcabdgovernprocess.war
The file names might be different from the names
in the list, depending on how you installed the applications on your
server.
Delete the associated folders for those applications.
From the archive_extract_location/apps/tomcat/ directory,
copy the following files to the tomcat_install_directory/webapps/ directory:
com.ibm.ram.repository.web.tomcat_runtime.war
com.ibm.ram.repository.web.ws.tomcat_runtime.war
ramhelp.war
rmcabdgovernprocess.war
To change the
context path of the applications, rename the WAR application files. Use the same context paths that you had before. The file names
and context paths for new installations are as follows:
Table 3. Context paths for Rational Asset Manager web application files
Original file name
New file name
Resulting context path
What is it?
com.ibm.ram.repository.web.tomcat_runtime.war
ram.war
ram
Rational Asset Manager primary
web application for Tomcat
com.ibm.ram.repository.web.ws.tomcat_runtime.war
ram.ws.war
ram.ws
Rational Asset Manager web
services application for Tomcat
ramhelp.war
ram.help.war
ram.help
Rational Asset Manager help
and user assistance application
rmcabdgovernprocess.war
ram.process.war
ram.process
Documentation application for asset-based development
and governance processes
Clear the cache for the Tomcat server. Delete the tomcat_install_directory/work/ directory.
Restart the Tomcat server
for Rational Asset Manager.
Migrate the Rational Asset Manager repository
to the newest version:
In a web browser, open the Rational Asset Manager web
client. The first time that you open the web client
after the upgrade, a message is displayed that indicates that you
must migrate the repository.
If necessary, log in with a user ID that has repository
administrator authority.
Note:For SQL Server, if an existing Rational Asset Manager database
does not have the collation set to a sequence that ends with _BIN2
(for example, Latin1_General_BIN2) then the Manual Configuration Required
page appears with a message. You can either recreate the database
and set the collation option to be case-sensitive to work correctly
with Rational Asset Manager or
you can accept that there might be unexpected case-sensitivity conflicts.
Click Migrate. On
large repositories, the migration might take several minutes; until
the migration is complete, some information about the repository might
not be available.
After the migration process completes, click Home.
After you migrate the
repository, stop and then restart your application server.
If you are upgrading from V7.1.1.1 or
earlier: Configure the settings
to connect to Rational Team Concert from Rational Asset Manager:
In the Rational Asset Manager web
client, click Administration.
Click Configuration.
In the Internal Rational Team Concert path section,
type the following information:
Path: The secure URL to the Rational Team Concert server
that you have configured. For example, https://localhost:9443/ramjazz.
Note the https connection, and the secure port
number.
User: The user name for the user in Rational Team Concert that
is the administrator for the "RAM Lifecycles" project area.
Password: The password for the user that
is the administrator for the "RAM Lifecycles" project area.
Timeout: The amount of time, in seconds,
to allow Rational Asset Manager to
connect to Rational Team Concert.
The default is 120.
To upgrade, you must file a request for a new license key. You
must acquire a new server license and new user authorized licenses.
Go to the Rational License
Key Center: http://www-01.ibm.com/software/rational/support/licensing/ If you see an error about Rational License
Server, adjust your license configuration:
Click Administration
On the Administration page, click Configuration.
In the License and Version section, to select what type
of server license this repository uses, select either Standard
edition or Enterprise edition.
At the bottom of the page, click Save.
You might see the License Server error again. Click Retry
connection to license server.
Update the Rational Asset Manager Eclipse
application by using the same method that you used to install it.
For more information about installing the Eclipse client, see Installing the Rational Asset
Manager Eclipse
client.
Note:Before you
install the latest version of the Rational Asset Manager Eclipse
client, uninstall the Rational Asset Manager Eclipse
client plug-in.
If you installed the Rational Asset Manager V7.0.0.2
Eclipse client into an existing Eclipse V3.3 application by using
Installation Manager, use Installation Manager to uninstall the client.
You cannot use the Eclipse Configuration Manager to uninstall Rational Asset Manager from
the Eclipse client.
If you installed the Rational Asset Manager Eclipse
client plug-ins by using the Eclipse update manager, before you install
the latest version of Rational Asset Manager,
use the Eclipse configuration manager to remove any features that
are named Rational Asset Manager.
To use the Eclipse configuration manager, in Eclipse, click Help > Software Updates > Manage Configuration.
What to do next
For Rational Asset Manager version
7.5.1, the URL for the internal Rational Team Concert server
changed from https://host:port/jazz to https://host:port/ramjazz.
If you are upgrading from a Rational Asset Manager release
earlier than 7.5.1, revise the URL references and tell your users
which changes they must make.
Update the
URLs in these locations:
The Rational Team Concert Eclipse
IDE repository connections that use the previous URL. To update a
repository connection:
Open the Team Artifacts view.
Expand Repository Connections.
Right-click the Rational Asset Manager connection
and select Properties.
Select Jazz repository connection.
In the URI location, change the URL to http://host_name/ramjazz.
Click OK.
The advanced properties in the Rational Team Concert server
that use the previous URL. To update the advanced properties:
Open Rational Asset Manager in
a web browser by using the revised URL: http://host_name/ramjazz/admin
Log on as the administrator.
Click Server > Configuration > Advanced Properties.
Update the properties that include the previous URL. For example: com.ibm.ram.repository.service.internal.RepositoryRemoteService
The Rational Asset Manager links
that are stored in bookmarks in web browsers.
Deploying the included Rational Team Concert server application
on Tomcat IBM Rational Asset Manager requires IBM Rational Team Concert, which controls the lifecycle functions that you can use to manage the development of assets. If you do not already have Rational Team Concert, a limited version of that product is included, which you can deploy to a Tomcat server.
Installing Rational Asset
Manager Eclipse client by using Eclipse update manager Rational Asset Manager has an Eclipse client which you can use to find and download assets and interact with the repository from Eclipse. You can install the IBM Rational Asset Manager Eclipse features into an existing of Eclipse IDE by using the Eclipse update manager and downloading the features from the Rational Asset Manager server, a method that insures that the versions of Rational Asset Manager on your Eclipse client and on the server are compatible.
Migrating the theme from an earlier release to version 7.5.1
If you used a customized theme in a release earlier than
7.5.1, that theme might not work as expected in version 7.5.1 or later.
If you upgrade to version 7.5.1 or later, you must edit and restore
the customized theme to use it.
Before you begin
For your previous release of IBM Rational Asset Manager,
you must have a customized theme. You can create a customized theme
by completing the steps in Changing the appearance of the site by using themes.
Save the customized theme:
Click Administration > Tools.
In the Manage Theme section, click Download Current
Theme. You are prompted to open or save a compressed file.
Save the file and rename it to identify the file as the customized
version.
About this task
In Rational Asset Manager version
7.5.1, the header.jspf file is updated to display
the name of the logged in user, the Log in and Log out links, the
Help menu and menu options. If you upload a theme from an earlier
version, these items in addition to the Help Contents, Extensions,
and About Rational Asset Manager menu options are not visible in the
banner. To see those options, you must copy additional HTML and JavaScript
to in the header.jspf file.
Procedure
Upgrade Rational Asset Manager. The default theme for the release is applied.
Optional: Download the
default theme for the upgraded version of Rational Asset Manager so
that you can compare the themes:
Click Administration > Tools.
In the Manage Theme section, click Download
Current Theme. You are prompted to open or save a compressed
file.
Save the file and rename it to identify the file as
the default version.
Extract the compressed files.
In the file that contains the customized version of the
theme, open the header.jspf file in a text editor.
Copy the following lines of HTML and JavaScript and paste
them into the header.jspf file in a location
that is logical for your customized theme. If you downloaded
the default theme, you can compare your changes against the structure
that is in the default header.jspf file.
<script type="text/javascript">
dojo.addOnLoad(function() {
	var helpMenu = new jazz.ui.MenuPopup({align: "right", cacheMenu: true},'help_menu'); //options,elementID
	helpMenu.menuProvider = function() {
		var menu = new jazz.app._ComponentMenu();
		menu.addItemByArgs({label: "${bundle.navigation_help_content}", icon: dojo.moduleUrl("jazz.ui","graphics/PageTemplate/icons/systemhelp.gif"), onClick: function() {window.open("${applicationScope.docPath}/index.jsp")} });
	menu.addItemByArgs({label: "${bundle.navigation_extensions}", icon: dojo.moduleUrl("ram","graphics/content/icons/extensions_obj.gif"), href: "${pageContext.request.contextPath}/extensions.jsp"});
		menu.addItemByArgs({label: "${bundle.navigation_about}", icon: dojo.moduleUrl("ram","graphics/content/icons/ram_obj.gif"),  onClick: showAboutDialog });
		return menu;
	};
);
</script>
Create custom style sheets for your theme to override the
default styles.
Create one or more CSS files and save them in the theme/custom/css directory.
Review the default style sheets that were installed
with Rational Asset Manager.
For any styles you would like to change, copy the style rules into
your CSS file and edit the styles. The changes you make in your new
CSS files override the style rules in the default style sheets.
Important:Do not modify the default style sheets
in the theme archive file. These style sheets change from release
to release and are overwritten when Rational Asset Manager is
upgraded.
Copy the cssIncludes.jspf file to the theme/custom directory
of your theme archive. This .jspf file is required for using custom
style sheets in version 7.5.1 to override the default style sheets.
Add your custom style sheets to theme/custom/cssIncludes.jspf as
links. Example:
Create an images folder in the
custom directory and save image files used in your theme within it. Example: theme/custom/images-jke-enterprises
Compress the theme into an archive file.
On the Tools page, in the Manage Theme section, click Browse.
Select the customized archive file.
Click Upload.
What to do next
Many of the style sheets for the banner were removed from
the theme archive. You can view the default styles rules in the PageTemplate.css file
and create your own stylesheet to override these styles. The default
location for the PageTemplate.css file is server/ram/javascript/dojo/jazz/ui/templates/PageTemplate.css.
Before you install the IBM Rational Asset Manager server,
consider several aspects of the installation, including which configuration
to use.
Installation scenarios
You
can install the
product in four basic scenarios:
Upgrade from an existing version
of the product
Install on a new instance of an embedded IBM WebSphere Application Server
Install on an existing installation of WebSphere Application Server
Manually install on a supported version of WebSphere Application Server or
Apache Tomcat
In each scenario, you can install the
product either by
using IBM Installation Manager
or by manually installing the deployment .zip files. If you are using
Installation Manager, you can use the GUI, console mode, or run a
silent installation from a command line.
Starting in version
7.2, IBM Rational Team Concert is
a required component that you must install. Rational Team Concert requires
at least an additional 250 MB of disk space for the server files,
and its database needs at least 5 GB of free space. You cannot install Rational Asset Manager onto
an existing Rational Team Concert server.
You cannot update Rational Team Concert in
the Rational Asset Manager 7.2
server. In a WebSphere network
deployment environment, Rational Team Concert cannot
be deployed onto clusters; that component must be deployed to a single
application server only.
In all of these scenarios, you can
also install the Rational Asset Manager Eclipse
client to interact with the repository.
Every valid client access license includes a designated
authorization for one user or one program to directly or indirectly
access the Rational Asset Manager server.
Beginning in version 7.2, the licensing for Rational Asset Manager Enterprise
edition is based on two defined types of user licenses:
Publisher
A publisher client access license provides access to all product
capabilities. A publisher can submit, search, view, discuss, rate,
comment on, update, download, and review assets, and run reports.
Collaborator
A collaborator client access license provides access to a limited
set of product capabilities. A collaborator can search, view, discuss,
rate, comment on, and download assets.
Both publisher and collaborator client access licenses can access
the product through the web client, Eclipse client, and published Rational Asset Manager application
programming interfaces.
These licenses are available:
Rational Asset Manager Enterprise
Edition Publisher client access license (authorized user or floating)
Rational Asset Manager Enterprise
Edition Collaborator client access license (authorized user or floating)
Rational Asset Manager Standard
Edition (authorized user)
User licenses can be assigned or floating. An assigned, or authorized,
user is a person or program that is authorized by an administrator
to use the licensed product. You must maintain licenses for the equivalent
number of persons and programs that use the licensed product. People
or programs cannot share user IDs. A user can be assigned either a
publisher or a collaborator license.
When you plan for the number of each license type for your deployment,
follow these guidelines:
For deployments of 1000 users or more, most users might be collaborators.
Consider using 10-20% publisher and 80-90% collaborator licenses.
For deployments of less than 100 users, most users are publishers.
Only administrators can assign licenses to users; licenses are
not automatically assigned. Administrators can assign authorized user
licenses from the web client. Floating licenses are used for a user
who does not have the appropriate authorized license. Programmatic
access also requires a Rational Asset Manager license based on the
user ID. One user license cannot be used across multiple repositories
concurrently but can be used across multiple client programs in the
same repository.
Note:Rational Asset Manager uses FLEXlm license key enforcement.
FLEXlm consumes a license whenever a person logs in to a Rational
Asset Manager server. Rational Asset Manager Standard Edition licenses
can be used only on Rational Asset Manager servers that are configured
to be Standard Edition servers. Similarly, Rational Asset Manager
Enterprise Edition licenses can be used only on servers that are configured
to be Enterprise Edition servers.
When a user accesses the system, the user is licensed as one of
these user types:
Anonymous user: The user can search for public assets without
authenticating and consuming a license. The allocated type of floating
license is based on the user operation.
Authorized user (AU): The user receives the license type that
has been allocated to them. Repository administrators assign users
to AU licenses. Those licenses are either collaborator or publisher
licenses.
Floating user (includes Token): These types of users receive a
floating license if they are not assigned an AU license or if they
perform publisher operations but have a collaborator AU license.
A
collaborator license is consumed initially until a publisher-level
operation is run, and then license consumption switches to a publisher
license. The license is released after 30 minutes of inactivity, or
if the user logs out.
The system checks whether a user is authorized, and either allocates
the authorized user license or provides a floating license based on
the user operation. License allocation follows these processes:
Checks a user ID for an authorized user license
Allocates a license according to usage: To update or create assets,
you need a publisher license. To search for and download assets, you
need a collaborator license.
If a user is not an authorized user
and is not assigned a license, when the user logs in, a license is
not consumed. Depending on the action that a user selects, a specific
type of license is required. When a user requests an action, a floating
license of the correct type is allocated. If no licenses are available,
the action is denied. A floating license is held until the user logs
out or all of the sessions for that user expire.
Allocates a license for each user ID, not for each session: One
user login consumes one license.
Allows for API operations to complete sessions on behalf of a
user.
If you complete an operation programmatically, through APIs,
the program consumes a license. To prevent multiple licenses from
being consumed in each user session, you can use a repository administrator
user ID to create a session on behalf of a user.
Releases a license when a session times out or if all user logs
out and all sessions are closed.
Examples of license allocation:
An anonymous user displays public asset details, and an available
collaborator floating license is checked out, even if the user has
not logged in.
A user with a collaborator user license attempts to modify or
submit an asset, and an available floating publisher license is checked
out.
An authenticated user displays an asset, and a collaborator license
is checked out. Exception: The collaborator license is not checked
out if the user already had a publisher license from a previous action.
An authenticated user modifies or submits an asset, and a publisher
license is checked out. If a collaborator license was checked out
for that user, the collaborator license is checked in.
An authenticated user logs out, and the Floating license is returned.
The license is returned whether it is a collaborator or publisher
license, unless the user has other sessions still running.
When an authorized user logs in, a license is allocated
to the user. If a user logs in with a different session or from the
Eclipse client, the user is still considered to be logged in and does
not consume additional licenses. The license is released only when
the user logs out completely from all of the sessions or when all
of the sessions time out.
If a user chooses an action that requires
a collaborator floating license and then chooses an action that requires
a publisher license, a publisher floating license is allocated to
the user and the collaborator floating license is released. The user
then holds the publisher license until they log out or until all of
the sessions expire.
If that user had an assigned collaborator
license, the license would not be released because that license is
assigned. Only floating licenses can be promoted. If you are assigned
a collaborator license and try to complete an action that requires
a publisher license, the license server allocates a publisher floating
license if one is available.
Related tasks
Installing Rational License
Key Server To distribute license keys to clients, the IBM Rational Asset Manager server uses the IBM Rational License Key Server.
Rational Asset Manager system
and capacity planning guidelines
This topic includes planning and performance guidelines
for IBM Rational Asset Manager.
Performance factors
Many factors determine
capacity requirements and performance results:
Number of servers
Processor speed
Number of processors and their configuration
Amount of memory on a node
Type of disk storage device and RAID configuration
Capacity of disk storage devices
Network bandwidth and latency
The number and size of assets stored in the Rational Asset Manager repository
System tuning (for WebSphere Application Server,
databases, web servers, operating systems, and cache proxies)
Hardware planning
When you plan your server
hardware requirements, consider the number of concurrent users to
have access and the number of assets to be stored in the repository.
Response time depends on the details of your specific use cases. For
example, uploading a large file takes more time than displaying a
web page.
Application server requirements
The embedded WebSphere Application Server is
a lightweight server. It supports environments that run a limited
number of applications and that do not require the full administration
support provided by WebSphere Application Server;
you do not have complete access to the WebSphere administrative console and accordingly
are not able to fully manage application, security, and performance
settings.
If you use WebSphere Application Server,
you can either choose to install a new embedded WebSphere Application Server or
use your existing version of that server. You can use either server
with any database or other platform software. However, if you integrate
with other products, do not use the version of WebSphere Application Server that
is embedded in Rational Asset
Manager.
You can also install Rational Asset Manager on
a single server that runs WebSphere Application Server and
a database, and use local disks for assets and indexing; however,
that configuration cannot scale well beyond 200 concurrent users.
To improve performance, at a minimum, use an external database server
and file server.
For the greatest flexibility in environments
with many users, install Rational Asset
Manager on WebSphere Application
Server Network Deployment cluster environment, which allows you to
distribute the load across multiple servers and across multiple disks
in various ways.
Restriction:To
create and use a cluster
of application servers, you must have IBM WebSphere Application Server Network
Deployment (ND), which is not bundled with IBM Rational Asset Manager.
Required integration: Rational Team Concert
Rational Asset Manager requires Rational Team Concert.
The Rational Team Concert application
manages the lifecycle processes for assets in Rational Asset Manager.
We include a limited version of Rational Team Concert that
you can install and use, or you can extend an existing Rational Team Concert server
application to work with Rational Asset Manager.
For more information see Integrating Rational Team Concert with Rational Asset
Manager.
Rational Asset Manager storage
is composed by two components: the database and the file system. The
assets are stored in the file system and the metadata are stored in
the database.
The amount of storage space you need for assets
depends on the types of artifacts (files) you are storing in the repository;
text documents and spreadsheets are relatively small, while bootable
operating system images are larger.
As one example for planning
how much storage space you might need, the repository for a 3-year-old
enterprise deployment with 70,000 assets requires 10 GB of space for
the database, and 250 GB of space for files.
Hardware configurations to improve performance
Place
the database, repository index, temporary folders, and assets directory
on separate hard disk drives. Using multiple drives prevents certain
operations, such as asset retrieval and indexing, from interfering
with performance, such as browsing assets.
By adjusting hardware,
you can improve performance:
To store more assets or to store assets with large files by using
larger disks.
To increase availability of the server applications by adding
nodes.
To increase the number of concurrent users that can use the applications
by adding nodes, servers, or memory, and by using faster disks.
To improve response, search response, and file upload and download
times by adding larger, and faster disks and by improving the network.
Database requirements for metadata, metrics, and lifecycle
processes storage
Rational Asset Manager requires
two databases: one for asset and data storage and another for managing
lifecycle processes, which is used by the included Rational Team Concert application.
For best performance, place the database server application on a separate
server and on a dedicated disk. To improve performance, place the
database server on a separate physical computer from the application
server and on a dedicated disk.
The size of the database for Rational Asset Manager depends
on the size of assets and other repository activity, such as forums,
tagging, and registered users. Metrics are recorded in the database
for many user activities, such as searching and downloading. Even
if you do not add assets to the repository, the database grows over
time as user activity metrics are recorded. The size of the database
increases in a linear fashion with increased repository usage.
The
size of the database for Rational Team Concert depends
on the amount of custom lifecycles that you add, and whether others
are using Rational Team Concert as
a project management and development tool.
File system requirements for asset files storage
In
addition to the space required for the application files and the databases,
you need several folders for storing assets:
The Persist folder: This
folder stores the asset files for your entire repository. There is
one persist folder for the entire repository. On a cluster, the persist
folder must be on a shared drive that all nodes and servers can access.
The Index folders: The indexes against which
searches are performed are on each application server, not the database
server.
The size of the index depends on both the size of the assets
and whether the content of the assets is mostly text, which can be
indexed, or binary content, which cannot be indexed. If you use large
amounts of text and large asset files, the index size is large. The
amount of disk space that the index needs depends on the type of assets,
number of assets, level of user activity, and length of time that
the repository has existed.
On a cluster, every node must have
its own index folder that must be on a local hard disk drive for the
server; the index folder for each server must not be a shared drive.
The Local folders: The local folder stores
temporary data for the server applications. It must be on a local
hard disk drive for the server; it must not be a shared drive. If
you are installing to a cluster, each node in the cluster must have
its own local storage folder that is not shared with the other nodes.
If you are installing multiple servers on the same physical node,
the servers must all use the same physical local storage folder.
User registries
To manage users in a large
deployment, you can use an existing LDAP or other custom user registry.
Both WebSphere Application
Server and Tomcat application servers support using an LDAP registry
to manage access to the server.
Although Rational Asset Manager supports
adding users from an external registry, such as LDAP or a custom registry,
you do not need to use an external registry. You can use a file-based
security system, or if you are using WebSphere Application Server you can use
the user accounts database for your operating system.
If you
plan to manually install onto an existing WebSphere Application Server that
is configured for security, for example, using LDAP, reconfigure the
application server for file-based security until the installation
and configuration of Rational Asset Manager is
complete.
File-based security is not intended for use in production
environments.
Configurations to improve user actions
When
you plan for the initial platform size and for production environment
upgrades, consider the relative system resources that are used by
different types of operations. For example, operations through the
Eclipse client consume more system operations than operations for
the web client.
User actions, such as searching for, downloading,
viewing, or submitting assets, require much more processing and memory
resources than are needed for asset storage. As more concurrent users
are added, you need more and faster servers.
User actions that
might impact configurations:
User searching for assets: For each server node, add disks or
use faster disks to store search indexes for the Index storage folder.
User creating and updating assets: Add disks and network latency
for the Persist storage folder for the repository.
Users downloading files: Add disks, processors, and memory for
each server.
Users running asset reports and audits: Use a faster disk, add
memory, and improve the processor for the database server.
Systems accessing Rational Asset Manager by using web services:
On the Configuration page, view the users of your web services and
configure the number of concurrent sessions that users can have.
If you expect the
repository to contain tens or hundreds of thousands of assets, several
asset management operations, such as indexing, might require several
hours. You might improve performance if you use data management and
hard disk management techniques, such as a Redundant Array of Independent
Disks (RAID) and disk striping.
Disk striping involves
dividing data into blocks and storing the data blocks on multiple
partitions on multiple hard disk drives. For instructions to set up
disk striping for your environment, see the documentation for your
operating system. As mentioned in the previous paragraph, consider
placing the repository index, assets, and database each on a different
hard disk.
Learn more about the component based software architecture practice: This practice focuses on identifying
the major abstractions of the system and deciding how the system is
to be built to ensure resilience and maintainability. Read more about
the component-based software architecture practice at http://www.ibm.com/developerworks/rational/practices/compbased_sa/.
Large file transfers
If you plan to complete
large file size uploads and downloads, follow these guidelines:
Use a dedicated disk and a dedicated server for the persist folder.
When uploading a large file, users can select the advanced upload
utility in the Submit wizard on the web.
Rational Asset Manager supports
HTTP range requests, which web clients use to resume an interrupted
download or to download a file in portions. When users download a
large file, they can use HTTP range requests by using a web browser
such as Firefox with the extension DownThemAll! (https://addons.mozilla.org/en-US/firefox/addon/201).
Users might also consider changing large files into a set of smaller
files.
Help and assistance
The Rational Asset Manager web
application accesses the help application to deliver contextual assistance
for pages, tools, and forms.
If
you require users to authenticate (for example, through the application
server or an external firewall) to access the Rational Asset Manager help
application, you must install the Rational Asset Manager help
application on the same server as the Rational Asset Manager web
application.
Installation requirements This section details hardware and software requirements for successfully installing and running your software.
Capacity and system
planning example
In this example, Rational Asset Manager supports
200 concurrent users and 10,000 assets.
Every
asset contains one artifact; the artifacts vary
in size:
The largest artifact is 375 MB
The smallest
artifact is 4 KB
80% of the artifacts are smaller than 10
KB
12% of the artifacts are 10 - 100 KB in size
5%
of the artifacts are 100 KB - 1 MB in size
3% of the artifacts
are 1 - 375 MB in size
Your users are doing these
activities:
90% of the time, they are searching with keywords
to find, view,
and then download assets.
5% of the time, they are submitting
assets.
5% of the time, they are viewing their My Dashboard
page, community
pages, or forums.
For this configuration of assets
and user activity, you
need this minimum equipment:
A high-speed internal network
A server dedicated to running the limited embedded WebSphere Application Server and the included IBM DB2.
The server must meet these specifications:
Processor: a dual-processor
64 bit CPU
Memory: at least 4 GB of RAM
Usage: dedicated
to running the embedded WebSphere Application
Server and IBM DB2
Performance settings: WebSphere Application
Server is configured to use a JVM heap size of 2 GB, which is the
recommended maximum
Storage: on your hard disk drive, you
need at least 50 GB for
the persist (artifact) storage, 2 GB for storing the search index,
5 GB for the asset database, and 5 GB for the lifecycle database
In general, to support more concurrent users
you must
add more nodes and servers (which requires WebSphere Application Server Network Deployment
edition), increase the memory, or use faster hard disks.
Installation requirements This section details hardware and software requirements for successfully installing and running your software.
WebSphere Application
Server clusters
A large IBM WebSphere Application Server cluster
is composed of front end HTTP servers and proxy servers with a load
balancer that directs requests around the cluster.
Restriction:To
create and use a cluster
of application servers, you must have IBM WebSphere Application Server Network
Deployment (ND), which is not bundled with IBM Rational Asset Manager.
You can scale WebSphere Application Server both
vertically and horizontally. Use a dedicated database server and file
server. The degree to which WebSphere Application Server can
be scaled and the number of servers that you can use depend on the
type and magnitude of server requests and the number of assets.
IBM HTTP Server
The first tier is the HTTP server,
which handles requests from
web clients and relieves the application server from serving static
content. It provides a logical URL that encompasses ancillary applications,
such as the IBM Rational Asset Manager application,
the Rational Asset Manager Help
application, and the Rational Asset Manager Asset
Based Development application. Note that in a large configuration,
a cache server is deployed in front of the HTTP server.
Load Balancer
A load balancer distributes load
across a number of systems. If
you have more than one HTTP server, you must use a load balancer.
For moderately sized deployments, use a software-based load balancer,
such as Edge Component. For larger deployments, which support a large
number of concurrent users, use a hardware-based load balancer.
Cache Proxy
A forward-caching proxy
system stores application data for clients
in a cache and relieves load from other server systems. If your Rational Asset Manager server
supports a moderate number of concurrent users, you need only one
forward proxy system. If your Rational Asset Manager server
supports a large number of concurrent users, you might need multiple
proxy systems.
Application Server
The Rational Asset Manager EAR
file is comprised of two WAR files: the repository and web application
file and the web services file. Deploy the Rational Asset Manager EAR
file on every WebSphere Application Server instance
in a cluster. Rational Asset Manager also
includes Help and IBM Rational Unified Process (RUP) WAR files; you do not have
to deploy these WAR files. If high availability is not required for
the Help and RUP support functions,
deploy them on a single WebSphere Application Server instance
or on an external WebSphere Application Server container.
Rational Asset Manager application
The Rational Asset Manager repository
is normalized for searches and data retrieval so that data is stored
in a manner that is designed to make searching for data, browsing
artifacts, and downloading assets more efficient. To do so, every Rational Asset Manager server
instance builds a local index for assets and a local index for artifacts.
This optimizes search performance, relieves database load, and enhances
scalability in a clustered environment. Local index directories might
perform better than an index that is shared across nodes.
Database server
The most important
considerations in choosing database hardware
are the number of disks in the machine and the RAID schema that the
machine uses. A RAID array should contain at least 6 to 10 drives
for every processor. While memory is important, there is no significant
difference between database server configurations with 4GB and 8GB
of memory for 1000 users and 50,000 assets.
Database disk
space requirements depend on many factors: the number
of assets, the number of artifacts for each asset, the number of team
spaces, the number of roles, the number of reviews, the number of
asset types, the number of users, the amount of transactions on the
server (user metrics), and quantity of forum discussions.
File server
Assets must be shared across WebSphere Application Server instances.
Use a concurrently accessed file system. Rational Asset Manager accesses
these files only during uploads, downloads, artifact indexing, and
significant changes to the Rational Asset Manager model
that require an asset manifest update.
Clustering
topologies
Clustering is combining
a group of machines into a logical entity that can be referenced as
if it were one machine. This section describes various cluster configurations
and the primary advantages and disadvantages of each.
Horizontal clustering
Horizontal clustering,
sometimes referred to as scaling out, is
adding physical machines to increase the performance or capacity of
a cluster pool. Typically, horizontal scaling increases the availability
of the clustered application at the cost of increased maintenance.
Horizontal clustering can add capacity and increased throughput to
a clustered application; use this type of clustering in most instances.
Vertical clustering
Vertical clustering,
sometimes referred to as scaling up, is adding WebSphere Application Server instances
to the same machine. Vertical scaling is useful for taking advantage
of unused resources in large SMP servers. You can use vertical clustering
to create multiple JVM processes that, together, can use all of the
available processing power.
Hybrid horizontal
and vertical clustering
Hybrid clustering is a combination
of horizontal and vertical
clustering. In this configuration, disparate hardware configurations
are members of the same cluster. Larger, more capable machines might
contain multiple WebSphere Application Server instances;
smaller machines might be horizontally clustered and only contain
one WebSphere Application Server instance.
When you use vertical clustering, be cautious. The only way to
determine what is correct for your environment and application is
to tune a single instance of an application server for throughput
and performance, and then add it to a cluster and incrementally add
additional cluster members. Test performance and throughput as each
member is added to the cluster. When you configure a vertical scaling
topology, always monitor memory usage carefully; do not exceed the
amount of addressable user space or the amount of available physical
memory on a machine.
Scalability
Scalability
is how easily a
site can expand. The number of users, assets, and communities for
a given Rational Asset Manager installation
must be able to expand to support an increasing load. The increasing
load can come from many sources, such as adding additional teams or
departments to the set of Rational Asset Manager users
or importing large sets of historical assets into Rational Asset Manager.
Scalability
is an architectural consideration that drives the design of your architecture.
While you might improve scalability by adding additional hardware
to your system, it might not improve performance and throughput.
The
choice between scaling up (vertical clustering) and scaling out (horizontal
clustering) is usually a decision of preference, cost, and the nature
of your environment. However, application resiliency issues can change
your preferences.
Scaling up implements vertical scaling
on a small number of machines
with many processors and large amounts of addressable user space memory.
This can present significant single points of failure (SPOF) because
your environment is composed by fewer large machines.
Scaling
out uses a larger number of smaller machines. In this
scenario, it is unlikely that the failure of one small server will
create a complete application outage. However, scaling out creates
more maintenance needs.
Availability
Also
referred to as fault-tolerance
or resiliency, availability is the ability of a system to provide
operational continuity in spite of failed components and systems.
Architectural decisions, such as horizontal versus vertical scaling
and using backup load balancers (that is, dispatchers), can impact
the availability of your Rational Asset Manager application.
Consider availability for all shared resources, networks, and disk
storage systems that compose your Rational Asset Manager environment.
In a fault-tolerant design, if an application or server fails, other
members of the cluster can continue to service clients.
There
are two categories of failover: server failover and session failover.
When server failover occurs, sessions on the failed cluster member
are lost (a user will have to log in again) but services are still
available to the clients. In session failover, the existing sessions
are resumed by other members of the cluster as if the cluster member
had not failed (although the last transaction can have been lost).
If a redundant infrastructure is configured to support server failover, Rational Asset Manager will
support it.
Related tasks
Enabling application
security on WebSphere Application
Server V7.0 If you are installing to an existing IBM WebSphere Application Server7.0, application security must be enabled. If application security is not enabled, the IBM Rational Asset Manager server setup application will be unable to make any configuration changes for WebSphere Application Server.
Integrations with Rational Asset
Manager
If you want to integrate a IBM Rational Asset Manager installation
with other software, such as IBM Rational ClearCase®, IBM Rational ClearQuest,
or IBM WebSphere Service Registry and Repository
(WSRR), consider a common authentication strategy, such as LDAP or
Active Directory.
Also consider the connectivity to each of the constituent components.
If the products cross firewall boundaries, open the appropriate ports
for each of the integrated products.
Client applications must be installed on the same computer as the
server and Rational Asset Manager server
application. To improve performance, run the servers for these applications
on computers other than the application server.
When you deploy the product to a cluster environment, the components
must use the same operating system and application server. If you
plan to integrate with Rational ClearCase and Rational ClearQuest,
the client applications must be installed on every component in the
cluster and have the same installation path on every node in the cluster.
You cannot configure individual nodes independently.
IBM Jazz Server applications
You can create
links between artifacts on Jazz servers
and assets in Rational Asset Manager.
For example, you could create a defect in IBM Rational Team Concert about
an asset, and then create a link between the asset and the work item.
IBM Rational Team Concert
Rational Team Concert is
a team collaboration tool that is built on a scalable, extensible
platform that integrates tasks across the software lifecycle. You
can create or link to work items on the Rational Team Concert server
as described above. You can also link asset files with Rational Team Concert source
control, so that when users download files from Rational Asset Manager into
their Eclipse clients, they will be prompted to download the most
recent version from the source control system.
Eclipse
You can add Rational Asset Manager to
an Eclipse integrated development environment so that you can search
for assets, download artifacts into your workspace, create new assets
from your files in your workspace, and collaborate on assets. For
information on installing the Rational Asset Manager into
an Eclipse client, see Installing the Rational Asset
Manager Eclipse
client.
IBM Lotus® Connections
You
can view Lotus Connections
business cards in the Rational Asset Manager applications.
Also, in Lotus Connections
you can view a list of the assets in Rational Asset Manager that
you have to approve.
IBM Rational Build Forge®
Rational Asset Manager complements
existing build applications systems such as Build Forge. You can use Build Forge to create a build based on
assets in Rational Asset Manager,
and you can also use the integration to publish the build results
as new assets in Rational Asset Manager.
A set of supplied scripts enables you to download assets, check dependencies,
compile, build, and deliver results as new assets.
IBM Rational Software Architect and
other Rational modeling
tools
You can easily post models and topologies from your
modeling application to Rational Asset Manager,
where others can review and approve your work.
IBM WebSphere Service Registry
and Repository
As part of the Rational Asset Manager and
WSRR integration, you can publish Rational Asset Manager assets
into WSRR. When you plan to integrate the registries for the two applications,
consider the usage of the registries. For example, if Rational Asset Manager is
the development time registry that contains assets that development
teams use and WSRR is a runtime registry that is used for documents
and for the logical services that are derived from the documents,
then some assets that are developed might be deployed and a portion
of the artifacts of the asset might be published in WSRR.
After
the artifacts of a Rational Asset Manager asset
pass onto WSRR, they are owned and managed as runtime documents. They
can change and be governed as needed by the runtime organization.
However, it is useful for both development and the runtime organization
to preserve links between the development assets and their runtime
counterpart documents so that users can understand the links between
developed assets and the deployed documents.
IBM Tivoli® Change and Configuration
Management Database
To support the integration scenarios, Rational Asset Manager uses
the Reusable Asset Specification (RAS) from the Object Management
Group (OMG) as the core structure for asset metadata. To integrate
with tools and other repositories, such as IBM Tivoli CCMDB,
additional metadata is required. RAS provides a structure for unique
asset identification and metadata extension; this combination provides
the basis to manage references between Rational Asset Manager and Tivoli CCMDB.
By using
RAS in Rational Asset Manager,
the enterprise can configure multiple asset types to meet their particular
needs. Regardless of the asset type configuration in Rational Asset Manager,
the synchronization works with Tivoli CCMDB.
In addition to the asset metadata (such as ID, which creates a reference
between Rational Asset Manager and Tivoli CCMDB) other metadata
elements (such as classification) are synchronized between Rational Asset Manager and Tivoli CCMDB. Synchronizing asset
classification and metadata can reduce administrative tasks and simplify
developer use. Even so, when you select a subset of Rational Asset Manager assets
and a subset of configured items in the CCMDB repository, you create
a many-to-many connection point, which makes tracing relationships
and finding necessary information more complicated.
The volatility
of the references in each of the repositories can impact several levels
of integration for these references, and thus impact the performance
of Rational Asset Manager.
Determine what to connect across the repositories. Do not connect
all Rational Asset Manager assets
for all asset types to all possible configured items in CCMDB. Instead,
identify the scenarios that are relevant to your enterprise and then
identify the asset and configured item relationships that you need
to support those scenarios, selecting a subset of the asset and configuration
item relationships to manage.
IBM Rational ClearCase
Rational ClearCase provides
version control, automated workspace management, parallel development
support, baseline management, and build and release management, which
can improve productivity and operational efficiency. To meet internal
and external compliance requirements, Rational ClearCase contains
extended security features, such as user authentication and audit
support. You can use UCM capabilities to add project and workflow
management to Rational ClearCase.
.
IBM Rational ClearQuest
Rational ClearQuest is
a customizable system to track defects and changes. With it you can
manage most types of change activity that are associated with software
development, including enhancements, defects, and documentation modifications. Rational ClearQuest shortens
development cycles by unifying your entire team in the process of
managing software change requests.
As you monitor your system, check web server log files
for errors and server restarts.
Also review system log
files, which are in the following location:
<install path>\IBM\WebSphere\AppServer\profiles\AppSrv01\logs
Backing up Rational Asset Manager
To
prevent data loss, back up the IBM Rational Asset Manager database,
the asset storage location, and (if you used Installation Manager)
the Rational Asset Manager installation
location. Also consider backing up your IBM WebSphere Application Server configuration.
You do not need to back up your indexes; Rational Asset Manager creates
an index for you. Do not back up any /temp data.
Before you
upgrade your system, perform the necessary back ups.
For detailed
instructions on backing up and restoring your applications, see Backing up
and restoring.
Upgrades to Rational Asset Manager
When
you plan to upgrade your system, consider the path that your upgrade
must follow. For example, do you plan to use IBM Installation Manager to
install the media on your server, or do you plan to copy the media
from other sources?
Pre-upgrade considerations:
If
you plan to use Installation
Manager, install it before you upgrade your system.
You
do not need to uninstall Rational Asset Manager before
you upgrade.
By using your existing Rational Asset Manager server,
the Installation
Manager and Setup assistant application maintain their context
root information for Rational Asset Manager.
If you do not log in at the console of your Rational Asset Manager server
machine, plan to access the server remotely.
IBM Installation Manager:
If you already have Installation Manager installed, it is detected
when you launch Installation Manager from the launchpad application
on the installation media.
IBM DB2 Enterprise
Server Edition
IBM Rational Team Concert:
This application is included to support the required integration between Rational Asset Manager and Rational Team Concert.
However, only a single developer license is included. That license
is sufficient for the integration with Rational Asset Manager.
IBM WebSphere Application Server:
A full version and a limited version of WebSphere Application Server is included.
You must install the full version prior to installing Rational Asset Manager or
use Installation Manager to install the limited version with Rational Asset Manager.
The limited version of WebSphere Application
Server is designed for testing and evaluation purposes and is not
sufficient for enterprise deployments.
IBM Rational License Key Server
Application server requirements
You must
have a supported application server. You will deploy the web applications
for Rational Asset Manager onto
an application server.
If you do not have an application server,
the installation media includes a limited, embedded version of IBM WebSphere Application Server that
you can install along with the Rational Asset Manager sever
applications. If you have one of the supported application servers,
you can install the Rational Asset Manager server
applications onto it.
For WebSphere Application Server,
a single application server and clustered deployments are supported.
Restriction:To
create and use a cluster
of application servers, you must have IBM WebSphere Application Server Network
Deployment (ND), which is not bundled with IBM Rational Asset Manager.
Database application requirements
A database
application is required for the Rational Asset Manager server.
You can use any of the supported databases with an installation of
the Rational Asset Manager server
that is installed on any of the supported application servers.
License server requirements
To distribute
licenses, you must use install and use Rational License Server. You will install
your licenses onto Rational License
Server. After you deploy Rational Asset
Manager, you must configure the Rational Asset
Manager web application to communicate with Rational License Server.
Required integration: Rational Team Concert
Rational Asset Manager requires Rational Team Concert.
The Rational Team Concert application
manages the lifecycle processes for assets in Rational Asset Manager.
We include a limited version of Rational Team Concert that
you can install and use, or you can extend an existing Rational Team Concert server
application to work with Rational Asset Manager.
For more information see Integrating Rational Team Concert with Rational Asset
Manager.
A supported web
browser is required to view the Rational Asset Manager web
client and the documentation, and to support the Eclipse Standard
Widget Toolkit (SWT) browser widget.
Additional software requirements
Adobe Acrobat Reader
Adobe Flash Player, to
view multimedia help, such as tours, tutorials, and demonstrations
Version 6.0 release
65 or later
Version 6.0 release
69 or later
User privileges requirements
You must have a user ID that meets the following requirements
before you can install IBM Rational Asset Manager.
Your user ID must not contain double-byte characters.
You
must have a user ID that belongs to the Administrators group.
You
must be able to log in as root.
Pre-installation tasks
Before you install the product, complete these steps:
Procedure
Confirm that your system meets the requirements
that are described in the section Installation requirements.
Confirm that your user ID meets the required access privileges
for installing the product. See User privileges requirements.
You can install IBM Rational Asset Manager either
by using IBM Installation Manager or
by using the deployment .zip files and installing them manually. If
you are using Installation Manager, you can use the GUI or install
silently by using the command line.
IBM Packaging Utility
Use IBM Packaging
Utility software to copy product packages to a repository that can
be placed on a web server available over HTTP or HTTPS.
Packaging Utility software is located on the Enterprise Deployment
CD for each platform
(Windows and Linux) that is included with IBM Rational Asset Manager.
If you want to place a repository that contains a Rational Asset Manager package
on a web server that will be available over HTTP or HTTPS, you must
use Packaging Utility to copy the product package of Rational Asset Manager into
the repository.
Use this utility to perform the following tasks:
Generate a new repository for product packages.
Copy product packages to a new repository. You can copy multiple
product packages into a single repository, thereby creating a common
location for your organization from which product packages can be
installed using IBM Installation
Manager.
Delete product packages from a repository.
Refer to the online help for Packaging Utility for full instructions
using the tool.
Installing Packaging Utility
Before you can use the IBM Packaging
Utility to copy the Rational Asset Manager product
package, you must install the Packaging Utility from the Enterprise
Deployment CD.
Procedure
To install IBM Packaging
Utility software from the Enterprise Deployment CD:
Run the Enterprise Deployment CD for the appropriate platform
and extract the compressed file from the CD.
In the Packaging Utility directory, extract the Packaging
Utility installation package from the compressed file (pu.disk_win32.zip
or pu.disk_linux.zip).
Locate the Packaging Utility installer executable file.
Change to the
InstallerImage_win32 directory in the area where the pu.disk_win32.zip
file was unpacked. Locate the install.exe file.
Change to the InstallerImage_linux
directory in the area where the pu.disk_linuz.zip file was unpacked.
Locate the install.exe file.
Start the installer executable file and follow the instructions
in the wizard to install the Packaging Utility.
If Installation Manager is not detected on
your workstation, you are prompted to install it and the installation
wizard starts. To install Installation Manager, follow the instructions
in the wizard.
After Installation
Manager is installed on your computer, Installation Manager starts
and automatically begins the installation wizard.
To complete
the installation, follow the instructions in the installation wizard.
Installing from download
After obtaining the installation files, extract the contents.
About this task
You install IBM Rational Asset Manager manually
by downloading the .zip files and then extracting the contents of
the compressed files to your file system.
If
you download the installation files from IBM Passport Advantage®,
you must extract the image from the compressed files before you can
install Rational Asset Manager.
If you select the Download Director option for
downloading the installation files, the Download Director applet automatically
verifies the completeness of each file that it processes.
Extracting the files
About this task
Extract each compressed file to the
same directory.
Do not include spaces in the directory
names, or you will not be able to run the launchpad.sh command to
start the launchpad from a command line.
Installing from the launchpad program
The launchpad program provides you with a single location
to view release information and start the installation process.
About this task
Use the launchpad program to start the installation of IBM Rational Asset Manager in
the following cases:
Installing from the product CDs
Installing from an electronic image on your local file system
Installing from an electronic image on a shared drive
By starting the installation process from the launchpad program, IBM Installation
Manager is
automatically installed if it is not already on your computer, and
it starts preconfigured with the location of the repository that contains
the Rational Asset Manager package.
If you install and start Installation
Manager directly,
then you must set repository preferences manually.
Starting the launchpad program
If you are installing from a CD and
autorun is enabled on your workstation, then the Rational Asset Manager launchpad
starts automatically when you insert the first installation disc into
your CD drive. If you are installing from an electronic image, or
if autorun is not configured on your workstation, then you must start
the launchpad program manually.
Before you begin
Complete the preinstallation tasks
described in Pre-installation tasks, if you
have not done so already.
Procedure
To start the launchpad program:
Insert the Rational Asset Manager CD
into your CD drive.
Ensure
that you have mounted the CD drive.
If autorun is enabled on your system,
the Rational Asset Manager launchpad
program automatically opens. If autorun is not enabled on your system:
Run launchpad.exe, which is
located in the root directory of the CD.
Run
launchpad.sh, which is located in the root directory of the CD.
Starting an installation from the launchpad program
Procedure
Start the launchpad program.
If
you have not done so already, read the release information by clicking Release
notes.
When you are ready to begin the installation, click Install IBM Rational Asset Manager.
If IBM Installation
Manager is
not detected on your system or if an older version is already installed,
then you must continue with the installation of the latest release
of it.
When the installation of Installation
Manager completes
successfully, click Finish to close the wizard. After the installation is complete, Installation
Manager opens
automatically.
If this is a product update, you must start Installation
Manager that you already have installed and then select Update and
choose the Rational Asset Manager offering
to check for updates. For complete details, see Upgrading from a previous version on WebSphere Application Server.
Installing with Installation
Manager
IBM Installation Manager is
a program that helps you install the product packages on your computer.
Installation
Manager also
helps you update, modify, and uninstall any package that you install.
A package can be a product, a group of components, or a single component
that is designed for Installation
Manager to
install.
In most installation scenarios for IBM Rational Asset Manager,
you use Installation
Manager. Rational Asset Manager usually
requires the most recent version of Installation
Manager at
the time of release.
This section deals with some common tasks relating to IBM Installation Manager.
For more information, see the Installation
Manager online
help or the Installation
Manager Information
Center at http://publib.boulder.ibm.com/infocenter/install/v1r5/index.jsp.
Installing Installation Manager on Windows
About this task
If you start the installation of your product from the launchpad
program, then the installation of Installation
Manager is
started automatically if it is not already installed on your workstation.
(For more information on this process, refer to Installing from the launchpad program.) In other cases, you
must manually start the installation of Installation
Manager.
Procedure
To start the installation of Installation
Manager manually:
Run install.exe from the InstallerImage_win32
folder on the first installation disk.
Click Next on the Install
Packages page.
Review the license agreement on the License Agreement page
and select I accept the terms in the license agreement to
accept. Click Next.
Click the Browse button on the Destination
Folder page to change the installation location if required. Click Next.
Click Install on the Summary page.
When the installation process is complete, a message confirms the
success of the process.
This file is located in the InstallerImager_linux
folder on the first installation disk.
This file is located in the InstallerImager_aix
folder on the first installation disk.
Click Next on the Install
Packages screen.
Review the license agreement on the License Agreement page
and select I accept the terms in the license agreement to
accept. Click Next.
If necessary, edit the installation directory location.
Click Next.
Click Install on the information
summary page. When the installation process is complete,
a message confirms the success of the process.
Click Finish. IBM Installation
Manager opens.
Starting Installation Manager on Windows
About this task
Installation
Manager should
be started from the launchpad program. Doing so starts Installation
Manager with
a configured repository preference and selected Rational Asset Manager packages.
If you start Installation
Manager directly,
then you must set a repository preference and choose product packages
manually. For more information, see Installation planning.
Procedure
To start Installation
Manager manually:
Open the Start menu from the Taskbar.
Select All Programs > IBM Installation Manager > IBM Installation
Manager.
Starting Installation Manager on Linux and AIX
About this task
Installation
Manager should
be started from the launchpad program. Doing so starts the Installation
Manager with
a configured repository preference and selected Rational Asset Manager packages.
If you start Installation
Manager directly,
then you must set repository preference and choose product packages
manually. For more information, see Installation planning.
Procedure
To start Installation
Manager manually:
Open a terminal window with root user privileges.
Change directory to the installation directory for Installation
Manager (by
default, /opt/IBM/InstallationManager/eclipse) and
run IBMIM.
Uninstalling Installation Manager on Windows
Procedure
To uninstall Installation
Manager:
Open the Start menu from the Taskbar.
Select All Programs > IBM Installation Manager > Uninstall
IBM Installation Manager.
Click Next on the Uninstall page. The IBM Installation
Manager is
selected for uninstallation.
Click Uninstall in the Summary page.
Results
Note:You can also uninstall Installation
Manager by
using the Control Panel. Click Start > Settings > Control Panel, and then double-click Add or Remove Programs.
Select the entry for IBM Installation
Manager and
click Remove.
Uninstalling Installation Manager on Linux and AIX
About this task
Installation
Manager must
be uninstalled using the package management tool that is included
with your Linux or AIX version.
Procedure
To uninstall Installation Manager manually on Linux or AIX:
Open a terminal window with root user privileges.
Change directory to the uninstallation directory of Installation
Manager. By default, this is /var/ibm/InstallationManager/uninstall.
If Installation Manager has been installed to a location other than
the default path, locate the uninstall directory relative to where
Installation Manager is installed.
Run ./uninstall.
Installing Installation
Manager in
console mode
You can install IBM Installation Manager in
console mode, which is a text-based user interface that is used in
a command-line utility.
Procedure
On a command line, change the directory to the InstallerImage_platform folder
on the first installation disk.
Start Installation
Manager in console mode by entering the consoleinst file.
Enter N. Installation
Manager is
selected for installation by default.
On the Licenses screen, enter A to
accept the terms of the license agreement.
Enter N.
Choose an installation location:
To change the installation location from the default value,
enter L. Enter an installation location, and
then enter N.
To accept the default installation location, enter N.
On the Summary screen, review your selections.
To generate a response file for installing Installation
Manager silently
on other computers, enter G.
Enter I to confirm the installation.
Enter R to restart Installation
Manager to
complete the installation.
Related tasks
Installing Rational Asset Manager by
using console mode If you cannot use the graphical user interface in IBM Installation Manager to install IBM Rational Asset Manager, you can use console mode, the interactive text-based user interface.
Installation
repositories for Installation Manager
IBM Installation Manager retrieves
product packages from specified repository locations.
If the launchpad is used
to start Installation
Manager,
the repository information is passed to Installation
Manager.
If the Installation
Manager is
started directly, you must specify an installation repository that
contains the product packages that you want to install. See Setting installation repository preferences in Installation
Manager.
Some organizations bundle and host their own product packages on
their intranet. For information about this type of installation scenario,
see the IBM Installation
Manager online help. Your system administrators will need to
provide you with the correct URL.
By default, IBM Installation
Manager uses
an embedded URL in each Rational software
development product to connect to a repository server over the Internet.
Installation Manager then searches for the product packages as well
as new features.
Setting installation repository preferences in Installation
Manager
When you start the installation of IBM Rational Asset Manager from
the launchpad program, the location of the repository that contains
the product package you are installing is automatically defined in IBM Installation Manager when
it starts. However, if you start Installation Manager directly (for
example, installing Rational Asset Manager from
a repository located on a web server) then you must specify the repository
preference (the URL for the directory that contains the product package)
in Installation Manager before you can install the product package.
Specify these repository locations on the Repositories page of the
Preferences window. By default, Installation Manager uses an embedded
URL in each Rational software development product to
connect to a repository server through the Internet and search for
installable packages and new features. Your organization may require
you to redirect the repository to use intranet sites.
Before you begin
Note:Before starting the installation process, be sure to
obtain the installation package repository URL from your administrator.
Procedure
To add, edit, or remove a repository location in Installation
Manager:
Start Installation Manager.
On the Start page of Installation Manager, click File > Preferences, and then click Repositories. The Repositories page opens, showing any available repositories,
their locations, and whether they are accessible.
On the Repositories page, click Add
Repository.
In the Add repository window, type
the URL of the repository location or browse to it and set a file
path.
Click OK. If you provided an HTTPS
or restricted FTP repository location, then you will be prompted to
enter a user ID and password. The new or changed
repository location is listed. If the repository is not accessible,
a red x displays in the Accessible column.
Click OK to exit.
What to do next
Note: For Installation Manager to search the default repository
locations for the installed packages, ensure the preference Search
service repositories during installation and updates on
the Repositories preference page is selected; this preference is selected
by default.
Setting installation repository preferences in console mode
When you start the installation of IBM Rational Asset Manager from
the launchpad, the location of the repository that contains the product
package to install is automatically defined in Installation
Manager.
If you start Installation
Manager directly,
you must specify the URL for the directory that contains the product
package before you can install the package.
You might
start Installation
Manager directly
if you are installing packages from a repository that is on a web
server.
Before you begin
Obtain the installation package repository URL from your administrator.
About this task
Specify these repository locations on the Repositories page
of the Preferences window. By default, Installation
Manager uses
an embedded URL in each Rational software development product to
connect to a repository server through the Internet and search for
packages and new features. Your organization might require you to
redirect the repository to use intranet sites.
Procedure
To add a repository location in Installation
Manager console
mode:
Start Installation
Manager in console mode by running ram-consoleinst-platform from
the command line.
On the Start page of Installation
Manager,
enter P to open the Preferences page.
Enter 1 to view the Repositories
page. The Repositories page shows the available
locations.
On the Repositories page, enter D to
add a repository.
Type the URL of the repository location. If
you provided an HTTPS or restricted FTP repository location, you are
prompted to enter a user ID and password.
Enter P to enter credentials.
Enter your user name.
Enter your password.
Enter 1 to save the password.
Enter O to save the repository. The new or changed repository location is listed.
Enter A to apply the changes and
return to the Preferences menu.
Enter C to exit the Preferences
menu.
What to do next
To ensure that Installation
Manager can
search the default repository locations for the installed packages,
verify that the repository has an X next to it. An X indicates that
the Search service repositories during installation and
updates preference on the Repositories preference page
is selected. This preference is selected by default.
Installing WebSphere Application Server,
version 7.0
IBM Rational Asset Manager requires
a server application. If you do not already have one of the supported
database applications installed, then you can install WebSphere Application Server,
version 7.0 which
is included with the Rational Asset Manager installation
media.
About this task
Installation instructions and release
notes, as well as information
about working with DB2 are available
in the WebSphere Application Server Version 7.0 Information
Center. See http://publib.boulder.ibm.com/infocenter/wasinfo/v7r0/index.jsp for information that applies to both the
full WebSphere Application Server and
the packaged embedded WebSphere Application Server.
Procedure
To start an installation of the full WebSphere Application Server Version 7.0:
From the Rational Asset Manager launchpad
program, click Install IBM WebSphere Application Server7.0.
If you are installing from CD media, you might be prompted to insert
the first WebSphere Application Server installation
CD.
Click the WebSphere Application Server Installation
page or select the page that applies to your installation scenario.
Read the installation guide and readme information
that
is available on this page or in the information center.
Click Launch the installation wizard for WebSphere
Application Server or, if you chose not to use the WebSphere Application Server Installation
page, launch the installer that applies to your installation scenario.
Follow the instructions in the wizard to complete
the installation.
For more information, see the installation instructions in the WebSphere Application Server Version 7.0 Information
Center.
What to do next
Click the Apply
latest Fix Pack for WebSphere Application Server link
in the Rational Asset Manager launchpad
or go to http://www-01.ibm.com/support/docview.wss?uid=swg27004980 in
your web browser to download and install updates.
Enabling application
security on WebSphere Application
Server V7.0
If you are installing to an existing IBM WebSphere Application Server7.0,
application security must be enabled. If application security is not
enabled, the IBM Rational Asset Manager server
setup application will be unable to make any configuration changes
for WebSphere Application Server.
Procedure
In the WebSphere Application Server Administrative
Console, click Security.
Make
sure Enable application security is
checked.
Click Apply.
Click Save.
Installing IBM DB2 Enterprise Server Edition, version 9.7
IBM Rational Asset Manager requires
a database application. If you do not already have one of the supported
database applications installed, then you can install IBM DB2 Enterprise
Server Edition, version 9.7 which
is included with the Rational Asset Manager installation
media.
About this task
Installation instructions and release notes, as well as information
about working with DB2 are available
in the IBM DB2 Database for Linux, UNIX, and Windows Information Center. See http://publib.boulder.ibm.com/infocenter/db2luw/v9r7/index.jsp for information that applies to both the DB2 Enterprise Server Edition and
the DB2 Data Server Trial Edition.
For installation instructions, click Database
fundamentals > Installing > Database
systems. For Windows, click DB2 Database for
Windows and click the appropriate installation topics.
For Linux, click DB2 Database for Linux and UNIX > DB2
Servers and click the appropriate installation
topics.
For release notes, click Product overviews > DB2 Database for Linux, UNIX, and Windows > Release notes.
Procedure
To start an installation of DB2 Enterprise
Server Edition, version 9.7:
Start the DB2 Setup
Launchpad program. From the Rational Asset Manager launchpad
program, click Install IBM DB2 Enterprise Server Edition,
Version 9.7.
If you are installing from CD media, you might be prompted to insert
the first DB2 installation CD. The DB2 Setup Launchpad
starts.
Make sure that you have read the release information that
is available in the DB2 Setup
Launchpad or in the information center.
In the left menu, click Install a product,
and then in the page that opens, under DB2 Enterprise Server
Edition, click Install new. The DB2 Setup wizard
opens.
Follow the instructions in the wizard to complete the installation.
For more information, see the installation instructions in the IBM DB2 Database
for Linux, UNIX, and Windows Information
Center or click Help in the DB2 Setup wizard.
The IBM DB2 Enterprise Server Edition, Version 9.7 license
key must be registered using the db2licm command.
About this task
The DB2 product uses
the license key information contained in the nodelock file. The nodelock
file is created or updated by running the db2licm command and specifying
the license file for the DB2 product.
Creating or updating the nodelock file is referred to as registering
the DB2 product license key.
The DB2 product uses the license key
information that is contained in the nodelock file, which is created
or updated by running the db2licm command and specifying the license
file for the DB2 product. To
register the license key, you must run the db2licm command on each
computer where DB2 is installed.
To
manually register your DB2 product
license key using root authority:
Log in as a user with root
authority.
Register the DB2 product
license key with the appropriate command:
/usr/opt/db2_08_01/adm/db2licm
-a filename on AIX
/opt/IBM/db2/V8.1/adm/db2licm
-a filename for
all other UNIX-based operating systems
where filename is
the full pathname and
filename for the license file that corresponds to the product you
are bundling.
For example, on AIX,
if
the CD-ROM is mounted in the /cdrom directory and the name of the
license file is db2ese_o.lic, the command should be: /usr/opt/db2_08_01/adm/db2licm
-a /cdrom/db2/license/db2ese_o.lic
After running
the db2licm command, the DB2 product
license key information is contained in the nodelock file in the following
directories:
AIX: /var/ifor.
HP-UX, Linux, or Solaris
Operating Environment: /var/lum.
Windows: DB2PATH/sqllib/license.
Procedure
To register your DB2 product
license key as the instance owner:
Create
the instance environment and become the instance
owner.
Register your DB2 product
license with the appropriate command:
For UNIX operating
systems: db2instance_path/adm/db2licm -a filename
For Windows operating
systems: db2instance_path\adm\db2licm -a filename
where db2instance_path is where
the DB2 instance was created
and filename is
the full pathname and filename for the license file that corresponds
to the product that you are bundling.
Installing Rational License
Key Server
To distribute license keys to clients, the IBM Rational Asset Manager server
uses the IBM Rational License Key Server.
Procedure
Install Rational License
Key Server.
For Windows, AIX,
or Linux:
If you use Rational License
Server version 7.01 or earlier, upgrade to the Rational License Key Server v8.1.2 or
later.
For Linux for zSeries: You must install Rational License
Key Server v8.1.2 1
or later on a supported platform.
Rational License
Key Server is included with the Rational Asset Manager installation
media. You can also retrieve the latest version of Rational License
Server through your Passport Advantage account, or through the Rational Download Center.
For
information about installing and configuring the license server, see
the following topics in the License Management Guide:
Start the Rational License
Server. For more information, see the IBM Rational License Management
Guide or the License Key Administrator Help.
After you deploy the Rational Asset Manager applications
to your application server, configure that server to communicate with Rational License Server.
This section discusses the steps to upgrade IBM Rational Asset Manager,
to install it with embedded IBM WebSphere Application Server,
version 7.0, and to install it to an existing installation of WebSphere Application Server or
Apache Tomcat server.
About this task
Note:As of version 7.2, only the server setup application
is installed using IBM Installation Manager.
You then use the server setup application to complete the installation.
Installing Rational Asset
Manager server by using Installation Manager
You can install the IBM Rational Asset Manager server
setup application to deploy all other applications by using IBM Installation Manager.
You can install the server application with an embedded version of IBM WebSphere Application Server,
version 7.0, on the full version of WebSphere Application Server you
installed from the Rational Asset Manager media
disk, or on an existing version of WebSphere Application Server you
already had installed. You can install to a single node or to a cluster.
Before you install Rational Asset Manager,
make sure that the database application (DB2,Oracle,
or SQL Server) is installed and running.
If you are installing to a full WebSphere Application Server server
or cluster, make sure that the server or cluster is running. You must
run Installation
Manager on
the same server as the application server, or for a network-deployed
cluster, on the server that is running the Deployment Manager.
Restriction:To
create and use a cluster
of application servers, you must have IBM WebSphere Application Server Network
Deployment (ND), which is not bundled with IBM Rational Asset Manager.
Procedure
Start the Rational Asset Manager launchpad
program (see Installing from the launchpad program).
To use a different language, select a language from the Select
a language list.
Click Install IBM Rational Asset
Manager server. Installation Manager launches
and you can click Install to open the installation
wizard.
If you are installing from the launchpad program, go
to step 6.
If Installation Manager is already installed
on your system but you do not have the latest version, the Install
wizard opens to update Installation Manager to the latest version
of Installation Manager appears. Complete the Install wizard to return
to the server installation.
To search for available updates
to the Rational Asset Manager server
package, click Check for Other Versions and Extensions.
Note: Installation Manager searches the predefined IBM update
repository locations for the installed packages. In the File > Preferences > Repositories preferences page, Search service repositories
during installation and updates is selected by default.
To use this preference, you must be connected to the Internet.
Installation Manager searches for updates in the predefined
service repository for the product package. It also searches any other
repository locations that you have set. You can install updates at
the same time that you install the base product package.
If updates are found for the Rational Asset Manager server
package, they are included after their corresponding products in the Installation
Packages list on the Install Packages page. By default,
only the latest updates are available. To see other versions of packages,
select Show all versions.
In the Installation Packages
window, expand IBM Rational Asset Manager server and
select Version 7.5.1.
Updates that have dependencies are automatically selected and cleared
together.
On the Licenses page, read the license
agreement for the selected package. If you selected to install more
than one package, there might be a license agreement for each package.
To view each license agreement, select each package version. The package
versions that you selected to install (for example, the base package
and an update) are listed under the package name.
If you agree to the terms of each license agreement,
click I accept the terms of the license agreements.
To continue, click Next.
On the Location page, either type
the path for the shared resources directory in the Shared
Resources Directory field or accept the default path.
The shared resources directory contains resources that package groups
can share. To continue, click Next.
Default
paths:
C:\Program Files\IBM\IBMIMShared
/opt/IBM/IBMIMShared
Important:You can specify the shared resources
directory only the first time that you install a package. To ensure
that adequate space is available for the shared resources of packages,
use your largest disk for this directory. You cannot change the directory
location unless you uninstall all packages.
On the Location page, either choose
an existing package group to install the Rational Asset Manager server
package into or create a new one. A package group represents a directory
in which packages share resources. To create a package group:
Click Create a new package group.
Type the path for the installation directory for the
package group. The name for the package group is created
automatically.
Default paths:
C:\Program Files\IBM\RAM75Server
/opt/IBM/RAM75Server
To continue, click Next.
On the Features page, click Next. You cannot clear any features on this page.
On the next Features page, in
the Select application server list, select
the application server:
Packaged embedded WebSphere Application Server:
Installs a new embedded WebSphere Application
Server and deploys the Rational Asset Manager server
setup application. If you choose this option, go to step 13.
WebSphere Application Server: Installs
the Rational Asset Manager server
setup application into an existing installation of WebSphere Application Server that
you specify. This option includes versions of WebSphere Application Server that
were previously installed or the full version of WebSphere Application Server installed
from the Rational Asset Manager media.
If you choose this option, go to step 14.
If you selected Packaged embedded
WebSphere Application Server, indicate the server configuration:
Specify the embedded WebSphere Application Server ports,
or use the default port assignments. The Available column indicates
whether the port is already in use or not.
Table 4. Default port definitions for embedded WebSphere Application Server V7.0
Port name
Default value
HTTP Transport Port (WC_defaulthost)
13080
Administrative Console Port (WC_adminhost)
13060
HTTPS Transport Port (WC_defaulthost_secure)
13443
Administrative Console Secure Port (WC_adminhost_secure)
13043
Bootstrap Port (BOOTSTRAP_ADDRESS)
13809
SOAP Connector Port (SOAP_CONNECTOR_ADDRESS)
13880
Click Next.
On the Context Root page, in
the Rational Asset Manager Setup
Server field, type a context root for the Rational Asset Manager server
setup application. A context root identifies the location
of a web application on the server. For example, if
you use the default context root ram.setup on
a server with a domain of www.example.com,
you would access the server setup application in a web browser at
the URL www.example.com/ram.setup.
If you selected WebSphere Application
Server, indicate the server configuration:
In the Application server
profile location field, type the full path to the application
server on the local computer, or click Browse and
open the application server profile location. (For a Network Deployment
cluster, type the location of the profile for the deployment manager.)
For example, on a full installation of WebSphere Application Server,
enter C:\Program Files\IBM\WebSphere\AppServer\profiles\profile_name,
where profile_name is the name of the profile on
the server or the deployment manager for a cluster. For an installation
of embedded WebSphere Application Server that
is installed with Rational Asset Manager,
by default the installation location is C:\Program Files\IBM\RAMServer\ram\ewas7\profiles\profile1.
If you enabled security on your application server,
type an administrator user name and password. If you did not enable
security, clear the check box.
In the Type of server configuration section, indicate
whether you are installing a single server or a network deployment
cluster, and provide the server or cluster name. The server must be
identified in the Server Configuration section and must be running.
Click Get list from server.
For single server node installations, the name of the server is
available in the field. For example, server1.
For clusters, the name of the cluster displays.
Click Next.
On the Context Root page, in
the Rational Asset Manager Setup
Server field, type a context root for the Rational Asset Manager server
setup application. A context root identifies the location
of a web application on the server. For example, if
you use the default context root ram.setup on
a server with a domain of www.example.com,
you would access the server setup application in a web browser at
the URL www.example.com/ram.setup.
On the Summary page, review your choices.
To change choices or configuration details, click Back,
and make your changes.
When you are satisfied with your installation
choices, click Install. An
indicator shows the progress of the installation and can take several
minutes.
When the installation process is complete,
a message confirms the success of the process. To return to the start
page of Installation Manager, click Finish.
If you needed an application
server, the embedded WebSphere Application Server is
installed and started, and the server setup application has been deployed
to the application server. If you installed to an instance of WebSphere Application Server,
the server setup application was deployed to the application server.
If you installed to a WebSphere Application Server cluster,
the server setup application was deployed to the cluster.
What to do next
The server setup application
is a wizard that deploys the other enterprise archive and web archive
files and configures the database, the database connection, security,
and repository settings.
To configure the server application,
open a web browser and navigate to the server setup application at http://applicationServerHostname:port_number/Server_Setup_Context_Root,
where applicationServerHostname is the name of
the application server, port_number is the port
number of the application server, and Server_Setup_Context_Root is
the context root directory of the server setup application. For example: http://WASappServer.companyname.com:9080/ram.setup
The
following table shows the default settings for the server setup application:
Table 5. Default settings for the server setup application
Server setup application
Default setting
WebSphere Application Server port
9080
Embedded WebSphere Application Server port
13080
Context root directory
ram.setup
For detailed post-installation instructions, see these topics:
Installing Rational Asset Manager by
using console mode
If you cannot use the graphical user interface in IBM Installation
Manager to install IBM Rational Asset Manager,
you can use console mode, the interactive text-based user interface.
Before
you install Rational Asset Manager,
make sure that a supported DB2,
Oracle, or SQL Server database is installed and running.
If you are installing to a full IBM WebSphere Application Server server
or cluster, make sure that the server or cluster is installed, updated
with the latest fix packs, and running. You must run Installation
Manager on
the same server as the application server. For a network-deployed
cluster, you must run Installation
Manager on
the server that is running the Deployment Manager.
Restriction:To
create and use a cluster
of application servers, you must have IBM WebSphere Application Server Network
Deployment (ND), which is not bundled with IBM Rational Asset Manager.
About this task
The Rational Asset Manager package
includes installation files for Installation
Manager.
A
selected option is indicated by an X [X]. An option
that is not selected is indicated by empty brackets [ ].
You can press Enter to accept the default entry or enter a different
command. For example, [N] indicates that the default
command is N, or next.
Procedure
Start Installation Manager in console mode by entering
the ram-consoleinst-platform file
that is specific to your operating system on a command line.
Enter 1 to install new software
packages.
Enter the number that is next to the Rational Asset Manager server.
To view the available versions for Rational Asset Manager,
enter O.
Enter 1 to choose version 7.5.1.
Enter N.
On the Licenses screen, these options are available:
1: IBM Rational Asset Manager server.
To view a license agreement, enter the number that is next to the
product name.
A: I accept the terms in the license agreement.
D: I do not accept the terms in the license agreement. If
you decline the license agreement, the installation stops. To continue
the installation, you must accept the license agreement.
Enter A to accept the terms in
the license agreement.
Enter N.
Choose one of these options:
To select a package group in the Shared Resources Directory
that is compatible with the Rational Asset Manager package,
enter the number that is next to that package group.
To enter a value for the Shared Resources Directory,
enter M. Enter a new location, and press Enter.
To accept the default package group, continue to the
next step.
Restriction:You can specify the shared resources
directory only the first time that you install a package. Select a
drive that has enough space so that the shared resources of future
packages will have enough space. You cannot change the location of
the shared resources directory unless you uninstall all of the packages.
Enter N.
On the Features screen, enter N.
Select IBM WebSphere Application Server or
the packaged embedded WebSphere Application Server.
If you selected WebSphere Application Server,
indicate the server configuration:
Enter the location for the application server profile. For a Network
Deployment cluster, enter the location of the profile for the deployment
manager. For example, on a full installation of WebSphere Application Server,
enter C:\Program Files\IBM\WebSphere\AppServer\profiles\profile_name,
where profile_name is the name of the profile on
the server or the deployment manager for a cluster.
If you enabled security on your application server, enter Y and
then enter the administrator user name and password. If you did not
enable security, enter N.
Indicate whether you are installing a single server or a network
deployment cluster, and provide the server or cluster name. The server
must be identified and running to continue.
Enter each server name.
If you selected Packaged embedded WebSphere Application
Server, indicate the server configuration. Enter a value
for each of these ports or servers:
Tip:To accept the
default values, press Enter.
HTTP transport port
Administrative console port.
HTTPS transport port.
Administrative console secure port.
Bootstrap port.
SOAP connector port.
Rational Asset Manager Setup Server.
Enter N.
On the Summary screen, review your selections before you
install the package.
Enter G to
generate an installation response file. Enter the name of the response
file and use .xml as the file extension. Response files are XML files. You can include a directory location
when you enter the response file name to save the file to a different
location.
Enter I to install the package.
When the installation is complete, enter F to
finish.
If you needed an application
server, the embedded WebSphere Application Server is
installed and started, and the server setup application has been deployed
to the application server. If you installed to an instance of WebSphere Application Server,
the server setup application was deployed to the application server.
If you installed to a WebSphere Application Server cluster,
the server setup application was deployed to the cluster.
What to do next
The server setup application
is a wizard that deploys the other enterprise archive and web archive
files and configures the database, the database connection, security,
and repository settings.
To configure the server application,
open a web browser and navigate to the server setup application at http://applicationServerHostname:port_number/Server_Setup_Context_Root,
where applicationServerHostname is the name of
the application server, port_number is the port
number of the application server, and Server_Setup_Context_Root is
the context root directory of the server setup application. For example: http://WASappServer.companyname.com:9080/ram.setup
The
following table shows the default settings for the server setup application:
Table 6. Default settings for the server setup application
Server setup application
Default setting
WebSphere Application Server port
9080
Embedded WebSphere Application Server port
13080
Context root directory
ram.setup
For detailed post-installation instructions, see these topics:
You can install IBM Rational Asset Manager from
the command line using response files rather than using the IBM Installation Manager graphical
user interface.
You can install silently
by using a response file from the command
line. There are sample response files included on the installation
media or installed to be used for silent installs. The sample response
files are on installation media in the disk1/sample_response_files folder
and they are also installed in the /sample_response_files directory.
The sample files are:
RAMClientInstall-Update.xml
RAMClientUninstall.xml
RAMServerInstall-Update_Manual.xml
RAMServerInstall-Update_PeWAS.xml
RAMServerInstall-Update_WAS61.xml
RAMServerUninstall.xml
Each file includes comments that help describe how you must modify
it for your specific installation.
Manually deploying and configuring Rational Asset Manager on an
existing application
server
If you want to use your existing IBM WebSphere Application Server or
cluster environment, follow these steps to manually install and configure IBM Rational Asset Manager.
About this task
The following list
is the order of the steps to deploy and
configure Rational Asset Manager for
use with an existing application server. In general, you will be completing
the following tasks:
Retrieving the
server application files directly from the installation
media
The installation media contain .zip files for every supported
operating system that contain all of the required files for manually
installing and configuring IBM Rational Asset Manager.
Before you begin
You must have
downloaded the installation media for Rational Asset Manager and
extracted all of the .zip files to the same directory.
About this task
The installation media contains a .zip file for
every supported operating system and application server that contains
the following files:
.ear files
for the Rational Asset Manager server
setup applications for IBM WebSphere Application Server.
.war files for the Rational Asset Manager server
application for Apache Tomcat
Shared library files for Apache
Tomcat
Scripts to help you set up your databases
The
complete list of files is in Table 1, below.
Note:The
application files and scripts for Rational Asset Manager are specific
for each operating system.
Procedure
On the
installation media, or through the IBM download
site, or in the download package from Passport Advantage, locate the
appropriate .zip files for your operating system and application
server.
The .zip files have the following naming convention: com.ibm.ram.manual.deploy.application_server.operating_system_version_number.disk1.zip,
where application_server will be either was for
WebSphere Application Server, or tomcat for Apache Tomcat.
Extract the appropriate .zip file or files
for
your operating system to a local disc image. Each .zip file
contains all the files that are required for the appropriate operating
system
Restriction:To
create and use a cluster
of application servers, you must have IBM WebSphere Application Server Network
Deployment (ND), which is not bundled with IBM Rational Asset Manager.
The extracted .zip files contain the
following
files:
Table 7. List of installation files for Rational Asset Manager server in .zip files for deploying manually
Disc
Path
File names
Description
.was only
extracted_.zip_location\apps\was
com.ibm.ram.repository.setup.web.ear
com.ibm.ram.repository.web_runtime.ear
ramhelp_war.ear
rmcabdgovernprocess_war.ear
RTC-server.zip
Rational Asset Manager .ear application
files, and the included IBM Rational Team Concert server
application that is required for managing asset lifecycles
.tomcat only
extracted_.zip_location\apps\tomcat
com.ibm.ram.repository.web.tomcat_runtime.war
com.ibm.ram.repository.web.ws.tomcat_runtime.war
ramhelp.war
rmcabdgovernprocess.war
RTC-Server.zip
sharedLib.zip
Rational Asset Manager Web
Archive files and shared library files for Tomcat
.was only
extracted_.zip_location\conf\bin
deployClusterSetup.py
UninstallSetup.py
Files for deploying or uninstalling the server
setup application to the Deployment Manager server on an IBM WebSphere
Application Server cluster.
.was only
extracted_.zip_location\conf\cq
linkscript.py
A file to help you configure a
connection between Rational Asset Manager and IBM Rational ClearQuest.
Both
extracted_.zip_location\DatabaseScripts
com.ibm.ram.lifecycle.zip
A file to populate the database tables for the
database for asset lifecycles that is used by the internal version
of Rational Team Concert.
Both
extracted_.zip_location\DatabaseScripts\DB2
bootStrap_DB2.sql
dbcreate.sql
dbcreate_populate.bat
dbcreate_populate.sh
dbcreate_populate_zLinux.sh
RAMSCHEMA_DB2.sql
Files for creating and populating a DB2 database
for Rational Asset Manager.
Both
extracted_.zip_location\DatabaseScripts\Oracle
bootStrap_Oracle.sql
RAMSCHEMA_Oracle.sql
Files for creating and populating an Oracle
database.
Both
extracted_.zip_location\DatabaseScripts\SQLServer
bootStrap_SQLServer.sql
RAMSCHEMA_SQLServer.sql
Files for creating and populating a Microsoft SQL Server database.
Both
extracted_.zip_location\sharedLibs
rlsclients_rlsibmratl_812.zip
Files for the Rational Licensing Server. This
.zip file contains the appropriate files for all supported operating
systems
Creating and configuring
databases for Rational Asset
Manager
If your database software is installed and
the database
server is running, you can create and configure a database either
prior to installing IBM Rational Asset Manager,
or while using the Rational Asset Manager server
setup application. If you are using IBM DB2, the server setup application
can create the databases for you.
If you are using IBM WebSphere Application Server and DB2 and choose to create your database
with the Rational Asset Manager server
setup application, skip this section.
Creating and
populating the database for assets
The Rational
Asset Manager server application requires
a database for assets and other repository information.
Before you begin
If you are using IBM WebSphere Application Server and
will be using the server setup application, you can skip this task
because the server
setup application can create and configure the databases for you.
Creating and populating database tables for assets in DB2 with batch files
Use batch files and database scripts to create and populate
tables in IBM DB2 for IBM Rational Asset Manager.
Before you begin
If you are using IBM WebSphere Application Server and
will be using the server setup application, you can skip this task
because the server
setup application can create and configure the databases for you.
You can create the database and tables
automatically by running batch files. DB2 must
already be installed and running. Ensure that you know the location
of the SQL scripts that are included in the installation media. The
location is install_location\ram\DatabaseScripts\DB2 if
you installed by using Installation Manager. You must also know the
installation directory for DB2 (typically C:\Program
Files\IBM\SQLLIB for Windows and opt/IBM/DB2/V9.7 for Linux, AIX, or Linux for zSeries.
You will use the following
scripts:
dbcreate_populate.bat
dbcreate_populate.sh
dbcreate_populate_zLinux.sh
dbcreate.sql
RAMSCHEMA_DB2.sql
bootStrap_DB2.sql
Procedure
If you are installing from the CD, then copy the SQL scripts
to your local file system.
Check that you have write permission
for the directory containing the SQL scripts.
In a command line, change to the directory containing the
SQL scripts for DB2 (path
to installation media\ db_scripts\DB).
Run the following batch file:
dbcreate_populate.bat
dbcreate_populate.sh
dbcreate_populate_zlinux.sh
When prompted, enter the name of the database or press
the Enter key to accept the default database name (RAMDB).
At the next prompt, enter the installation directory path
for DB2, or press the Enter
key to accept the default value (C:\Program Files\IBM\SQLLIB for Windows, and /opt/IBM/DB2/V9.7 for Linux, AIX, or Linux for zSeries.
The batch file runs. The script performs
the following actions:
A database with the name that you entered is created.
Tablespace is configured for the database.
Tables and schema for RAM are created in the database.
Note:When you run the batch file for the first time, you might
see a number of SQL0204N error messages that name is
an undefined name, and they will be similar to the following example:
** CLI error in executing the SQL statement:
(-204): [IBM][CLI Driver][DB2/NT] SQL0204N  "RAMSCHEMA.FORUM" is an undefined name.  SQLSTATE=42704
If
you are running the batch file for the first time, then you can safely
ignore these messages.
Verify that the tables were created. For example, start
the DB2 Control Center and browse
for the RAMDB database. Verify that the database and tables were created.
Restriction:To
create and use a cluster
of application servers, you must have IBM WebSphere Application Server Network
Deployment (ND), which is not bundled with IBM Rational Asset Manager.
Creating and populating database tables for assets in DB2 manually
These are the instructions for manually configuring IBM DB2 and
creating and populating tables for IBM Rational Asset Manager in DB2.
Before you begin
If you are using IBM WebSphere Application Server and
will be using the server setup application, you can skip this task
because the server
setup application can create and configure the databases for you.
DB2 must already be installed and
running. Also, make sure that you know the location of the SQL scripts
that are included with the installation media (typically, path
to installation media\ db_scripts\DB2). Finally, ensure
that you also know the installation directory for DB2 (typically C:\Program Files\IBM\SQLLIB for Windows, opt/ibm/DB2/V9.7 for Linux and /opt/IBM/db2/V9.7 for AIX.
Restriction:To
create and use a cluster
of application servers, you must have IBM WebSphere Application Server Network
Deployment (ND), which is not bundled with IBM Rational Asset Manager.
Creating and populating
the database for assets in Oracle
This section includes
instructions for manually creating
and populating tables for IBM Rational Asset Manager in
Oracle.
Before you begin
Oracle
must already be installed and running. Also, make sure that you know
the location of the SQL scripts (typically, path_to_installation_media \db_scripts\Oracle).
Procedure
To create the database tables:
Using the Oracle Database Configuration Assistant, follow
the steps in the wizard to create a database.
Use global database name ramdb_your_domain,
and a system identifier (SID) ramdb.
On the Custom Scripts tab,
do
not run the SQL scripts that are mentioned in the later steps. You
must create a user account first.
On
the Character Sets page, select Use Unicode
(AL32UTF8).
Also on the Character
Sets page, for National Character
Set, select UTF8 - Unicode 3.0 UTF-8.
Complete the other pages in the wizard, accepting
the
default values.
Create a database user:
Open Database Control.
Navigate to the Users page.
(In Oracle 10.2(g), click Administration, then Users;
in Oracle 11(g), click Server, then in the
Security section click Users.)
Create a user named RAMSCHEMA that
meets these qualifications:
The user must be named RAMSCHEMA. Rational Asset Manager requires
a schema named RAMSCHEMA, and in Oracle schemas
are owned by a database user and share the name of that user. You
cannot use a different name.
The user has the RESOURCE and CONNECT roles.
The user must have the CREATE VIEW privilege: GRANT
CREATE VIEW TO RAMSCHEMA
The quota setting for the
user is unlimited.
For tablespace, you can use any default
tablespace except for Temp that
meets the access level requirements for the user that you created.
Tip:Oracle provides a default
user named "Scott" that has the appropriate permissions. You can use
this default user as the basis for your new user account; however,
you still must name the user RAMSCHEMA.
Run the scripts that populate
the database. This step is
not necessary if you are using the server setup application; the server
setup application runs the scripts for you.
Click SQL+ to open it.
Open the RAMSCHEMA_Oracle.sql file
in the sqlscripts/oracle folder. Highlight the
entire contents of the file, copy them (right-click, and then Copy),
and then paste them into the top of the SQL+.
Click Execute. When
the process
finishes, delete the commands from the top window.
Repeat these steps for the bootStrap_Oracle.sql file.
Restriction:To
create and use a cluster
of application servers, you must have IBM WebSphere Application Server Network
Deployment (ND), which is not bundled with IBM Rational Asset Manager.
Make sure that you know the location of the SQL scripts. Typically,
the location is: path to installation media\db_scripts\SQLServer).
Procedure
To create the database tables:
Ensure that your ID has permission to execute CREATE SCHEMA
statements. Typically, the database owner has this permission.
Create a new database with database name RAMDB. The default collation option for SQL Server is case-insensitive;
the Rational Asset Manager
database must use a case-sensitive collation to work correctly. You
must select a collation sequence that ends with_BIN2 (for
example, Latin1_General_BIN2).
From the command
line tool, type:
CREATE DATABASE RAMDB COLLATE collation
where collation is where you specify
a collation sequence. For example:
CREATE DATABASE RAMDB COLLATE Latin1_General_BIN2
Execute the scripts that will populate the database.
Open a command prompt.
Type sqlcmd -d RAMDB -i path
to SQL scripts\RAMSCHEMA_SQLServer.sql (where RAMDB is
the name of the database that you created in step 2), and press Enter.
Type sqlcmd -d RAMDB -i path
to SQL scripts\bootStrap_SQLServer.sql (where RAMDB is
the name of the database that you created in step 2), and press Enter.
Restriction:To
create and use a cluster
of application servers, you must have IBM WebSphere Application Server Network
Deployment (ND), which is not bundled with IBM Rational Asset Manager.
You must create a second database for custom asset lifecycles.
About this task
If you are using IBM WebSphere Application Server and DB2 and choose to create your database
with the Rational Asset Manager server
setup application, skip this section.
If you are using an existing Rational Team Concert server,
you can skip this task because Rational Team Concert will
already have a database.
Creating a database for asset lifecycles in DB2
Create a database for lifecycle management in IBM DB2 for IBM Rational Asset Manager This database will be used by the included version
of IBM Rational Team Concert.
Before you begin
If you are using IBM WebSphere Application Server and
will be using the server setup application, you can skip this task
because the server
setup application can create and configure the databases for you.
If you are using an existing Rational Team Concert server,
you can skip this task because Rational Team Concert will
already have a database.
Ensure that you also know the installation
directory for DB2 (typically C:\Program
Files\IBM\SQLLIB for Windows and opt/IBM/DB2/V9.7 for Linux, AIX, and Linux for zSeries.
The user performing
these instructions must have system administrator authority on the
DB2 database.
Tip:On Linux, AIX, or Linux for zSeries,
to get system admin authority on the DB2 database,
sudo to the DB2 user db2inst1 and
run bash. Note that db2inst1 is the default instance user.
Procedure
To set up the DB2 database:
Create the database in the DB2 Command
Window. The following example commands create a new database called RTCDB.
These commands run in the DB2 Command
Window. The Command Window can be opened from the application Start
menu under the DB2 Command Line
Tools menu.
On Windows:,
where <database_storage_drive> is
the drive (for example, C:\ ) where you want
to store the database files:
db2 create database RTCDB on <database_storage_drive> using codeset UTF-8 territory en pagesize 8192
Tip:The hard drive that you create the database on must have
at least 5 gigabytes of storage space available.
On Linux,
AIX, or Linux for zSeries,
where <database_storage_directory> is
a fully qualified path to the directory on your file system where
you want to store the database files:
db2 create database RTCDB on <database_storage_directory> using codeset UTF-8 territory en pagesize 8192
Tip:The database storage directory must already exist and have
at least 5 gigabytes of storage space available.
Note:To ensure proper handling of Unicode content, the database
character set must be UTF-8 encoding.
Tip:If the
database is not running, the command db2start starts DB2.
For DB2 v9.1 only: You must increase the APP_CTL_HEAP_SZ setting
from its default of 128 to 1024. You will have to restart your database
server:
In the DB2 Command Window, type the following command:
db2 UPDATE DATABASE CONFIGURATION FOR RTCDB USING APP_CTL_HEAP_SZ 1024
Stop the database server with the following command:
db2 stop database manager force
Start the database server with the following command:
Restriction:To
create and use a cluster
of application servers, you must have IBM WebSphere Application Server Network
Deployment (ND), which is not bundled with IBM Rational Asset Manager.
Creating a database for asset lifecycles in Oracle
These are the instructions for creating a database for
lifecycle management in Oracle for IBM Rational Asset Manager. This database will be used by the included version
of IBM Rational Team Concert.
Before you begin
If you are using an existing Rational Team Concert server,
you can skip this task because Rational Team Concert will
already have a database.
Oracle
must already be installed and running.
You must create the database
for asset lifecycles on the same host as the database for assets.
Procedure
To set up the Oracle database for asset lifecycles:
Using the Oracle Database Configuration Assistant,
follow the steps in the wizard to create a new database.
Use global database name rtcdb,
and a system identifier (SID) rtcdb. The
global database name and the system identifier must be the same and
must be 8 or fewer characters long.
On the Character Sets page, select Use Unicode
(AL32UTF8).
Also on the Character Sets page, for National Character
Set, select UTF8 - Unicode 3.0 UTF-8.
Complete the other pages in the wizard, accepting the
default values.
Create a tablespace. The tablespace
must have the following properties:
A name other than oracle_tbs;
A location in a different directory than the oracle_tbs tablespace;
A size of at least 1 GB; for larger installations, you might need
more space.
The following command for a Windows computer shows a sample create statement:
CREATE BIGFILE TABLESPACE jazz_tbs DATAFILE 'D:\jazz_tbs\jazz_tbs.dbf' SIZE 1G AUTOEXTEND ON EXTENT MANAGEMENT LOCAL AUTOALLOCATE
Note:In
the above command, the directory D:\jazz_tbs\ must
exist.
Create a database user:
Open Database Control.
Navigate to the Users page.
(In Oracle 10.2(g), click Administration, then Users;
in Oracle 11(g), click Server, then in the
Security section click Users.)
Create a user named RAMSCHEMA that
meets the following qualifications:
You can use any valid user name. Unlike the database for assets,
a specific user name is not required.
The user has the RESOURCE and CONNECT roles.
The user's quota setting is unlimited.
The default tablespace for the user is the tablespace that you
created in step 2.
The user must have the following permissions:
ALTER ANY INDEX
ALTER ANY TABLE
CREATE ANY INDEX
CREATE DATABASE LINK
CREATE MATERIALIZED VIEW
CREATE PROCEDURE
CREATE PUBLIC SYNONYM
CREATE ROLE
CREATE SEQUENCE
CREATE SESSION
CREATE SYNONYM
CREATE TABLE
CREATE TRIGGER
CREATE TYPE
CREATE VIEW
DELETE ANY TABLE
DROP ANY INDEX
DROP ANY TABLE
INSERT ANY TABLE
UNLIMITED TABLESPACE
UPDATE ANY TABLE
Tip:Oracle provides a default
user named "Scott" that has many of the appropriate permissions. You
can use this default user as the basis for your new user account.
Restriction:To
create and use a cluster
of application servers, you must have IBM WebSphere Application Server Network
Deployment (ND), which is not bundled with IBM Rational Asset Manager.
Creating a database for asset lifecycles in Microsoft SQL Server
These are the instructions for manually creating a database
for lifecycle management for IBM Rational Asset Manager in Microsoft SQL Server. This database will be used by the included version
of IBM Rational Team Concert.
Before you begin
If you are using an existing Rational Team Concert server,
you can skip this task because Rational Team Concert will
already have a database.
SQL
Server must already be installed and running.
Procedure
To set up an SQL Server database by using the command
tool sqlcmd:
Create a Jazz Team
Server database. From the command line tool, type:
CREATE DATABASE rtcdb
GO
Change the ownership of the Jazz Team
Server database to the same user that you use for the Rational Asset Manager asset
management database. The following example command assigns the user
name ramDBuser as the owner
of database rtcdb. From
the command line tool, type:
USE rtcdb;
exec sp_changedbowner 'ramDBuser'
GO
Change the collation of the Jazz Team
Server database. From the command line tool, type:
ALTER DATABASE rtcdb COLLATE Latin1_General_CP437_CS_AS
GO
Restriction:To
create and use a cluster
of application servers, you must have IBM WebSphere Application Server Network
Deployment (ND), which is not bundled with IBM Rational Asset Manager.
Deploying
the server applications manually on WebSphere Application
Server
About this task
You can manually deploy the IBM Rational Asset Manager server
setup application, which will deploy all of the other applications,
on an existing IBM WebSphere Application Server.
Deploying the server
setup application to WebSphere Application
Server
Manually
install IBM Rational Asset Manager on
an existing installation of IBM WebSphere Application Server.
Launch the WebSphere Application Server Administrative
Console and login as an administrator.
Click Applications > Application types.
Click WebSphere
enterprise applications.
Click Install.
Type the path and file name of the Rational Asset Manager Server
setup EAR file (com.ibm.ram.repository.setup.web.ear).
Click Show me all installation options
and parameters.
Until you reach Step
9, click Next,
or click this step in the navigation pane.
On
the Summary page, click Finish.
After the EAR file is installed, click Save
to Master Configuration.
Click Save.
Start the application.
In the navigation pane, click Applications > Application types.
Click WebSphere
enterprise applications.
Select
the com.ibm.ram.repository.setup.web.ear application
and click Start.
If you access Rational Asset Manager without
a web server front end, skip this step. If you access Rational Asset Manager through
the IIS or Apache server:
In the navigation
pane, click Servers > Server
types.
Click Web
Servers.
Select the web server
name and click Generate
Plug-in. (If the web server plug-in has not been created,
see Installing web server plug-ins.)
Check the web server name again and click Propagate
Plug-in. This sends the plug-in to the web server so that
the Rational Asset Manager Server
application can be referenced through the installed web server.
Configure
the application
security and authentication settings:
Click Security.
Click Global security.
In the Administrative Security section, if
the Enable
administrative security checkbox is selected, select the Enable
application security checkbox.
In
the Authentication section, click Web
and SIP security.
Click General
settings.
In the Web Authentication
Behavior section, select the Use
available authentication data when an unprotected URI is accessed checkbox
if it is not already selected.
Click Apply.
In the Messages window, click Save
directly
to the master configuration.
Stop, and then restart WebSphere Application Server
and web servers.
To access
the Rational Asset Manager server
setup application, use the following URLs:
If
you use a web server, type http://machine_name/ram.setup/ .
For example, http://www.example.com/ram.setup/
If you do not use a web server, type http://machine_name:port/ram.setup/.
For example, http://www.example.com:13080/ram.setup/(Use
the port number for the Default Host that is defined in Virtual Hosts
under Environment in the navigation pane.)
Restriction:To
create and use a cluster
of application servers, you must have IBM WebSphere Application Server Network
Deployment (ND), which is not bundled with IBM Rational Asset Manager.
Log in to the WebSphere Application Server administrative
console.
Click Applications > New Application.
Click New Enterprise Application.
Select Local file system, then click Browse and
select the server setup application (com.ibm.ram.repository.setup.web.ear)
file on your file system.
Click Next.
Select Show me all installation options and
parameters.
Click Next until you reach Step
2: Map modules to servers section (or click that step directly).
Map the module to your cluster:
Select the com.ibm.ram.repository.setup.web module
in the table.
From the Clusters and servers list,
select the cluster where you want to deploy the server setup application.
(Later, you will use the server setup application to deploy all the
other applications to this cluster.)
Click Apply.
Click Next until you reach Step
7: Map context roots for Web modules (or click that step
directly).
Note the Context Root value. You
can change it, or accept the default of ram.setup.
Click Next until you get to Step
9: Summary.
Click Finish.
After the application installs, click Save directly
to the master configuration. While saving the
configuration, synchronize the configuration with the nodes where
you intend to use to run the application. To synchronize a node manually,
on the System Administration > Node Agents page, verify that
the node is running; then, on the System Administration > Nodes page, select the node and
click Synchronize.
Select com.ibm.ram.repository.setup.web.ear and click Start.
If you access Rational Asset Manager without
a web server front end, skip this step. If you access Rational Asset Manager through
the IIS or Apache server:
In the navigation
pane, click Servers > Server
types.
Click Web
Servers.
Select the web server
name and click Generate
Plug-in. (If the web server plug-in has not been created,
see Installing web server plug-ins.)
Check the web server name again and click Propagate
Plug-in. This sends the plug-in to the web server so that
the Rational Asset Manager Server
application can be referenced through the installed web server.
Configure
the application
security and authentication settings:
Click Security.
Click Global security.
In the Administrative Security section, if
the Enable
administrative security checkbox is selected, select the Enable
application security checkbox.
In
the Authentication section, click Web
and SIP security.
Click General
settings.
In the Web Authentication
Behavior section, select the Use
available authentication data when an unprotected URI is accessed checkbox
if it is not already selected.
Click Apply.
In the Messages window, click Save
directly
to the master configuration.
Stop, and then restart WebSphere Application Server
and web servers.
To access
the Rational Asset Manager server
setup application, use the following URLs:
If
you use a web server, type http://machine_name/ram.setup/ .
For example, http://www.example.com/ram.setup/
If you do not use a web server, type http://machine_name:port/ram.setup/.
For example, http://www.example.com:13080/ram.setup/(Use
the port number for the Default Host that is defined in Virtual Hosts
under Environment in the navigation pane.)
Deploying the server setup application to the Deployment Manager
on a WebSphere Application Server cluster
You can manually deploy the server setup application onto
the Deployment Manager by running a Jython script to place the server
setup application on the Deployment Manager server for the cluster.
Before you begin
Restriction:To
create and use a cluster
of application servers, you must have IBM WebSphere Application Server Network
Deployment (ND), which is not bundled with IBM Rational Asset Manager.
user_name is the name of a IBM WebSphere Application
Server administrator
password is the administrator's password
install_dir is the Rational Asset Manager installation
directory
context_root (optional) is the context root
to use for the server setup application; if you do not specify a value,
the context root of the server setup application will be the default ram.setup
Note:The path to the Jython script should contain backslashes
(\) on Windows and forward
slashes (/) on AIX and Linux. The path to the .ear file should contain
forward slashes, regardless of platform.
Launch the WebSphere Application Server Administrative
Console and login as an administrator.
Start the application:
In the navigation pane, click Applications > Application types.
Click WebSphere enterprise applications.
Select the com.ibm.ram.repository.setup.web.ear application
and click Start.
Creating
an application server instance for Rational Team Concert
on a WebSphere Application Server distributed server cluster
Although you cannot deploy IBM Rational Team Concert,
which is required for managing the lifecycles of assets in IBM Rational Asset Manager,
to an IBM WebSphere Application Server cluster,
you can create a single application server instance on your cell for Rational Team Concert.
Before you begin
Restriction:To
create and use a cluster
of application servers, you must have IBM WebSphere Application Server Network
Deployment (ND), which is not bundled with IBM Rational Asset Manager.
If
you already have Rational Team Concert installed
and configured, skip this task.
You must be an WebSphere administrator
to create a new server instance on a cell.
About this task
Important:Only complete this task if you are
using a clustered environment with WebSphere Application Server. If
you are not using a cluster, you can install Rational Asset Manager and Rational Team Concert on
the same application server.
Because you cannot deploy Rational
Team Concert to a cluster, you must create an additional application
server that is separate from your clustered servers. You can then
deploy Rational Team Concert to that server.
You do not need
another machine; you can create a new stand-alone application server
on any individual node in your cell.
Procedure
In a web browser, log in to the WebSphere Application Server administrative
console. By default, this is located
at:
For embedded WebSphere Application Server: http://localhost:13060/ibm/console .
The default user name is admin and the default
password is admin.
For WebSphere Application Server: http://localhost:9060/ibm/console
In the navigation pane, click and expand Servers > Server types.
Click WebSphere
Application Servers.
Click New.
Select a node for the application server.
Type a name for the application server. For example, ramTeamConcertServer. This name must be different from the names of any other application
servers on the node.
Click Next.
Select a server template. For this, you
can
use the default server template.
Click Next.
Select Generate unique HTTP ports to
assign a unique port to the new application server.
Click Next and review the settings
for the new server.
Click Finish.
Click Review, select Synchronize
changes with nodes, and then click Save.
What to do next
Your new application server is now configured.
You can
configure it further by clicking the name of the server on Servers > Application servers page.
You can improve the performance
and stability of Rational Asset Manager by
installing its web applications and the application files for the
included IBM Rational Team Concert on
separate Tomcat servers. Throughout this document, the installation
directory for the Tomcat server for Rational Asset Manager is
referred to as tomcat_install_directory.
The installation directory for the Tomcat server for Rational Team Concert is tomcat_for_rtc_install_directory.
If you are installing all the web applications on the same Tomcat
server, the directories are the same.
Note:If
you intend to deploy Rational Asset Manager and
the included Rational Team Concert on
different Tomcat server applications on the same machine, make sure
that you have configured the different Tomcat servers to use different
secure and unsecured ports to avoid collisions. For more information
about ports in Tomcat 5.5, see the Apache Tomcat documentation.
Procedure
Verify that all of the repository
servers are set to the same current date, time, and time zone.
Extract the shared library files to the tomcat_install_directory\shared\lib folder:
Find and extract the archive_extract_location\apps\tomcat\sharedLib.zip file.
Copy the entire contents
of the extracted sharedLib.zip file to the tomcat_install_directory\shared\lib directory.
If you are installing Rational Team Concert on
a different Tomcat server, copy the extracted contents of the sharedLib.zip file
to the tomcat_for_rtc_install_directory\shared\lib directory
for the other Tomcat server.
Extract the library files for Rational
Licensing Key Server V8.1.2 to
the tomcat_install_directory\shared\lib folder:
Important:If you are installing on Linux for zSeries,
do not complete this step
Find and extract the archive_extract_location\sharedLibs\rlsclients_rlsibmratl_812.zip file.
From the extracted .zip file, find the file rlsibmratl812.zip for
your operating system and architecture. For example, the file for
32-bit Windows is in the win32 directory.
Extract the contents of the appropriate rlsibmratl812.zip file.
Copy the entire contents of the extracted rlsibmratl812.zip file
to the tomcat_install_directory\shared\lib directory.
Modify the startup script for the
Tomcat server for Rational Asset Manager:
Important:If you are installing on Linux for zSeries,
do not complete this step
Find the Tomcat
startup file and open it in a text editor. On Windows, this file is tomcat_install_directory\bin\startup.bat.
On Linux, AIX, or Linux for zSeries, it is tomcat_install_directory/bin/startup.sh.
In the startup file, type the following text:
set JAVA_OPTS=-Djava.library.path="tomcat_install_directory\shared\lib"
From the archive_extract_location/apps/tomcat/ directory,
copy the following files to the tomcat_install_directory/webapps/ directory:
com.ibm.ram.repository.web.tomcat_runtime.war
com.ibm.ram.repository.web.ws.tomcat_runtime.war
ramhelp.war
rmcabdgovernprocess.war
To change the
context path of the applications, rename the WAR application files. Use the following names.
Table 8. Context paths for Rational Asset Manager web application files
Original file name
New file name
Resulting context path
What is it?
com.ibm.ram.repository.web.tomcat_runtime.war
ram.war
ram
Rational Asset Manager primary
web application for Tomcat
com.ibm.ram.repository.web.ws.tomcat_runtime.war
ram.ws.war
ram.ws
Rational Asset Manager web
services application for Tomcat
ramhelp.war
ram.help.war
ram.help
Rational Asset Manager help
and user assistance application
rmcabdgovernprocess.war
ram.process.war
ram.process
Documentation application for asset-based development
and governance processes
Configure the Tomcat server for Rational Asset Manager to
access your database:
In a text editor, open the tomcat_install_directory\conf\server.xml file.
Find any lines in server.xml that
begin with <Connector and that contain port="8080" or port="8009".
Change the beginnings of these lines to <Connector URIEncoding="UTF-8".
Between the opening and closing tags for Global JNDI
resources, <GlobalNamingResources> and </GlobalNamingResources>,
enter the following text for your version of Tomcat.
Note:For
the values your_username and your_password, use a user ID and password that
have full administrative access to the database. For example, the
"url" attribute might look like jdbc:db2://localhost:50000/RAMDB
Enter this text for your database server, replacing the following
variables:
In the username and password attributes, replace your_username and your_password with
a user ID and password that have full administrative access to the
database server.
In the url attribute, replace fully_qualified_database_server_name and database_port_number with the server address
and port number for your database, and replace Rational_Asset_Manager_database_name with
the name of the database for assets. For example, for DB2, the url attribute
might look like jdbc:db2://localhost:50000/RAMDB.
The values shown for the maxWait, maxActive,
and maxIdle attributes are sample values and can be adjusted
according to your performance needs.
Copy the following JAR files to the tomcat_install_directory\common\lib folder:
db2jcc_license_cu.jar
db2jcc.jar
ojdbc5.jar (You can download this file from Oracle. If you are using Oracle 10, download
a package for Oracle 11 to find the ojdbc5.jar file.)
sqljdbc.jar (You can download this file from Microsoft.)
These files are available from your database provider, most
likely in the /java/ folder of your database
installation.
Configure the Tomcat server
for user security. If you intend to use LDAP security, first use file-based
security to configure the applications, and after you configure the
applications, switch to LDAP authentication. For more information,
see Configuring LDAP
authentication for Tomcat.
In a text editor, open the tomcat_install_directory\conf\tomcat-users.xml file.
Add a user named admin and assign
that user the admin and manager roles.
To add this user, you can copy and paste the following text between
the <tomcat-users> tags:
Deploying the included Rational Team Concert server application
on Tomcat
IBM Rational Asset Manager requires IBM Rational Team Concert,
which controls the lifecycle functions that you can use to manage
the development of assets. If you do not already have Rational Team Concert,
a limited version of that product is included, which you can deploy
to a Tomcat server.
Before you begin
If you already deployed and configured a Rational Team Concert server
application, you can use your existing application instead of installing
a new application. To configure Rational Team Concert to
work with Rational Asset Manager,
see Configuring a Rational
Team Concert server to work with Rational Asset Manager.
You must have administrative and file
access to a Tomcat server that is installed and running.
Before you do this task, complete the
following tasks:
You must have a security certificate for your Tomcat server.
The included version of Rational Team Concert requires
a secure connection.
About this task
You can improve the performance
and stability of Rational Asset Manager by
installing its web applications and the application files for the
included IBM Rational Team Concert on
separate Tomcat servers. Throughout this document, the installation
directory for the Tomcat server for Rational Asset Manager is
referred to as tomcat_install_directory.
The installation directory for the Tomcat server for Rational Team Concert is tomcat_for_rtc_install_directory.
If you are installing all the web applications on the same Tomcat
server, the directories are the same.
Procedure
Verify that all of the repository
servers are set to the same current date, time, and time zone.
Extract the library files for Rational
Licensing Key Server V8.1.2 to
the tomcat_for_rtc_install_directory\shared\lib folder:
Important:Do not complete this step on Linux for zSeries
Find and extract the archive_extract_location\sharedLibs\rlsclients_rlsibmratl_812.zip file.
From the extracted .zip file, find the file rlsibmratl812.zip for
your operating system and architecture. For example, the file for
32-bit Windows is in the win32 directory.
Extract the contents of the appropriate rlsibmratl812.zip file.
Copy the extracted contents of the rlsibmratl812.zip file
to the tomcat_for_rtc_install_directory\shared\lib directory.
If you are installing Rational Asset Manager and Rational Team Concert on
the same application server, you already completed this step.
On the installation media, find the archive_extract_location/apps/tomcat/RTC-server.zip file.
Extract RTC-server.zip to
a location on your hard disk drive, which is referred to in these
instructions as rtc_install_dir.
Find the rtc_install_dir/jazz/server/ramjazz_war.ear file
and extract it. To extract .ear files, you can
use a free utility, such as 7-Zip. From the extracted ramjazz_war.ear package,
copy the ramjazz.war file to the tomcat_for_rtc_install_directory/webapps/ directory.
Configure a secure port
on your Tomcat server for Rational Team Concert:
Create a security certificate that identifies your Tomcat
server for Rational Team Concert for
SSL connections. You can use the Java JDK keytool command
to create a self-signed certificate. Alternatively, you can request
a certificate that is signed by a trusted certificate authority.
For more information about creating self-signed certificates
with the keytool command, see the Oracle Java documentation.
You can create a self-signed certificate with the following example keytool command:
When
you run that command, you will be prompted for a password for the
keystore file. The default password is changeit,
but you should specify a different one. You will have to remember
that password to input it into the server.xml file
later.
If you are using an IBM JRE,
many versions include the IBM tool ikeyman in
the IBM_Java_JRE_install_location/jre/bin/ directory.
You can use this tool to create and manage security certificates on
the server. For more information about using the iKeyman tool, see iKeyman User's Guide.
We also include
a simple certificate in the rtc_install_dir/jazz/server/ folder;
the certificate file is ibm-team-ssl.keystore
In the tomcat_for_rtc_install_directory\conf\server.xml file,
find the <Connector> tag with the attribute scheme="https".
The default file includes an example <Connector> tag
for port 8443 that is commented out.
keystore_file is
the file name of your keystore file. It can be an absolute path, or
relative from the root directory of your Tomcat server (tomcat_for_rtc_install_directory).
If you used the simple command above, this will be .keystore.
If you use the included certificate, this will be rtc_install_dir/jazz/server/ibm-team-ssl.keystore .
keystore_password is
the password for the keystore file. If you use the included keystore
file, this is ibm-team .
keystore_protocol is
the protocol for the keystore. Most likely it is TLS or SSL_TLS.
If you use the included keystore file, this is SSL_TLS .
keystore_algorithm is
the X509 algorithm for the keystore. Most likely it is SunX509 or IbmX509,
depending on the source of the certificate. If you use the included
keystore file, this is IbmX509 .
You can change the port value to use a port
besides 8443 for the non-SSL connector (by
default, port 8080). If you change the port
value, change the value of the redirectPort attribute
to match your port number for the SSL connector.
Copy the appropriate .jar file
from your database provider:
Copy the ojdbc14.jar file
to the rtc_install_dir/jazz/server/oracle folder
(you might need to create the oracle folder).
You
can download the file from Oracle. If you are using Oracle 11, download
the package for Oracle 10g to find the ojdbc14.jar file.
Copy the following file to the rtc_install_dir/jazz/server/sqlserver folder
(you might need to create the sqlserver folder):
sqljdbc.jar (You can download this file from Microsoft.)
Configure the
Tomcat startup property settings:
Find the Tomcat startup
file and open it in a text editor. On Windows, this file is tomcat_for_rtc_install_directory\bin\startup.bat.
On Linux, AIX, or Linux for zSeries, the file is tomcat_for_rtc_install_directory/bin/startup.sh.
In the startup file, type the following text:
Replace each space character in the rtc_install_dir with %20:
set ORACLE_JDBC=oracle_jar_dirset SQLSERVER_JDBC=sqlServer_jar_dirset JAZZ_INSTALL_DIR=rtc_install_dir
set JAVA_OPTS=-Djava.awt.headless=true -Djava.library.path="tomcat_for_rtc_install_directory\shared\lib" -DSQLSERVER_JDBC="%SQLSERVER_JDBC%" -DORACLE_JDBC="%ORACLE_JDBC%" -DDB2I_JDBC="%DB2I_JDBC%" -DDB2Z_JDBC="%DB2Z_JDBC%" -Dorg.eclipse.emf.ecore.plugin.EcorePlugin.doNotLoadResourcesPlugin=true -DJAZZ_HOME=file:///%JAZZ_INSTALL_DIR%\jazz\server\conf -Dcom.ibm.team.repository.tempDir=%TEMP% -Xmx700M
rtc_install_dir is
the extracted directory of the RTC-server.zip file.
On Windows, replace each space character in rtc_install_dir with %20
oracle_jar_dir is
the directory for the ojdbc14.jar file (rtc_install_dir/jazz/server/oracle)
sqlServer_jar_dir is
the directory of the sqljdbc.jar file (rtc_install_dir/jazz/server/sqlserver)
tomcat_for_rtc_install_directory is
the installation directory for the Tomcat server
If you are installing Rational Asset Manager and Rational Team Concert on
the same application server, use this JAVA_OPTS system
variable to replace the one that you created when you configured the startup script for the Tomcat
server for Rational Asset Manager; this
declaration still includes the -Djava.library.path option.
Find and rename the appropriate the Jazz server properties file:
In the rtc_install_dir/jazz/server/conf/ramjazz/ directory,
find the teamserver.properties file and rename
it to teamserver.derby.properties.
Find the
appropriate file for your database server:
For DB2 on Windows: teamserver.db2.win32.properties
For DB2 on Linux, AIX, or Linux for
zSeries: teamserver.db2.linux.properties
teamserver.oracle.properties
teamserver.sqlserver.properties
Rename the file to teamserver.properties.
In a text editor, open the teamserver.properties file
and modify it as follows (for your database provider):
Edit the value of com.ibm.team.repository.db.jdbc.location for
your DB2 server location, and
the name of the database for lifecycles:
Replace localhost:50000 with the location
and port for the DB2 database.
Tip:In the DB2 command
window, type db2 get dbm cfg, and then find
the line that contains SVCENAME, which indicates the DB2 port name or number. If this command displays
a number, use it as the port number (in place of 50000 in the earlier
example). If the command returns a non-numeric name, determine what
port number was assigned for this name and use that port number. On Linux, the /etc/services file
contains the mapping between port names and numbers; on Windows, the C:\windows\system32\drivers\etc\services file
contains the mapping. For more information, ask your database administrator
or see the database documentation.
Replace JAZZ with the name of the database for lifecycles.
Replace db2admin with the user name for the DB2 database.
Note:The DB2 user must have permissions to create tables,
table spaces, and to modify the database configuration. DB2 users are created by the operating system.
In the com.ibm.team.repository.db.jdbc.password property,
specify the user password.
Note:Do not change the password={password} text
in the com.ibm.team.repository.db.jdbc.location property.
In the teamserver.properties file,
add the following properties:
Where:
unsecure_port is the unsecured port for your
Tomcat server (by default, 8080)
secure_port is the secure port number for your
Tomcat server (by default, 8443)
team_temp_dir is an absolute path to a directory
for storing temporary files
Edit the value of com.ibm.team.repository.db.jdbc.location for
your Oracle server location and the name of the database for lifecycles:
Replace jazzDBUser with the user name for the
Oracle database (for example, RAMSCHEMA.
Replace @localhost:1521 with the location and
port for the Oracle database. If the location is not localhost,
you must precede the location with two forward slashes (//);
for example, @//oracleserver.example.com:1521.
Replace ORCL with the name of the lifecycle database;
for example, rtcdb.
In the com.ibm.team.repository.db.jdbc.password property,
replace JazzDBpswd with the password for the Oracle
that user you specified earlier.
Note:Do not change the {password} text
in the com.ibm.team.repository.db.jdbc.location property.
In the teamserver.properties file,
add the following properties:
Where:
unsecure_port is the unsecured port for your
Tomcat server (by default, 8080)
secure_port is the secure port number for your
Tomcat server (by default, 8443)
team_temp_dir is an absolute path to a directory
for storing temporary files
Configure the Tomcat server
for user security. If you intend to use LDAP security, first use file-based
security to configure the applications, and after you configure the
applications, switch to LDAP authentication. For more information,
see Configuring LDAP
authentication for Tomcat.
Add a user named admin and
assign that user the admin, manager, and JazzAdmins roles. To add
this user, you can copy and paste the following text between the <tomcat-users> tags:
Configuring a Rational
Team Concert server to work with Rational Asset Manager
You can manually configure a IBM Rational Team Concert server
that is required for lifecycles in IBM Rational Asset Manager.
Before you begin
To configure a Rational Team Concert server
application to work with Rational Asset Manager,
the application must be deployed to the application server and connected
to the database. If you are using IBM WebSphere Application Server,
the server setup application does this procedure for you.
The
Tomcat server for Rational Team Concert must
be running.
On the installation media, find the archive_extract_location/apps/tomcat/RTC-server.zip file.
Extract RTC-server.zip to
a location on your hard disk drive, which is referred to in these
instructions as rtc_install_dir.
Launch the Administrative web interface
of Rational Team Concert in
a web browser at https://machine_name:secure_port/jazz/admin/. Note the https; the connection must be secure.
Log in with the user
ID and password for the administrator of Rational Team Concert. If no one has logged in to Rational Team Concert before,
use the user ID and password for the administrator of the application
server.
If you are working with a new
installation of Rational Team Concert:
Configure the administrative user for Rational Team Concert:
If you see an error about "fetching server status information,"
shut down and restart both your database server and your application
server and log in again.
In the Rational Team Concert Administrative
web interface, click User Management. Ignore
any errors about an external registry not being configured.
Click Create User.
Enter the following details:
User Name: The user ID of the application
server administrator
User ID: The user ID of the application
server administrator
Email Address: A valid email address for
the application server administrator
In the Client Access License section,
select Rational Team Concert - Developer to
assign the developer license to that user.
Click Save.
Log out, and then log back in to the Administrative
web interface as the administrator of the application server.
Import the lifecycles process
template into Rational Team Concert:
In the Rational Team Concert Administrative
web interface, click Process Template Management. If you cannot see the Process Template Management link,
log out and then log back in to the Administrative web interface.
Click Import Template and browse
to the com.ibm.ram.lifecycle.zip file in the archive_extract_location/DatabaseScripts/ folder.
Then click OK. The RAM Lifecycle
template is displayed.
Create a project area in Rational Team Concert:
In the Rational Team Concert Administrative
web interface,
click Project Area Management. If
you cannot see the Project Area Management link,
log out and then log back in to the Administrative web interface.
Click Create Project Area.
Enter the following details about the project area:
Project name: RAM Lifecycle
Summary: Rational Asset Manager
Lifecycle control project area
Description: This area is used
to manage the lifecycles for Rational Asset Manager
Click Save.
Assign the appropriate memberships
and process roles for the project area:
On the Project Area Management page, click the RAM
Lifecycle project area.
In the Administrators section, click Add.
Search for and select the administrator user that you created. If
you are working with an existing Rational Team Concert application,
you can also select a different user to be administrator for this
project area.
In the Members section, click Add;
then search for and select the same user that you selected as the
administrator for the project area.
After you add the administrator, click the Process
Roles icon next to the administrator's name.
In the Edit Process Roles window, from the Available
Roles list, select Administration and
click Add.
Click Finish.
Click Save.
Stop and then restart the application
server. If you are using Rational Asset Manager and Rational Team Concert on
separate Tomcat servers, also start the Tomcat server for Rational Asset Manager. To start Tomcat, run the following file:
To finalize configuration of the server
application, a
repository administrator must perform the steps in the topics in this
section.
If you installed IBM Rational Asset Manager manually
and did not configure the server using the server setup application,
perform the steps in the topics in this section and then perform the
steps in the topics in the section entitled "Mandatory configuration."
Deploying and configuring application files by using the server
setup application
The server setup application is a browser-based web application
for IBM WebSphere Application Server that
helps you deploy the other Rational Asset Manager applications
and configure the database, security, performance, and repository
settings. You can use the server setup application to later modify
these settings instead of using the Administration pages within Rational Asset Manager web
client.
Before you begin
The server setup application helps you complete the following
tasks:
Deploy the Rational Asset Manager server
applications and the included IBM Rational Team Concert
Create and configure databases for assets and lifecycles
Configure security for the application server
To configure Rational Asset Manager,
the setup enterprise archive must be deployed and running, and the
database server must be running:
Deploy the com.ibm.ram.repository.setup.web enterprise
archive on a running application server. You can do this by using IBM Installation Manager to
install the Rational Asset Manager feature:
Install a database application, either locally or remotely, that
the Rational Asset Manager server
can access. You must have system administrative access to the database
server. If you plan to use the server setup application to configure IBM DB2,
the browser that you run the server setup application in must be on
the computer on which DB2 is
installed.
About this task
Important:The server setup application will
need to stop and restart the server - including all nodes on a cluster
- to configure Rational Asset Manager.
If you are running other applications on your server or cluster, make
the proper preparations for your server or cluster to be stopped and
restarted.
As you configure Rational Asset Manager,
the server setup application creates and updates a log file that records
all changes to your server environment. To view all of the current
changes that you made while using the server setup application, click Tools > View/hide log . A list of your current changes
will be displayed at the bottom of your browser view.
While
the log is in view, to view a complete record of all the changes that
the server setup application has made to your server environment,
click View full log .
To view the current details of your server
environment, click Tools > View
configuration report .
Procedure
Verify that all of the repository
servers are set to the same current date, time, and time zone.
On Linux, AIX, or Linux for zSeries, increase the number of file descriptors
a process might have open at once to at least 3072:
To view the current number of descriptors that can be
open at once, in the command line type: ulimit -n
If the limit is not at least 3072,
increase the limit with the following command: ulimit -n 3072
Configure the application security and authentication settings
for WebSphere Application Server:
In a web browser, log in to the WebSphere Application Server administrative
console. By default, this is located
at:
For embedded WebSphere Application Server: http://localhost:13060/ibm/console .
The default user name is admin and the default
password is admin.
For WebSphere Application Server: http://localhost:9060/ibm/console
Click Security.
Click Global security.
In the Administrative Security section, if the Enable
administrative security check box is selected, select
the Enable application security check box.
In the Authentication section, click Web
and SIP security.
Click General settings.
In the Web Authentication Behavior section, select the Use
available authentication data when an unprotected URI is accessed check
box if it is not already selected.
Click Apply.
In the Messages window, click Save directly
to the master configuration.
Stop, and then restart the server.
If you are upgrading from version
7.1.1.1 or earlier and use a WebSphere Application Server cluster
and you need to install Rational Team Concert,
you must create a stand-alone application server instance on your
cluster for Rational Team Concert.
To do so, see Creating
an application server instance for Rational Team Concert
on a WebSphere Application Server distributed server cluster. If you are not using a cluster, you do not have to do this; Rational Team Concert and Rational Asset Manager can
be installed on the same application server.
If you manually deployed
the server setup application (you did not use Installation
Manager),
on the same machine that you deployed the server setup application,
create a folder that contains the following application server files:
If
you are unable to access the machine that you deployed the server
setup application to, you will be able to upload the files later.
Open the server setup application by navigating a web browser
to http://machine_name:port_number/Server_Setup_Context_Root.
The default URL for the server setup application is:
http://localhost:13080/ram.setup for an
installation of Rational Asset Manager with
the embedded WebSphere Application Server.
http://localhost:9080/ram.setup for an
installation of Rational Asset Manager with
an existing WebSphere Application Server.
For a WebSphere Application Server Network Deployment cluster,
if you used Installation Manager to deploy the server setup application,
the hostname and port number will be for the application that you
specified in Installation Manager. If you deployed the application
in the admin console, you can access it on any application server
on the cluster after the nodes have been synchronized.
Restriction:To
create and use a cluster
of application servers, you must have IBM WebSphere Application Server Network
Deployment (ND), which is not bundled with IBM Rational Asset Manager.
If security is enabled on the application server, you will be
prompted for the user ID and password for an application server administrator.
On the Introduction page, indicate the type of database
and user authentication to use:
Select the database application that you will be using
from the Database vendor list.
Select the type of user authentication
for the Rational Asset Manager web
application to use:
LDAP: User information is stored in a Lightweight
Directory Access Protocol (LDAP) repository. To access the repository,
you need administrative information.
File: User information is stored in a custom
user registry, as defined for your application server. This information
might be displayed in the list as the name of the custom registry
as defined for the application server. An example custom user registry
is File, where user information is stored in a
flat file on the server. If you are not using any of the other types
of authentication, select this option.
Tip:File-based authentication is not intended for use in a
production environment. An LDAP or custom user registry supports common
security practices such as rules for password patterns, password expiration,
and account lockouts to prevent enumeration attacks. File-based authentication
does not support these features.
Federated Repository: User information
is stored in multiple repositories, such as LDAP repositories. This
type of authentication is managed by WebSphere Application Server.
Local Operating System: User information
is stored in the user accounts database on the local operating system.
This type of authentication is managed by WebSphere Application Server.
Rational Asset Manager requires Rational Team Concert.
Select if you must installRational Team Concert from
the Rational Team Concert server list:
I have a Rational Team Concert server
and would like to use that.: You will configure an existing Rational Team Concert to
work with Rational Asset Manager.
Confirm that the Server or Cluster listed
is the one that you want to configure. If you must create
a Network Deployment cluster for Rational Asset Manager,
see the WebSphere Application Server documentation.
Click Next.
In the Step 1: Locate Installation
Files section, click Provide the location of the files
on the server and type
the directory on the file system on the server that is running the
server setup application where the new web application files are located. If you used Installation
Manager,
the files will be at the package_group_location\ram\apps\was directory.
The following files must be in that directory:
com.ibm.ram.repository.web_runtime.ear
RTC-Server.zip
rlsclients_rlsibmratl_812.zip
ramhelp_war.ear
rmcabdgovernprocess_war.ear
If you deployed the server setup application
to an application server that is part of a cluster and you are accessing
that application server, to upload the files to the server that is
running the server setup application, click Upload the
files to the server; then click Browse and
select each of the required files.
To verify that all required application
files are in the directory, or to upload them to the server, click Verify
Location. If you uploaded the application files,
the server setup application saves them to a temporary directory.
A message verifies if all the required files are present.
If you are using a WebSphere Application Server cluster,
you might see a message that says that you do not have enough Java
heap memory to deploy the applications. If you see this message, the
server setup application has increased the heap memory to the recommended
setting. To make this change take affect, click the restart
of the server link. Your server might be unavailable for
several minutes while it restarts. After you deploy the
applications, you can change the heap memory settings for
your application servers.
In the Step 2: Select the applications and
documentation to install section, applications that are successfully
deployed are indicated with the cluster or server name that they are
deployed on. To deploy Rational Asset Manager web
applications:
Select one or more applications to deploy.
From the Clusters and servers or Servers list,
select the clusters or servers to deploy to. You cannot
deploy Rational Team Concert to
a cluster; use the single server that you created in step 4.
Note:If you
require users to authenticate (for example, through the application
server or an external firewall) to access the Rational Asset Manager help
application, you must deploy the Rational Asset Manager help
application on the same server or cluster as the Rational Asset Manager web
application.
Click Deploy Applications. A separate page opens to show the progress. The process
to deploy one or more applications can take several minutes.
Click Next to review the results.
On the Summary page, click Next.
In Section 2, Part 1, either create new databases or connect
to existing databases:
Select whether to create new databases or use existing
databases.
To create and populate new Assets and Lifecycles databases, select You
need to create both databases and then click Next.
Go to step 12b.
To create a new Lifecycle database and use an existing Assets
database, select You need to create the lifecycle database and
then click Next. Go to step 12bv.
To use an existing Assets and Lifecycles databases (for example,
if you are upgrading from a previous version of Rational Asset Manager),
select You have already created both databases and want
to modify the settings and then click Next.
Go to step 13.
Create a database.
For DB2, you can use
a Java applet to create and
populate the database, or you can perform these manually.
To use the Java applet:
After the applet loads, it searches for an instance of DB2 on the local computer. The browser
that you run the server setup application on must be on the computer
on which DB2 is installed. If
the applet finds an instance of DB2,
the location of the DB2 installation
and its version are displayed. If the applet does not find an instance,
you are prompted to enter the location.
To use a different installation of DB2,
click Change install location.
Type the User ID and Password for
the DB2 administrator. DB2 administrators are managed by the operating
system.
After you select the appropriate location, in the Create
a database for Asset Management field, type a name for
the asset database (for example, RAMDB).
If you are installing
a new Rational Team Concert,
in the Create a database for Lifecycle Management field,
type a name for the lifecycle management database (for example, RTCDB).
If you are using an existing Rational Team Concert,
you do not need to create a new database.
Click Create Database(s). This will also
populate the tables for the database for assets.
To manually create and configure the DB2 database,
click View instructions on how to manually create the DB2
DATABASE(s) and follow the displayed instructions.
For Oracle or
SQL Server, follow the instructions to manually create and populate
the database.
In Section 2, Part 2, specify the database connection
properties:
In the Database server text field,
type the host name or IP address of the database server; for example, servername.example.com.
(Do not use localhost).
In the Port field, type the port
number. For example, the default value for DB2 is 50000.
Type the user ID and password of a user with administration
authority for the database application.
Select to either provide the location of the archive
file or files required by the database on the server, or upload them
to the server. Your database vendor can provide these files.
To enter the location of the archive files on the server, type
the full path to the folder that contains them; for example, C:\Program
Files\IBM\SQLLIB\java.
To upload the files to the server, select that option and browse
to the file or files on the local computer. By default, these are
available in Rational_Asset_Manager_install_root\ram\ewas\universalDriver\lib on
the local computer. When uploaded to the server, they will be placed
in WebSphere_install_directory\profiles\profile_name\config\cells\cell_name\ram_jdbc
Note: Replace
back slashes ("\") in the directory paths with forward slashes ("/").
Note:For
Oracle, you can download the appropriate .jar files from Oracle. For Microsoft SQL Server, you
can download the appropriate .jar file from Microsoft.
Important: If you must run WebSphere Application Server or Apache
Tomcat as a non-root user, then you must set the appropriate permission
on the database Java archive
files that you upload. Refer to the instructions in Enabling database connectivity for non-root users (Linux and AIX).
In the Database name for RAM field,
type the name of the main Rational Asset Manager database;
for example, RAMDB. Then, type the User
ID and Password for a database
administrator.
In the Database name for Lifecycle field,
type the name of the Lifecycle management database; for example, RTCDB.
Then, type the User ID and Password for
a database administrator.
Click Test Connection. The server
setup application reports whether the server could connect to the
databases.
If the connection test was successful, click Next.
In Section 2, part 3, populate the databases :
For Step 5: Populate Rational Asset Manager Core
Database, click Populate the database if the
database configured with errors.
Click OK to continue configuring
the database. This process can take a few minutes.
For Step 6: Populate Rational Asset Manager Lifecycle
Database, click Populate the Database if the
database configured with errors.
Click OK to continue configuring
the database. This process can take a few minutes.
After the databases are configured, click Next.
In Section 2, Part 4, if you use DB2, you can configure database
settings to optimize the performance of Rational Asset Manager. If you are using
Oracle or SQL, you cannot configure database settings here.
If you are using DB2,
configure your database settings. Suggested values and
current values for the following parameters are listed. To change
all parameters to the recommended values, select Use recommended
values. Changes to database settings take effect when
you restart the database server.
LOCKLIST: to specify the amount of storage
that is allocated to the lock list, type a number between 4 and 60000,
inclusive.
LOCKTIMEOUT: To specify the number of seconds
that an application waits to obtain a lock, type a number between 1 and 30000.
Setting this property helps avoid global deadlocks for applications.
If the value is -1, lock timeout detection
is turned off.
LOGFILSIZ: To specify the size of each
primary and secondary log file, type a number. The size of these log
files limits the number of log records that can be written to them
before they become full and a new log file is required. If the database
has a large number of update, delete, or insert transactions running,
which will fill the log file quickly, increase the value of LOGFILSIZ.
Note:Changing
the LOGFILSIZ parameter from the default is
necessary only when there are a large number of assets in the repository
(for example, tens or hundreds of thousands).
MAXAPPLS: type a number that is greater
than the number of expected concurrent connections.
MAXLOCKS: To specify the percentage of
the lock list that is reached when the database manager escalates,
from row to table, the locks that the application holds, type a number
between 1 and 100. Although
the escalation process does not take much time, locking entire tables
versus individual rows decreases concurrency, and potentially decreases
overall database performance for subsequent attempts to access the
affected tables.
Click Next.
In Section 2, Summary, the server setup application will
prompt you to restart the server. If you plan to continue through
other sections of the server setup application, you can wait to restart
the server until you have finished those sections.
If you are finished specifying your configuration settings
(for example, if you are using the server setup application to make
changes to an existing setup), restart the server now. To restart
the server, click Tools > Restart
the server.
To continue without restarting the server, click Next.
In Section 3, configure users and authentication:
If you chose LDAP authentication in step 7b,
configure the connection to the LDAP on the Configure LDAP Authentication
page. LDAP must be running and the LDAP server must be accessible
from this computer.
Configure the LDAP repository connection. On this page, you define
the information that Rational Asset Manager server
uses to contact the LDAP server: the address of the LDAP server, the
communications port, and if necessary, a user ID and password that Rational Asset Manager will
use to query the registry.
LDAP Vendor: Select your LDAP software.
When you select a vendor, the suggested value column shows example
values for some of the properties that the LDAP server requires.
Server: Type the name of the server on
which LDAP is installed; for example, ldap.example.com.
If security is enabled on the LDAP server, check SSL enabled.
Port: type the port number of the LDAP
server.
Connect Anonymously: If your LDAP repository
does not require a user ID and password for access, select this check
box. If your LDAP repository requires a user ID and password, clear
this box and complete the Bind User DN and Bind
Password text fields.
Bind User DN: Type the distinguished name
(DN) of a user that has access to query the LDAP database. Rational Asset Manager uses
this user name to access LDAP. For example, uid=123456,c=us,ou=exampleorganization,o=example.com.
Bind password: if you typed a user DN,
type the password for the user name.
Note:If you are using LDAP authentication and a single LDAP
hostname is mapped to multiple IP address in your network configuration
then you must use the WebSphere Application Server administrative
console and click Security > Global security > Standalone LDAP registry > Configure to apply the appropriate
configuration property to prevent possible LDAP user account lockouts
if users log in to Rational Asset Manager with invalid credentials.
An
invalid login causes the server to validate the user with each IP
address and thus causes multiple login failures. If you have set a
maximum number of login attempts, one invalid logon could cause an
LDAP account lockout. To prevent this issue from occurring, follow
the steps described here: http://www-01.ibm.com/support/docview.wss?rs=180&uid=swg1PK42672
Click Test connection. If the server setup
application connects to LDAP, continue. You cannot proceed with LDAP
Authentication until a connection is configured.
Identify a user in the LDAP registry to be the Rational Asset Manager repository
administrator.
Administrator ID: Type the unique ID of
the user who will be the repository administrator for Rational Asset Manager.
The repository administrator is responsible for configuring Rational Asset Manager server. For
example (if your LDAP uses email address as the unique identifier) Administrator@example.com.
Password: type the password for the administrator
ID.
User search filter: Type the syntax that
LDAP will use to query for a user. The %v represents the search term
that was entered from an input text field. The search will run as
if a wildcard is part of the search term. The default search template
is constructed to find all person objectClasses
where either the mail property or the name property
is the same as the search term.
User search base: type the path of the
root from where to start searching the LDAP registry for users; for
example, ou=exampleorganization,o=example.com.
Click Verify the User.
If the server setup application found the user in the LDAP registry,
click Next. Do not continue configuring LDAP
authentication until a user has been identified as the repository
administrator.
On the next page, map user properties in Rational Asset Manager to
the corresponding user properties in your LDAP registry. Rational Asset Manager requires
this information for user authentication, for user data retrieval
and display, and to communicate with users by email.
Unique identifier: Type the property name
of the user's objectClass instance that represents
the unique user's ID. For example: (objectClass) person's serialNumber property,
or the (objectClass) user's sAMAccountName property.
The default value is uid.
Login identifier: Type the (objectClass)
property that users use as their login ID. Even though it is common
for the Unique ID and login ID to be the same, you can set the registry
so that a user logs in using another ID (for example, an email address).
For example, userPrincipleName.
LDAP user name query: Type the LDAP search
query that maps the short name of a user to an LDAP entry; for example, *:userPrincipleName or *:uid.
Email: Type the property name that contains
a user's email address; for example, mail.
Phone number: Type property name that contains
a user's phone number; for example, telephonenumber.
Locale: Type the property name of the user’s
email language setting; for example, zh-TW,
or leave the field blank for the default value and for users to manage
their email language setting. If the value is a language that is supported
in Rational Asset Manager, such as de, ko, ja, zh_TW, zh_CN, es, pt_BR, en, fr,
and ru), the user profiles are set with that
language preference. It the value is not valid or does not exist in
LDAP, en (English) is used by default.
Image URL Template: You can store images
somewhere other than an LDAP registry. If you can retrieve a user's
image by using a URL, configure this template to retrieve the image
at the same time as the user information in the registry. In the template,
${value} represents a LDAP user property of the user object that will
be replaced when the image is retrieved. For example, for a user with
a uid property=123456, the default template https://image_server_url/photo/${uid}.jpg results
in the URL https://image_server_url/photo/123456.jpg.
Click Test the Mapping. If all mappings
are correct, the administrator's user ID, name, email, phone number,
and photo are displayed with a success message.
Specify user group properties in LDAP. User group information
in LDAP can be retrieved and reused by Rational Asset Manager communities.
In Rational Asset Manager,
communities are the primary organizational grouping within a repository:
they are collections of users with a common interest in a set of assets,
and each community can define its members, member roles, permissions,
processes, and assets.
User group search filter: This is the filter
for searching groups. The default searches any of groupOfUniqueNames (static
group), groupOfNames (static LDAP group), groupOfUrls (dynamic
LDAP group), group (Active Directory defined group)
for the search term entered by the user.
User group search base: type the base search
for searching groups; for example, ou=memberlist,ou=groups,o=example.com.
Group ID Map: type the LDAP search query
that maps the short name of a group to an LDAP entry; for example, *:cn.
Group Member ID Map: type the LDAP search
query that identifies user-to-group relationships; for example, memberof:member.
Click Next. The Users and Authentication
Configuration summary page opens.
To complete the configuration, restart the application server.
You can also wait to restart the server until you complete the other
steps in the server setup application.
Click Next.
Note:
This configures LDAP authentication for only the Rational Asset Manager application.
If you chose File-based authentication in step 7b,
add or delete users from the list on the Configure File-based Authentication
page. File-based authentication means that user information is stored
in a text file on the server. By default there are six users ("admin"
and "user1" through "user5").
Note:The passwords for the six default
users are the same as their user IDs.
Add, edit, or delete users:
To filter the list of users, type a search string in the Search
text field and click Search. You can use wildcards (*).
To see the entire list, type * in the Search
text field.
To add a user, click Add User and type
the user's ID and password.
To delete a user, next to that user's name, click Delete.
When you are finished, click Next. The
Users and Authentication Configuration summary page opens.
To complete the configuration, restart the application server.
You can also wait to restart the server until you complete the other
steps in the server setup application.
If you chose to use a federated repository, the local operating
system, or a custom user registry (other than file-based) in step 7b,
you will be prompted to confirm that the user ID of the administrator
for the user registry will be the repository administrator. There
are no other configuration options for this type of authentication.
In Section 4, configure settings for Rational Asset Manager:
Type the address for the License server with
the format of port_number@host_name;
for example, 27000@example.com.
If
you downloaded Rational Asset Manager from
jazz.net, the field will be populated with a temporary license key.
Do not modify the key while you evaluate the product.
If you
have redundant license servers, separate multiple entries with commas.
(You must provide three servers.) For example, 27000@primary.example.com,27000@secondary.example.com,27777@tertiary.example.com.
If
you have multiple license servers (where the servers are on different
networks and have different licenses):
Separate server addresses with semicolons
(;), for example, 27000@main.example.com;27000@backup.example.com.
Separate server addresses with colons
(:), for example, 27000@main.example.com:27000@backup.example.com.
By default, Rational License
Key Server uses TCP/IP port 27000.
In the License type section, select the type of license
that the Rational Asset Manager server
will use.
Configure the address of the server with the applications
that were deployed in step 11.
Type the protocol, fully qualified host name, and port number; for
example, http://example.com:9080.
Important:Always use a host name or IP address for these entries.
Do not use localhost. If
you use IPV6, use the IPV6 hostname; an IPV6 address will not work.
Configure the paths for the applications. The
default paths are based on the server address provided.
Rational Asset Manager:
Type the deployment URL for the Rational Asset Manager server
application; for example, http://example.com:9080/ram.
Web Services: Type the deployment URL for the web services; for
example, http://example.com:9080/ram.ws
Help and User Assistance: Type the deployment URL for the Rational Asset Manager user
assistance application; for example, http://example.com:9080/ram.help.
Asset-Based Development Process: Type the deployment URL for the
Rational Asset-based Development Process application; for example, http://example.com:9080/ram.process.
To modify the locations or context roots (for example, if you
have specified different context roots in WebSphere Application Server),
click Edit.
Click Next.
Configure the storage folder locations. If you are installing
to a cluster, the cluster name is displayed and you must select the
folders for every node in the cluster; to use the settings that you
entered for the first node for all nodes, click Use these
settings for all nodes.
Note: If you are using a remote file server
or a WebSphere Application Server cluster,
the same Windows user account
(user name and password) must be able to log on to every computer
used by Rational Asset Manager.
Otherwise, Rational Asset Manager will
not be able to save files on different file servers.
Persist folder: Type the full path to the
folder where assets and search indexes are to be stored on the file
system. This can be a mapped directory. If you are installing to a
cluster, this must be a location that is shared between all of the
nodes of the cluster.
Local storage folder: Type the full path
to the folder where the Rational Asset Manager web
application will store data. This must be a location on the local
computer, not a mapped or shared location. If you are installing to
a cluster, each node in the cluster must have its own local storage
folder that is not shared with the other nodes. If you are installing
multiple servers on the same physical node, the servers should all
use the same physical local storage folder.
Index folder: Type the full path to the
folder where the Rational Asset Manager web
application will store search index files. On a cluster, each node
will have its own index folder.
Tip:For best performance,
all of these folders should be on different physical drives. The drives
should be capable of fast reads and writes, and should not be the
same drive as the operating system or application server. For cluster
installations, each computer should have its own local folder on a
hard disk that is local to the computer. Sharing a local folder between
all application servers will degrade performance.
Click Next.
For cluster installations, Java Messaging
Service (JMS) must be correctly configured for Rational Asset Manager to
communicate between servers in the cluster. Confirm that JMS is configured
correctly and click Next.
Optional: In Section 4, Part 3, configure performance
settings for WebSphere Application Server:
Configure server settings.
Class garbage collection: Optional: Type
the name of the garbage collection algorithm to use. The recommended
value is intended to result in increased server performance:
-XX:+UseParallelGC
-Xgcpolicy:optavgpause
Performance monitoring: Performance monitoring
should remain disabled. To turn on performance monitoring on the application
server, check Enable.
Maximum number of sessions: Type the number
of sessions that WebSphere Application Server will
maintain in memory. The default value is 1000.
To allow more sessions to be maintained in memory, increase this number.
JDBC maximum connections: Type a number
that is equal to or greater than the number of users that might be
logged in to Rational Asset Manager at
one time. For example, 100.
Session timeout (minutes): Type a number
for the number of minutes before a user's session times out. The default
number of minutes in WebSphere Application Server is 30.
Tip:Although reducing the Session timeout value
might allow for more users, especially if many users will be making
brief transactions, setting the timeout too low might interfere with
a user's experience or prevent users from uploading large assets.
Web container minimum size: Type the minimum
number of threads to allow in the web container. The default value
is 25 for Windows and 15 for Linux and AIX. If the processor for the server is underutilized,
increase this number; if the processor is overutilized, decrease the
number.
Web container maximum size: Type the maximum
number of threads to allow in the web container. The default value
is 50 for Windows and 30 for Linux and AIX. If the processor for the server is underutilized,
increase this number; if the processor is overutilized, decrease the
number.
Click Next.
On the Configure Java Virtual
Memory Heap Settings page, change the heap size for the server. If
you are installing to a cluster, you can set the heap size per node. The default is No setting. Before you
select one of the other options (Low, Medium,
or High), make sure that you know how much
physical memory the computer has.
Click Next. The summary
page is displayed again.
Restart the server. To restart WebSphere Application Server,
at the bottom of the page, click Restart the Server,
type the User ID and Password of
the server administrator, and click Restart. You cannot launch any of the Rational Asset Manager deployed
applications until the server has been restarted. After
the server has restarted, the Lifecycle management settings page opens.
If the server takes longer than 180 seconds to restart, navigate to
the start page of the server setup application (http://machine_name:port_number/Server_Setup_Context_Root ;
for example, http://localhost:13080/ram.setup)
to access the Lifecycle management settings page.
If you are using the embedded WebSphere Application Server,
because you have now configured security, you will have to log in
with the Username and Password of
a WebSphere Application Server administrator. After you log in, the Configure lifecycle management settings
page opens.
In the Configure Lifecycle management
settings page, type the path and login information for the Rational Team Concert application:
In Step 1, In the Rational Team Concert server field,
type the path to the Rational Team Concert location.
You must use a secure (https://) connection.
By default, this value is:
For the embedded WebSphere Application Server: https://localhost:13443/ramjazz
For an existing WebSphere Application Server: https://localhost:9443/ramjazz
For an external Rational Team Concert server: https://url:port/jazz
In Step 2, in the Jazz Administrator ID field,
type the user ID of the administrator for the Rational Team Concert server
(the default is admin); then, in the Password field,
type the password for that user (by default, this is admin). If you just installed the Rational Team Concert with
the server setup application, type the user name and password for
the application server administrator.
In Step 3, in the Project Area Name field,
type a descriptive name for the project area that will be created
for lifecycles (for example, Rational Asset Manager lifecycles).
Then, in the Project Area Administrator ID field,
type the user ID for the user that you want to be the project area
administrator. Then, type the Password for
that user. If you are using an external Rational Team Concert
server, the Project Area administrator will probably be a different
user from the Jazz server administrator. If you are installing a new
Rational Team Concert, the server setup application will suggest using
the Jazz Administrator ID as the Project Area Administrator ID.
Click Configure server. This
process might take a few minutes. After the configuration,
the Summary page appears.
On the Summary page, click Start
using Rational Asset Manager.
or click Finish. The web client
opens.
What to do next
Next, configure the email settings for Rational Asset Manager.
To do so, see Configuring email settings.
Note:Sample values in the section are for
a basic standalone environment. For a more complex installations,
the server administrator will need to customize these settings for
their environment.
The application server or servers that
host the Rational Asset Manager and Rational Team Concert server
applications must be started before you can complete the following
steps.
Procedure
Verify that all of the repository
servers are set to the same current date, time, and time zone.
Access the Rational Asset Manager server
application using the appropriate URL:
where port_number (HTTP
transport port, or WC_defaulthost) is 13080 by
default and Rational_Asset_Manager_Context_Root (context
root for the Rational Asset Manager application)
is ram by default.
For example, type:
http://localhost:13080/ram/home.faces
To
confirm the port number (WC_defaulthost) value, open the file installation
location\ram\ewas\profiles\profile1\properties\portdef.props in
a text editor and check the value of wc_defaulthost, where installation
location is the installation location of Rational Asset Manager.
where port_number (HTTP
transport port, or WC_defaulthost) is 9080 by
default and Rational_Asset_Manager_Context_Root (context
root for the Rational Asset Manager application)
is ram by default..
For example, type:
http://www.example.com:9080/ram/home.faces
To
confirm the WC_defaulthost value, open the WebSphere Application Server administrative
console and click Servers > Server
types > WebSphere application servers > server_name > Ports.
On Apache Tomcat:
http://server:8080/ram/home.faces
For
example, type:
http://localhost:8080/ram/home.faces
Log in as an application server administrator:
For WebSphere Application Server,
the default User ID and Password are admin.
For Apache Tomcat, the default User ID is admin and
the default Password is blank.
The first time that you access Rational Asset Manager,
you will see a Configuration Error page. Click the here link
and enter the administrator user ID and password at the prompts. The Configuration page opens.
In the License and Version section, specify the license
server path and select the type of license that this repository will
use:
In the License and Version section, in the Location
of license server field, type the port number, then the
full name of the lìcense server. Separated the number and name with
an At sign (@). For example, 27000@license_server_path.
If you have redundant license servers, separate multiple
entries with commas. You must provide three servers. For example, 27000@primary.example.com,27000@secondary.example.com,27777@tertiary.example.com.
If
you have multiple license servers, where the servers are on different
networks and have different licenses:
Windows: Separate server
addresses with semicolons (;). For example, 27000@main.example.com;27000@backup.example.com.
Linux, AIX, or Linux for zSeries: Separate server addresses
with colons (:). For example, 27000@main.example.com:27000@backup.example.com.
To configure the type of licenses for the repository
to use, under License Type, select either Standard edition or Enterprise
edition.
In the Database section, verify that the user in the User field
has full access to the Rational Asset
Manager and Rational
Team Concert databases. Otherwise, type the User and Password for
a database user with full permissions.
where host_name is
the host name of the application server, port_number is
the HTTP transport port , and Rational_Asset_Manager_Web_Services_Context_Root is
the context root for the Rational Asset Manager Web
Services application.
If you are using a load balancer, specify
the name of the load balancer. If you are using a web proxy server
without a load balancer specify the name of the web server. If
you use IPV6, use the IPV6 hostname; an IPV6 address will not work.
For
example, type:
http://www.example.com:9080/ram.ws
In the Internal Rational Team Concert Path
section, specify the path and login information for IBM Rational Team Concert:
In the Path field, enter the
secure path for Rational
Team Concert server. For example, https://www.example.com:9443/jazz. If
you use IPV6, use the IPV6 hostname; an IPV6 address will not work.
In the User and Password fields,
type the user name and password of the user that is the administrator
for the "RAM Lifecycles" project area on Rational Team Concert. In simple
installs, this will probably be the Rational Team Concert and application
server administrator.
In the Custom user
registry section, if you have configured your web server
to use LDAP authentication, you can configure Rational Asset Manager to
use the LDAP registry to perform user authentication, retrieve user
information, and leverage group bindings:
If you intend to use a custom user class, select the Use
a custom user registry checkbox and type the fully qualified
class path in the Class field. Otherwise,
leave the default value for the Class field.
In the Administrator ID field,
type the login ID of a registry user that will have repository administrator
permission for Rational Asset Manager. You must provide a valid repository administrator, or else you
will be unable to log on to Rational Asset Manager as
a repository administrator to further configure the application.
Click Configure and enter the
following information to configure the relationship between Rational Asset Manager and
the LDAP registry. If you leave a value empty, it will
revert to the default value. If you want a value to be null, enter
a space (" ") character.
Table 9. LDAP registry configuration options
LDAP configuration field
Description
LDAP Server's URL
The URL to the LDAP server; for example, ldap://hostname:389.
For secure communication, use ldaps://hostname:636.
User's Distinguished Name
A user name to use to log in to the registry
in order to gain access. Enter the distinguished name of the user,
for example, uid=123456,c=us,ou=exampleorganization,o=example.com.
The password for the user
The password for the user above.
A unique ID property for the user
The property name of the objectClass instance
for the user that represents the unique ID. For example: (objectClass)
person's serialNumber property, or the (objectClass)
user's sAMAccountName property.
User's Login ID property
The (objectClass) property that a user uses
to log in. Even though it is common for the unique ID and login ID
to be the same, it is possible that the registry may be set so that
a user logs in using another ID (for example, using an email address).
Note that the Login ID property must be the same as the administration
user's login ID in step 9b.
User's Phone Number property
The (objectClass) property that represents the
telephone number of the user. For example: (objectClass) person's
telephonenumber property.
User's Email property
The (objectClass)'s property representing the
email address of the user. For example: (objectClass) person's mail property.
User's display name property
The (objectClass) property representing the
name for the user to display in the interface. For example: (objectClass)
person'scn property.
Locale property
The (objectClass) property representing the
language for the user to display the interface in. For example: es
LDAP User base searching
To avoid searching parts of the registry that
do not contain user objects, enter the value of the path of the root
from where to start the search. For example, ou=exampleorganization,o=example.com.
User search filter
The template to use when searching for a user.
The %v represents the search term that was entered from an input
text field. The search will perform as if a wild card is appended
to the search term. The default search template is constructed to
find all person objectClasses where either the mail property or the
name property is the same as the search term.
LDAP Group base search
Similar to a base search, this is the base search
for searching groups. For example, ou=memberlist,ou=groups,o=example.com.
Group search filter
Similar to the user based filter, this is the
filter for searching groups. The default searches any of groupOfUniqueNames (static
group), groupOfNames (static LDAP group), groupOfUrls (dynamic
LDAP group), group (Active Directory defined group)
for the search term entered by the user.
Image URL template
It is common to store images somewhere other
than an LDAP registry. You can retrieve a user's image using a URL
by configuring this template to retrieve the image at the same time
as the user information in the registry. In the template, ${property}
represents a LDAP objectClass property of the user object that is
going to be replaced when the image is retrieved. For example, for
a user with a uid property=123456, the default
template https://ImageServer_url/photo/${uid}.jpg results
in the URL https://ImageServer_url/photo/123456.jpg.
Note:If you are using LDAP authentication and a single LDAP
hostname is mapped to multiple IP address in your network configuration
then you must use the WebSphere Application
Server administrative console to apply the appropriate configuration
property to prevent possible LDAP user account lockouts if users log
in to Rational Asset Manager
with invalid credentials.
An invalid attempt to log in causes the
server to validate the user with each IP address and thus can cause
multiple failures. If you have set a maximum number of attempts to
log in, one invalid attempt could lock you out of your LDAP account.
To prevent this issue from occurring, follow the steps described
here: http://www-01.ibm.com/support/docview.wss?rs=180&uid=swg1PK42672
Optional: To configure Rational Asset Manager to
perform some processing with a remote Java executable,
which can improve performance, see Configuring
remote processes.
Otherwise, select Use Web Server's JRE.
In the Disk Storage section, configure disk storage for
assets and index files:
Note: If you are using a remote file server
or a WebSphere Application Server cluster,
the same Windows user account
(user name and password) must be able to log on to every computer
used by Rational Asset Manager.
Otherwise, Rational Asset Manager will
not be able to save files on different file servers.
From the Persist type list, select
how you want to store assets.
If you are using the file system to store assets, type
the location in the Persist folder field; for
example, d:\RAMStorage. On a cluster,
the persist folder must be on a shared drive that all servers on the
cluster can access. For Linux and UNIX systems, if the persist location
is on a shared location on a remote system, the remote location must
be mounted to a local directory on the Rational Asset Manager server.
In the Local folder field, type
the full path to the folder where you want to store temporary data
used by the web application; for example, e:\RAMlocalfolder. It must be on a local hard drive for the server; it must not
be a shared drive. If you are installing to a cluster, each node in
the cluster must have its own local storage folder that is not shared
with the other nodes. If you are installing multiple servers on the
same physical node, the servers should all use the same physical local
storage folder.
In the Index folder field, type
the full path to the folder where you want to store search indexes. It must be on a local hard drive for the server; it must not
be a shared drive.
To improve performance, all three folders should be on different
physical drives.
where server is
the host name of the application server, and port_number is
the HTTP transport port, and Rational_Asset_Manager_Context_Root is
the context root of the Rational Asset Manager application.
If
you are using a load balancer, specify the name of the load balancer.
If you are using a web proxy server without a load balancer specify
the name of the web server. If
you use IPV6, use the IPV6 hostname; an IPV6 address will not work.
For
example, type:
http://www.example.com:9080/ram
Specify the documentation path:
In the Path to Information center field,
if the documentation web application is on the same server as the
server application, check Use default. Otherwise,
clear the Use default check box and type the
URL where the help web application is installed; for example, http://server.com:port/ram.help. If
you use IPV6, use the IPV6 hostname; an IPV6 address will not work.
Attention: Whether you install the documentation
web application on the same server or a different server, the public
information center content is loaded automatically into the application.
If you do not have internet access or prefer to install the help plugins,
from the help server you can open the Local Help Updater with the
URL http://127.0.0.1:port/help/updater/updatewar.jsp and
install the plugins. To change the help preferences, open the URL http://server.com:port/ram.help/remote/remotehelp.jsp.
Under Path to Asset-based Development process, if the
Asset-based Development and Governance Process documentation web application
is on the same server as the server application, check Use
default. Otherwise, clear the Use default check
box and type the URL to where the help web application is installed;
for example, http://server.com:port/ram.process. If
you use IPV6, use the IPV6 hostname; an IPV6 address will not work.
In the Job Schedules section, configure how frequently
certain repetitive jobs will run:
Statistics index builder schedule is
the schedule for updating information provided in the Repository Statistics
page, the Asset Statistics page, and the home page.
The Process subscriptions schedule is
the schedule for sending email subscriptions to subscribers. Typically,
this would be scheduled to run once per day.
The User/group information update schedule is
the schedule for how often information is updated from, and written
to, the user directory. Information in an LDAP registry is not updated
through this process, however; any recent updates to the information
in an LDAP registry is updated in the Rational Asset Manager user information.
The Review process notifications schedule is
the schedule for processing alerts to reviewers indicating that an
asset requires their review. For example, if set to one hour, then
the notifications for all new assets created within the hour are sent
at the beginning of the next hour.
The Artifact cache refresh schedule is
the schedule for refreshing the cache of artifacts that have been
downloaded.
For each job in the Job Schedules section, edit the frequency
for the jobs. Click Edit, and then select from
the following options:
To run the job at a certain interval of hours or minutes,
select Schedule job to run at interval, type
a number, and then select Minutes or Hours from
the drop-down list.
To run the job once per day or once per week, select Schedule
job to run at a set time, select Every day or
a specific day of the week, and then select a time from the drop-down
list.
Configure performance options:
In the Performance Options section, if you do not want Rational Asset Manager to
automatically generate thumbnails of artifacts that you attach to
assets, clear the Automatically create featured content
on asset submission checkbox. This can improve
performance when submitting assets to the repository. If this setting
is checked, when you submit an asset, preview images will be automatically
created for up to 3 artifacts that contain the following extensions: .doc, .ppt, .pdf, .odt, .odp,
and .otp.
If you do not want the search engine to consider the
popularity of assets, clear the Enable popularity indexing checkbox. Clearing the checkbox can improve the performance for large
repositories; however, the search engine will not use factors such
as downloads and page views to deliver more relevant results.
In the Maximum number of sessions per user field,
type the maximum number of sessions a single user can open.
Click on the Help link. (If the
help system does not open, check that you included the documentation
when you installed Rational Asset Manager server.)
In the navigation pane of the Help, navigate to Configuring > Configuring Rational
Asset Manager > Optional configuration. Depending on your configuration, you might have to
configure other aspects of Rational Asset Manager.
Set up the location of the SMTP server and information
to use for sending email messages to users. This information is used
to send email messages for user subscriptions and other notifications.
Procedure
Log on to the IBM Rational Asset Manager web
client as a repository administrator.
Click Administration.
Click Configuration.
Locate the Email section of the Configuration page.
In the SMTP server text field, type
the location of the Simple Mail Transfer Protocol server; for example, smtp.example.com.
In the Default return email text
field, type the email address to be used in the reply-to field of
automated outgoing messages.
In the Default return email name text
field, type the name to be used in the name field of automated outgoing
messages.
Click Save.
Configuring SMS settings
To send SMS asset notifications to cell phones, you must
set up the mobile phone carriers to receive the messages.
Before you begin
You can find most SMS email extensions by typing this query
into a search engine on the internet: carrier email
extension, where carrier is
the name of the mobile phone service provider. If you are unable to
find a specific email extension by a search, you can contact the mobile
phone provider to obtain the SMS email extensions. These email extensions
are provided by the carrier and cannot be customized.
Remember:If a mobile
phone carrier does not support the SMS email extension format, SMS
notifications cannot be sent to the users who have chosen to use that
mobile phone carrier.
About this task
This table lists the mobile phone carriers that are provided
by default in IBM Rational Asset Manager.
Table 10. Mobile phone carriers
Mobile phone carrier
SMS email extension
AT&T
@txt.att.net
Sprint
@messaging.sprintpcs.com
T-Mobile
@tmomail.net
Verizon Wireless
@vtext.com
Virgin Mobile
@vmobl.com
Procedure
Log on to the Rational Asset Manager web
client as a repository administrator.
Click Administration.
Click Configuration.
Locate the SMS section of the Configuration page.
In the Mobile phone carrier field,
type the name of the service provider.
In the SMS email extension field,
type the domain for the mobile phone carrier.
Click Save.
What to do next
If you delete the default phone carriers from the Configuration
page, you can restore them by clicking Restore default
mobile phone carriers.
Before you do the following procedure,
you must deploy and configure both Rational Asset Manager and Rational Team Concert by
using file-based security:
If you installed Rational Team Concert on
a separate Tomcat server, you do not need to configure LDAP authentication
for Rational Team Concert;
the included Rational Team Concert uses
a single user, so file-based security is sufficient.
Follow
the instructions in the topics below to configure both Rational Asset Manager and Rational Team Concert on
Tomcat to use LDAP authentication.
Configuring the Tomcat server for Rational Asset Manager to
use LDAP
You must configure both Rational Asset Manager and
the Tomcat server to use LDAP authentication.
Procedure
Log in to the Rational Asset Manager web
client as the server administrator and configure Rational Asset Manager
to use LDAP authentication. Be sure to specify the user ID for the
repository administrator in the Administrator ID field,
or else you cannot log in to Rational Asset Manager later. For more
information, see step 9 in Configuring the Rational Asset
Manager server application.
Log out of Rational Asset Manager.
Shut down the Tomcat server.
Configure the Tomcat server for Rational Asset Manager to
use LDAP:
In a text editor, open the tomcat_install_directory/conf/server.xml file.
Find the Realm tag
and edit it with the appropriate values for your LDAP server:
Table 11. LDAP Properties needed for Rational Asset Manager and Rational Team Concert
LDAP Property
Definition
connectionURL
The location and port for the LDAP server
connectionName
The distinguished user name that is used to
connect to the LDAP repository
connectionPassword
The password for the distinguished user
userBase
When you search for a user, this is where to
start the search.
userSearch
The LDAP search filter to use to select the
user entry after substituting the user name in {0}.
userSubtree
To enable LDAP searches of the entire subtree,
set to this value to true.
roleBase
The base entry for the role search
roleName
An LDAP entry that contains the name of the
role
roleSearch
The LDAP filter that is used for searching groups
roleSubtree
To enable LDAP searches of the entire roles
subtree, set this value to true.
Restart the Tomcat server.
Results
Now you can log in to Rational Asset Manager as
a repository administrator by using the ID that you specified in Rational Asset Manager.
Note:Tomcat
no longer uses file-based authentication. You can create communities
and assign other LDAP users to be administrators.
What to do next
If the included Rational Team Concert is
on the same server, or it is on a different server and you want it
to use LDAP authentication, you must configure Rational Team Concert to
use LDAP.
Configuring Rational Team Concert on Tomcat to use LDAP
You can configure the included IBM Rational Team Concert running
on Apache Tomcat to use LDAP.
Before you begin
You must have administrative access to the Tomcat server.
Unlike Rational Asset Manager, Rational Team Concert uses
LDAP groups to determine user roles. You must be able to create LDAP
groups, or know the names of LDAP groups that you can remap to the
appropriate roles for Rational Team Concert.
About this task
Complete the following procedure only if you meet either
of these requirements:
The included Rational Team Concert is
on the same Tomcat server as Rational Asset Manager and
you have configured Rational Asset Manager to
use LDAP authentication.
The included Rational Team Concert is
on a different server and you want to use LDAP authentication for
the single user.
Table 12. LDAP Properties needed for Rational Asset Manager and Rational Team Concert
LDAP Property
Definition
connectionURL
The location and port for the LDAP server
connectionName
The distinguished user name that is used to
connect to the LDAP repository
connectionPassword
The password for the distinguished user
userBase
When you search for a user, this is where to
start the search.
userSearch
The LDAP search filter to use to select the
user entry after substituting the user name in {0}.
userSubtree
To enable LDAP searches of the entire subtree,
set to this value to true.
roleBase
The base entry for the role search
roleName
An LDAP entry that contains the name of the
role
roleSearch
The LDAP filter that is used for searching groups
roleSubtree
To enable LDAP searches of the entire roles
subtree, set this value to true.
Configure four LDAP groups for Rational Team Concert.
Create four groups:
JazzAdmins
JazzDWAdmins
JazzUsers
JazzGuests
The user who is the Rational Team Concert server
administrator must be in the JazzAdmins group. To add the
user to the group, complete either of these steps:
In LDAP, create a group called JazzAdmins, and add the
Tomcat server administrator to that group.
You can map existing LDAP group names to the group names required
for Rational Team Concert.
Modify the tomcat_for_rtc_install_directory/webapps/jazz/WEB-INF/web.xml file
as described in TN0030:
User management for Jazz servers in Tomcat. If that file does
not exist, start and then stop your Tomcat server; the file will exist
after the ramjazz.war application is deployed.
For more information about creating LDAP groups,
see the documentation for your LDAP server.
Restart the Tomcat server.
Remove the developer license from the old administrative
user:
Launch the Administration web user interface of Rational Team Concert in
a web browser at https://machine_name:secure_port/jazz/admin/. Note the https; the connection must be secure.
Log in with the user ID and password for the new administrative
user that is a member of the JazzAdmins LDAP group.
Click User Management.
Click the name of the previous administrative user.
In the Client Access License section, clear the selected Rational
Team Concert - Developer license.
Click Save.
Add the new administrative user:
Click Create user.
Enter the following details:
User Name: The user ID (LDAP login) of
the new server administrator
User ID: The user ID (LDAP login) of the
new Tomcat server administrator
Email Address: A valid email address for
the Tomcat server administrator
In the Client Access License section,
select Rational Team Concert - Developer to
assign the developer license to that user.
Click Save.
Log out, and then log back in to the Admin Web UI as
the new administrator of the application server.
Assign the appropriate memberships and process roles for
the new administrator:
On the Project Area Management page, click the RAM
Lifecycle project area.
In the Administrators section, click Add.
Search for and select the administrator user that you created. If
you are working with an existing Rational Team Concert application,
you can also select a different user to be administrator for this
project area.
In the Members section, click Add;
then search for and select the same user that you selected as the
administrator for the project area.
After you add the administrator, click the Process
Roles icon next to the administrator's name.
In the Edit Process Roles window, from the Available
Roles list, select Administration and
click Add.
Click Finish.
Click Save.
Stop and then restart the Tomcat server.
Change the information about the administrative user for Rational Team Concert in Rational Asset Manager:
In a web browser, log in to the Rational Asset Manager as
a repository administrator.
Click Administration > Configuration.
In the Internal Rational Team Concert Path section,
update the User and Password fields
for the new Rational Team Concert administrator.
Click Save.
Tuning the performance of Rational Asset
Manager
The performance of IBM Rational Asset Manager heavily
depends on how you tune your application server, database, web server,
caching proxy, load balancer, and operating system. This section provides
guidelines for how to tune these systems and Rational Asset Manager.
Although it is not possible to cover every setting, this is a starting
point for driving high user loads on Rational Asset Manager.
The Rational Asset Manager configuration
page has settings that you can adjust to achieve optimal performance.
This page can be accessed by any repository administrator.
Local and index folders / Do not use a remote
or shared folder
For best performance, each application server
should have its own local and index folders on a hard disk local to
the computer. This should not be the same hard disk on which the application
server or operating system is installed.
To set the parameter,
log in to Rational Asset Manager as
an administrator and navigate to Administration > Configuration; in the Disk Storage
section, set the Local folder and Index
folder parameters.
Slow responses when searching for assets
Popularity indexing / Disabled
The search engine can consider the popularity
(for example, views and downloads) of assets to deliver more relevant
search results; however, this can affect the performance of large
repositories.
To disable popularity indexing, log in to Rational Asset Manager as
an administrator and navigate to Administration > Configuration; in the Performance
Options section, clear the Enable popularity indexing checkbox.
Slow responses when searching for assets.
Index folder / Use a fast dedicated drive for
the index folder
It is important that the index folder resides
on a dedicated drive that is not used for other purposes. Separating
the local folder and index folder helps to ensure quick response times
when searching for assets.
To set the parameter, log in to Rational Asset Manager as
an administrator and navigate to Administration > Configuration; in the Disk Storage
section, set the Index folder parameter.
General performance issues at regular intervals
Statistics index builder schedule / 10 minutes
Frequently running the statistics index builder
leads to poor performance. A default setting of 10 minutes is adequate
for most environments.
To set the parameter, log in to Rational Asset Manager as
an administrator and click Administration > Configuration; then, in the Job
Schedules section, locate the Statistics index builder
schedule and click Edit.
General performance issues at regular intervals
Process subscriptions schedule / Set time for
low workload periods
Subscriptions can be processed at custom
intervals. For better performance, set this interval to a time when Rational Asset Manager experiences
a relatively low workload.
To set the parameter, log in to Rational Asset Manager as
an administrator and navigate to Administration > Configuration; then, in the Job
Schedules section, locate the Process subscriptions schedule and
click Edit.
General performance issues at regular intervals
User and group information update schedule
/ Set time for low workload periods
User and group information can be processed
at custom intervals. For better performance, set this interval to
a time when Rational Asset Manager experiences
a relatively low workload.
To set the parameter, log in to Rational Asset Manager as
an administrator and navigate to Administration > Configuration; then, in the Job
Schedules section, locate the User / group information
update schedule and click Edit.
General performance issues at regular intervals
Review process notifications schedule / Set
time for low workload periods
Review process notifications can be processed
at custom intervals. For better performance, set this interval to
a time when Rational Asset Manager experiences
a relatively low workload.
To set the parameter, log in to Rational Asset Manager as
an administrator and navigate to Administration > Configuration; then, in the Job
Schedules section, locate the Review process notification
schedule and click Edit.
Out of memory errors in logs - session issues
Maximum number of sessions per user / 10
It's possible for a single user to exhaust
all available sessions on a server. This might be the result of a
poorly written script or a denial of service attack. To prevent against
this possibility the default maximum sessions per user is set to 10.
After a user reaches this limit they will not be able to create new
sessions on the server.
To set the parameter, log in to Rational Asset Manager as
an administrator and navigate to Administration > Configuration; in the Performance
Options section, set the Maximum number of sessions per
user parameter.
Submitting an asset is slow
Automatically create featured content on asset
submission / Disabled
When you submit an asset, Rational Asset Manager creates thumbnail
images of artifacts that are attached to the asset. If the asset has
many artifacts, submitting an asset can take a long time.
To
disable the automatic creation of those thumbnails, log in to Rational Asset Manager as
a repository administrator and navigate to Administration > Configuration; in the Performance
Options section, clear the Automatically create featured
content on asset submission checkbox.
In addition to the above parameters, administrators can access
the Job Status page in Rational Asset Manager by
navigating to Administration > Tools > View Job Status. This page will display currently running or previously
run jobs that might impact performance in Rational Asset Manager.
Error messages might also display on the Job Status page.
Application server tuning
Rational Asset Manager works
closely with your application server; therefore, optimizing your application
server settings will improve the performance of Rational Asset Manager.
This
section specifically covers IBM WebSphere Application Server,
version 7.0 settings
that significantly affect performance. You can also adjust these
setting in WebSphere Application Server 7.0,
but the instructions to set the parameters might be different.
Important:Back up your WebSphere Application Server profile
before changing any parameters.
Table 14. Cross-Platform WebSphere Application Server Tuning Parameters
Problem
Parameter / Setting
Additional Details
Session timeout issues
Maximum In-Memory Session Count / Default
By default, WebSphere Application Server will
maintain up to 1000 sessions in memory. However, the Allow Overflow
option is also selected, which indicates that additional sessions
will be stored in a secondary session table. If you expect to have
more than 1000 in memory sessions, you must increase the number for
the secondary session table.
If you want to limit the number
of sessions to prevent out of memory errors, make sure the Allow
overflow checkbox is not selected and set the Maximum
in-memory session count to an appropriate setting for your system.
To
set the parameter, log in to the WebSphere Application Server Administrative
Console and navigate to Servers > Application Servers > Server types > Server name > Session
Management > Maximum in-memory session count.
Out of memory errors in logs
Java Virtual
Machine heap size / Between 1300 and 2000
On a server with 4GB of memory is installed,
you can specify two instances with a heap size of 1300MB, or one instance
with a heap size of 2000MB. You must watch the system paging to make
sure that there is enough memory available. If your server has 8GB
of memory, then specify 2 instances with a heap size of 2000MB for
each instance.
To set the parameter, log in to WebSphere Administrative Console and navigate
to Servers > Server types > WebSphere application servers > Java
and process management > Process definition > Java virtual machine > Initial heap
size and Maximum heap size.
Note
that this setting should be applied to the Rational Asset Manager servers.
The required setting for the IBM Rational Team Concert server
is 768MB and is the default value and the maximum setting is 2048MB.
In a cluster, the IBM Rational Team Concert server
may be installed on its own node if needed.
Out of memory errors in logs - session issues
Session Timeout / Default (30 minutes)
The default value for a session timeout in WebSphere Application Server is
30 minutes. Setting this value to a shorter time allows for more
users, especially if you have many users making quick transactions.
Setting this value too low might not allow users to upload very large
assets. Remember that most users do not explicitly log out when they
are done with a transaction: most sessions will exist until they timeout.
To
set the parameter, log in to the WebSphere Application Server Administrative
Console and navigate to Servers > Server types > WebSphere application
servers > Server name > Session management > Set timeout.
Downloads for large assets are failing, possibly
with Async or IO errors
The default value for a write timeout from
the server to a client in WebSphere Application Server is
60 seconds. Setting this value to a longer time may prevent failures
when download files, especially if the client that is downloading
the files has a slow connection or is making many requests.
To
change the parameter, log in to the WebSphere Application Server Administrative
Console and navigate to Servers > Server types > WebSphere application
servers > Server name > Ports > View associated transports
(for the port that you are using for Rational Asset Manager; for example,
9080) > WCInboundDefault > HTTP
inbound channel (HTTP 2) > Write timeout.
Periodic slowness; observed performance spikes
due to garbage collections
Class Garbage Collection / Xgcpolicy:optavgpause
(for WebSphere Application
Server v6.1 Fix Pack 16 and below) or -Xgcpolicy:gencon (for WebSphere Application Server
v7 and v6.1 Fix Pack 17 and above)
Your specific server environment or workload
might benefit from one of the other garbage collection settings.
See http://www.oracle.com/technetwork/java/gc-tuning-5-138395.html
for more information on garbage collection settings.
To set
the parameter, log in to the WebSphere Application Server Administrative
Console and navigate to Servers > Server types > WebSphere application
servers > Server name > Java and process management > Process
definition > Java virtual machine > Generic JVM arguments.
Server fails during transfer of large files;
possibly with out of memory or malloc errors in logs
Web container custom property channelwritetype
/ synchronous data transfer (sync)
The use of asynchronous data transfer might
require an excessive number of buffers to send data over a TCP/IP
connection.
In the WebSphere Application Server Administrative
Console, navigate to Servers > Server types > WebSphere application
servers > Server name > Web Container Settings > Web Container > Custom Properties.
Click New.
Add the following pair:
Name: com.ibm.ws.webcontainer.channelwritetype
Value: sync
Click OK and then save the configuration.
Restart the application server to pick up the property.
For
a deployment manager:
Start an interactive wsadmin session:
dmgr-profile-root\bin>wsadmin -lang jacl
Copy the following block of lines, then paste them all at once
at the wsadmin> prompt:
set dmgr [$AdminConfig getid /Server:dmgr/]
set webcontainer [$AdminConfig list WebContainer $dmgr]
$AdminConfig create Property $webcontainer {{name com.ibm.ws.webcontainer.channelwritetype} {value sync}} properties
$AdminConfig show $webcontainer
$AdminConfig save
Restart the deployment manager to pick up the property.
By default, WebSphere Application Server enables
basic performance monitor infrastructure (PMI). Although PMI is a
good tool for tuning an application server, for maximum performance,
disable this feature after the server has been properly tuned. You
must disable it for all instances and node agents.
To set the
parameter, log in to the WebSphere Application Server Administrative
Console and navigate to Monitoring and Tuning > Performance Monitoring Infrastructure (PMI) > Server name > Enable
Performance Monitoring Infrastructure (PMI).
Database connection errors
JDBC Maximum Connections / 100
Make sure that there are enough JDBC connections
available to support all users that are logged into Rational Asset Manager.
To
set the parameter, log into the WebSphere Application Server Administrative
Console and navigate to Resources > JDBC > Data sources > <Rational Asset Manager data
source> > Connection pool properties > Maximum connections.
Refer
also to topic "MAXAPPLS and MAXAGENTS parameters" under DB2 tuning.
Refer also to topic "Maximum
number of processes for AIX and Linux" under operating system tuning.
General performance issues
Prepared Statement Cache / 100
WebSphere Application Server provides
the ability cache commonly used prepared statements. If cached statements
are being discarded, turn on PMI in WebSphere Application Server and
increase the value.
To set the parameter, log in to the WebSphere Application Server Administrative
Console and navigate to Resources > JDBC > Data sources > <Rational Asset Manager data
source> > WebSphere Application Server data source
properties > Statement cache size.
Refer also to topic "Further Information for
Tuning WebSphere Application Server."
Table 15. AIX / Linux WebSphere Application Server Tuning Parameters
Problem
Parameter / Setting
Additional Details
CPU is being overused or underused
WebContainer Pools / 30
Web container threads are used by the application
server to handle requests. If you notice that the CPU of the server
is underused, try increasing this number. If it is overused, try
reducing this number. Do not set the web container threads above
50.
To set the parameter, log in to the WebSphere Application Server Administrative
Console and navigate to Servers > Server types > WebSphere application
servers > Server name > Thread pools > WebContainer.
Minimum size: 15
Maximum size: 30
Table 16. Windows WebSphere Application Server Tuning Parameters
Problem
Parameter / Setting
Additional Details
CPU is being overused or underused
WebContainer Pools / 50
Web container threads are used by the application
server to handle requests. If you notice that the CPU of the server
is underused, try increasing this number. If it is overused, try
reducing this number. Do not set the web container threads above
50.
To set the parameter, log in to the WebSphere Application Server Administrative
Console and navigate to Servers > Server types > WebSphere application
servers > Server name > Thread pools > WebContainer.
Minimum size: 25
Maximum size: 50
In addition to these parameters, you can tune WebSphere Application Server under
a specific workload by turning on Performance Monitor Infrastructure
(PMI). This will provide detailed graphs showing performance data.
Although you should have PMI turned on under a normal workload to
capture data, this will decrease performance and it should be turned
off after data capture is complete.
To enable PMI, log in to
the WebSphere Application Server Administrative
Console and navigate to Monitoring and Tuning > Performance Monitoring Infrastructure (PMI) > Server name > Enable
Performance Monitoring Infrastructure (PMI).
To improve the performance of Rational Asset Manager,
you should tune your database using the parameters and values below
as a guide. However, if you install Rational Asset
Manager by using the server setup application the performance tuning
settings provided in this section will be set and you can skip this
section if you choose to use these recommended settings.
Note:This
section is specific to DB2 version
9.7, but many of the parameters here are available in other versions
of DB2. There might be similar
parameters in Oracle and SQL Server.
Table 17. Cross-Platform DB2 Tuning Parameters
Problem
Parameter / Setting
Additional Details
No connections available
MAXAPPLS / AUTOMATIC (WebSphere Application Server maximum JDBC
connections * the number of instances)
Make sure that MAXAPPLS is set high enough
to handle the number of JDBC Connection Pools that are specified in
your application server. The MAXAPPLS setting must be greater than
or equal to the JDBC Maximum Connections setting.
Setting location:
Database parameters
Also refer to topic "JDBC Maximum Connections"
under Application Server Tuning
No connections available
MAXAGENTS / AUTOMATIC (WebSphere Application Server maximum JDBC
connections * the number of instances)
This setting is for DB2 version 9.5 and earlier; it is not available
in DB2 version 9.7.
Make
sure that MAXAGENTS is set high enough to handle the number of JDBC
Connection Pools that are specified in your application server. The
MAXAGENTS setting must be greater than or equal to the JDBC Maximum
Connections setting.
Setting location: Instance parameters
Also
refer to topic "JDBC Maximum Connections" under Application Server
Tuning
Deadlocks
MAXLOCKS / AUTOMACTIC (80)
The MAXLOCKS parameter indicates the maximum
percentage of available locks within DB2 that
an application can hold before escalating row locks to table locks.
These table locks can result in deadlocks.
Setting location:
Database parameters
Deadlocks
LOCKLIST / AUTOMATIC (20000)
The LOCKLIST parameter represents the available
memory for locks in DB2. You
can use the following formula to set this parameter in a specific
environment:
LOCKLIST = [(512 * 64 * MAXAPPLS) / 4096]*2
Do
not set this higher than the memory heap that is available to DB2. Setting location: Database
parameters
Deadlocks
LOCKTIMEOUT / 60
If a single lock is stopping other transactions,
this can result in a deadlock. To make sure this does not happen,
set the lock time out to 60 seconds.
Setting Location: Database
parameters
General performance issues
Statistics / Schedule regular runs
Running statistics against the tables will help
the optimizer determine the best path for accessing data. Statistics
should be run on a regular basis or scheduled automatically.
Errors during database migrations
LOG_FIL_SIZ / 10000
The migration function in Rational Asset Manager might
not work on databases with thousands of assets of the LOG_FIL_SIZ
is set too low.
Table 18. AIX / Linux / DB2 Tuning Parameters
Problem
Parameter / Setting
Additional Details
Unable to access DB2 server
*See Topic: Maximum number of processes for AIX and Linux under operating system tuning.
If you cannot access the DB2 server, it might be possible that the db2agents
have used the maximum number of processes.
Other parameters to check in your specific environment
may include, but is not limited to:
APP_CTLHEAP_SZ
DATABASE_MEMORY
DFT_PREFETCH_SZ
NUM_IOCLEANERS
NUM_IOSERVERS
SORTHEAP
MAX_QUERYDEGREE
Not all of these parameters are available in all environments.
Setting
parameters to AUTOMATIC within DB2 will
allow DB2 to tune the parameters
based on the current workload. At first, this can result in a negative
performance impact and some potential errors if certain values are
not tuned quickly enough, but it is a good way to determine what parameters
might need to be tuned to achieve maximum performance.
If you
set a parameter too high and cannot start the DB2 control center, the parameter can be changed
on the DB2 command line by using
the statement db2 update db cfg for
db_name using
parameter_namevalue.
Additional
Resources:
DB2 is a complex system
with many tuning parameters that have not been covered in this very
brief overview. One of the most comprehensive articles for tuning DB2 is "Best Practices for Tuning DB2 UDB V8.1 and its Databases"
by Fraser McArthur. http://www.ibm.com/developerworks/db2/library/techarticle/dm-0404mcarthur/
Web server tuning
This section provides tuning
information for IBM HTTP Web
Server, which is included in the supplements for WebSphere Application Server.
The
parameters that are described in this section can be modified in the httpd.conf file.
Table 19. Cross-Platform Web Server Tuning Parameters
Problem
Parameter / Setting
Additional Details
Connection closed errors
MaxKeepAliveRequests / 0
This directive signifies the maximum number
of requests that a single client can make before the connection is
closed. Generally, this value is set to 0.
This will activate the Fast
Response Cache Accelerator (FRCA).
General Performance Issues
Afpa Logging / off
Note:The use of this setting is deprecated
as of IHS 7 and should not be enabled.
If you do not need FRCA
logging turned on, you can turn it off by placing the comment character
(‘#') before the AfpaLogFile directive. Doing this will also
boost server performance.
Table 20. AIX / Linux Web Server Tuning Parameters
Problem
Parameter / Setting
Additional Details
Out of threads errors in web server logs
ThreadLimit / 25
Depending on how many users access Rational Asset Manager at
a given time, it might be necessary to increase the thread limit.
To see if you need to increase the limit, check the web server logs
for out of threads errors or warnings.
Out of threads errors in web server logs
ThreadsPerChild / 25
Depending on how many users access Rational Asset Manager at
a given time, it might be necessary to increase the thread limit.
To see if you need to increase the limit, check the web server logs
for out of threads errors or warnings.
Table 21. Windows Web Server Tuning Parameters
Problem
Parameter / Setting
Additional Details
Out of threads errors in web server logs
ThreadLimit / 4000
Depending on how many users access Rational Asset Manager at
a given time, it might be necessary to increase the thread limit.
To see if you need to increase the limit, check the web server logs
for out of threads errors or warnings.
Out of threads errors in web server logs
ThreadsPerChild / 3000
Depending on how many users access Rational Asset Manager at
a given time, it might be necessary to increase the thread limit.
To see if you need to increase the limit, check the web server logs
for out of threads errors or warnings.
This section
specifically covers IBM Edge
Caching Proxy. For information on DMZ caching proxy server configuration,
see the DMZ caching proxy server configuration section.
You
can modify the parameters that are described in this document in the ibmproxy.conf file.
Table 22. IBM Edge Server Tuning Parameters
Problem
Parameter / Setting
Additional Details
Unable to upload assets with large file sizes
LimitRequestBody / 2G
By default, this parameter is set to 10 M.
Change this to a larger value so that users can upload large files.
Unable to upload assets with large file sizes
due to timeouts
InputTimeOut / 60 Minutes
Changing this parameter to 60 minutes will
give users sufficient time to upload large assets.
Refer also
to topic "Session Timeout" under Application Server Tuning
Unable to upload assets with large file sizes
due to timeouts
ReadTimeout / 60 Minutes
Changing this parameter to 60 minutes will
give users sufficient time to upload large assets.
Refer also
to topic "Session Timeout" under Application Server Tuning
Unable to upload assets with large file sizes
due to timeouts
ScriptTimeout / 60 Minutes
Changing this parameter to 60 minutes will
give users sufficient time to upload large assets.
Refer also
to topic "Session Timeout" under Application Server Tuning
Table 23. Additional Settings
Parameter
Setting
SendRevProxyName
yes
PurgeAge
3
DirShowCase
off
MaxActiveThreads
110
ConnThreads
15
MaxPersistRequest
15
ServerConnPool
on
CacheMemory
1200 M (max)
CacheAlgorithm
responsetime
Numclients
100
flexibleSocks
off
ListenBacklog
256
DMZ caching proxy server configuration
Follow these caching proxy server
guidelines for better performance:
In the file, /DMZ-install-dir/profiles/SecureProxySrv01/config/cells/cell-name/nodes/node-name/servers/proxy1/server.xml you
can take the following steps:
In the file, /DMZ-install-dir/profiles/SecureProxySrv01/config/cells/cell-name/nodes/node-name/servers/proxy1/proxy-settings.xml,
keep the outboundRequesttimeout at its default value:
During large file (1 GB and higher) uploads on a slow
connection, the DMZ proxy server may return a 504 timeout error.
This error does not indicate a problem with Rational Asset Manager,
and the upload will complete normally. However, to avoid the 504 error,
increase the outboundRequesttimeout.
Operating System tuning
Cross-Platform:
Make sure that the page file size is at least 2GB.
On AIX systems, define the
paging file on a disk that is separate from the disk where WebSphere resides.
To ensure
they are separate, determine where WebSphere is
installed and then run swap -l or lsps
-a.
Windows:
Table 24. Windows Operating System Settings
Problem
Parameter / Setting
Additional Details
"Address already in use" errors seen when testing
with Rational Performance
Tester.
registry item MaxUserPort / 65534
Note:The setting needs to be modified on the Rational Performance Tester
client, not the Rational Asset
Manager server.
In the registry editor, navigate to My Computer\HKEY_LOCAL_MACHINE\SYSTEM\CurrentControlSet\Services\Tcpip\Parameters.
Right-click Parameters, click New > DWORD Value.
Type MaxUserPort for the name of the DWORD
value.
Right-click the value and click Modify.
Set the value to 65534.
Under base, select Decimal.
Reboot the computer.
To avoid session availability bottleneck (seen
with 900 users on 6-instance cluster)
registry item TcpTimedWaitDelay / 30
In the registry editor, navigate to My Computer\HKEY_LOCAL_MACHINE\SYSTEM\CurrentControlSet\Services\Tcpip\Parameters.
Right-click Parameters, click New > DWORD Value.
Type TcpTimedWaitDelay for the name of
the DWORD value.
The maximum number of processes that a
user can run must be set to a high enough level. This is especially
true of the database server, which can have many database agents.
To
view the set maximum number of processes, use the following command:
lsattr -E -l sys0 -a maxuproc
To set the maximum
number of processes, use the following command:
chdev -l sys0 -a maxuproc=2000
This
will result in a limit of 2000 after restarting the system.
File descriptors:
In the /etc/security/limits file
(or, in the .conf file for Redhat Linux systems),
change all settings for open files to unlimited and set the limit
for soft and hard file size to 65535. Since the effect of changing
these settings depends on who the logged in user or using service
is, be sure to set the changes to the default user so they apply for
all users.
Soft NOFILE Size    65535
Soft FILE Size      -1
Soft CPU Time       -1
Soft STACK Size     -1
Soft CORE File Size -1
Hard NOFILE Size    65535
Hard FILE Size      -1
Hard CPU Time       -1
Hard STACK Size     -1
Hard CORE File Size -1
Setting values to unlimited can also be accomplished by
using the ulimit command.
Table 25. AIX/Linux Operating System Settings
Problem
Parameter / Setting
Additional Details
Going to external DNS
/etc/netsvc.conf
Add this line to the netsvc.conf file:
hosts=local,bind4
Ethernet adapter is doing Segmentation Offload
no -o tcp_recvspace=65536
no -o tcp_sendspace=65536
no -o udp_sendspace=65536
no -o udp_recvspace=65536
no -o tcp_finwait2=60
no -o tcp_timewait=1
no -o tcp_keepidle=600
no -o tcp_keepintvl=10
no -o tcp_keepinit=40
The impact of these commands is affected by
how big the TCP/IP packets are that your application creates, sends,
or receives. The "no -a" commands are in effect until the system
is rebooted. To make them permanent, add the following command to
the /etc/tunables/nextboot file:
These commands can also be set on a
per-tcpip-interface basis. Check the "lsattr -E -l en0" and if they
are not set there, then AIX uses
the "no -a" values.
AIX sees
a number of virtual processors that is greater than the number of
physical processors.
smtctl -m off
The AIX smtctl command
shows how many virtual processors that AIX sees.
Turn SMT off with the command:
smtctl -m off
Running
the smtctl -m off command requires you to then
run the bosboot command to make the change permanent.
If you do not run bosboot you will lose the effect
of running smtctl -m off after a system restart.
The
two threads on each physical processor share a Level1 cache. If the
threads are unrelated, they corrupt the other cache data, which can
end up slowing down the overall throughput as the system waits for
more memory fetches to refresh the cache. Consider making a couple
of test runs with this on and off to see what setting is best for
your workload.
NIS is running.
Disable NIS.
If the /etc/hosts and /etc/passwd files
contain lines with '+', then the system is running 'NIS', also
called YellowPages. This can also be seen by
ps -ef | grep yp
NIS
is not normally enabled on AIX-out-of-the-box. If you do not need
this for the application server, consider a test run with NIS disabled.
Many sockets in FIN_WAIT_2 state
no -o tcp_finwait2=60
If the "netstat -an" shows many sockets in
FIN_WAIT_2 state, this means "high connection rates occur" and will
correspond to the "Address already in use" message that is in server
logs.
This can be controlled by a "no" command. First look
at the current setting,
"no -a | grep fin"
and see the default of 1200 half-seconds (i.e., 10 minutes). Try
a test run with the following setting:
no -o tcp_finwait2=60
The
"no" command is good until reset or until a reboot. To make it permanent,
define it in /etc/tunables/nextboot.
The processor is capable of using large pages,
but is not doing so.
Add parameter to JVM: -Xlp
This JVM is for the Rational Asset Manager server on WebSphere Application Server.
From the WebSphere Application
Server administration console, select Application
Servers > RAM Server name > Java and Process Management > Process
definition > Java Virtual Machine > Generic JVM arguments.
The
parameter is -Xlp<size>. You should specify
-Xlp with no size to enable the default large paging size. You can
also set a specific size. For example -Xlp64 enables 64 KB pages.
To improve the performance of the
web application, you
can configure IBM Rational Asset Manager to
perform some of its processing using a Java executable
other than the one in the web container. You must be an administrator
to configure remote processing.
Procedure
In the
web client, click Administration.
Click Configuration.
In the Remote Processes section, select the Java runtime environment that you want to use
for Rational Asset Manager processes
that could be handled outside the web container:
Use
Web Server's JRE: Select this option
to have all work done by the Java runtime
environment in the web container.
Provide
the path to a Java executable on this node:
Select this option and enter the full path to a Java executable file (that is, java.exe or javaw.exe)
on the server where Rational Asset Manager is
installed (for example, E:/WebSphere/AppServer/java/jre/bin/javaw.exe).
Use the Java executable path set into the CQJRE
JNDI variable: Select this option if you are using a cluster
environment and the JRE exists in a different location on every node.
Using this option allows you to provide a JNDI variable.
Restriction:To
create and use a cluster
of application servers, you must have IBM WebSphere Application Server Network
Deployment (ND), which is not bundled with IBM Rational Asset Manager.
Communication
port range: Enter the
lowermost number of a range of ports for Rational Asset Manager to
use to communicate with the remote processes. For example, if a starting
port number of 4545 is specified, then ports 4545 through 4554 may
be used.
Maximum heap size in megabytes::
Define
the amount of physical memory available for the Java application.
Click Save.
Configuring the embedded WebSphere Application
Server as a service (Windows and Linux only)
If you installed the embedded IBM WebSphere Application Server,
it is not automatically configured as a service for your operating
system; you must start and stop the server manually. You can create
a service to start the server automatically for you.
About this task
Note:These commands will not work on AIX or Linux for zSeries
Procedure
To create a service for the embedded WebSphere Application Server:
If you change the administrative security for the embedded WebSphere Application Server,
you must update the service commands with the updated user name and
password.
Additional
configuration requirements for Linux and AIX
If you are
running IBM Rational Asset Manager on Linux or AIX, perform the tasks in this section as needed
to complete your configuration.
Enabling content indexing on Linux and AIX
If you are using Apache Tomcat on Linux or AIX,
you must set the appropriate exporter permission on the directory
that contains the files for Stellent content indexing.
About this task
The Stellent files are located in the
following directories, depending on which application you used for
installing Rational Asset Manager server:
Embedded IBM WebSphere Application Server,
version 7.0: RAM_install_directory/ram/ewas/profiles/appServerName/installedApps/node/RAM1WebApplication.ear/com.ibm.ram.repository.web.ws.was.war/WEB-INF/classes/oiexport/
In a command line, change to the directory of the Stellent
content indexing files described above.
Type the following command: chmod 755 exporter.
Enabling database connectivity for non-root users (Linux and AIX)
If you must run IBM WebSphere Application Server or
Apache Tomcat as a non-root user, then you must set the appropriate
permission on the database Java archive
files that you upload.
Procedure
To set permission:
Log in as root.
In a command line, change to the WebSphere_install_directory/profiles/profile_name/config/cells/cell_name/ram_jdbc directory.
Type the following command: chmod
755 database_jar_file_name.jar (for
example, chmod 755 db2jcc.jar).
Repeat step 3 for
each database Java archive file that you uploaded.
Installing the X Virtual Frame Buffer on AIX or Linux
On Linux, Linux for zSeries, or AIX operating
systems, if you want to create thumbnails of the files that you attach
to assets, you must install the X Virtual Frame Buffer (XVFB).
Before you begin
You must have administrative access to your operating system.
The following instructions are for AIX and Linux, however this process is
similar for other Linux distributions.
Procedure
Install the XVFB file sets. For AIX, the file sets are included on the installation
CDs for the operating system. For Linux, the location of the file
sets depends on your specific distribution. On some distributions,
you can install the xorg-x11-server-Xorg package
to obtain the necessary file sets. If not, refer to the documentation
for your distribution.
For supported Linux and AIX operating system
platforms, see the system requirements and review the operating
system sections.
Start XVFB:
These are the file sets to install:
OpenGL.OpenGL_X.dev.vfb.05.01.0000.0000
X11.vfb.05.01.0000.0000
To associate XVFB with one display, run the following command, where n is the display number
to associate with this instance of the XVFB:
To set XVFB so that it is effective at system boot and restarts
if it fails, have a system administrator add the following entry to
the /etc/inittab file, where n is the display number
to associate with this instance of the XVFB:
If XVFB is running, you will see the following string: XVFB_SCREEN(STRING)
= "TRUE".
Export the display:
Run the following command, where n is
the display number of XVFB:
export DISPLAY=:n
Export the gdfontpath:
Run the following command, where font_path is
the full path to a folder that contains .ttf system
fonts (for example, WebSphere_Application_Server_install_location/java/jre/lib/fonts):
export GDFONTPATH=font_path
Tip:Use the following command to find folders that contain .ttf fonts:
Installing the Rational Asset
Manager Eclipse
client
This section contains the instructions to
install the IBM Rational Asset Manager Eclipse
client.
About this task
You can install the Rational Asset Manager Eclipse
client by either of two methods:
If an Eclipse integrated development
environment (IDE) is installed
on your computer, you can use the Eclipse update manager to find and
install the Rational Asset Manager Eclipse
client plug-ins from a Rational Asset Manager server.
To install the client plug-in, follow the Eclipse update process (Help > Software Updates > Find and Install).
If
an Eclipse IDE is not installed on your computer, install the
Eclipse client from the Rational Asset Manager installation
media. You can also install the Eclipse client into an existing Eclipse
IDE by this method.
Installing Rational Asset
Manager Eclipse client by using Eclipse update manager
Rational Asset Manager has an Eclipse client which you
can use to find and download assets and interact with the repository
from Eclipse. You can install the IBM Rational Asset Manager Eclipse
features into an existing of Eclipse IDE by using the Eclipse update
manager and downloading the features from the Rational Asset Manager server,
a method that insures that the versions of Rational Asset Manager on
your Eclipse client and on the server are compatible.
Before you begin
You can use the Rational Asset
Manager Eclipse client with a Rational Asset Manager server
of the same release version and one release version prior to that.
Release versions include the original release and its fix packs. For
example, you can use a Rational Asset Manager Eclipse
client of version 7.1.1 with a Rational Asset
Manager server of versions 7.1.1, 7.1.0, and 7.1.0.1.
Your Eclipse
IDE must meet the software requirements before you can install the Rational Asset Manager Eclipse
client into it. See Software requirements for
detailed requirements. You must also know the URL for accessing the Rational Asset Manager server
using the web client.
Note:These instructions are for Eclipse
3.4. The process for installing new software is slightly different
in each version of Eclipse and in different applications that are
built on Eclipse. For example, in Eclipse 3.5 the update manager is
located in Help > Install
New Software. In general, the wizard to
install new software is usually under the Help menu.
Procedure
Start Eclipse.
Click Help > Software Updates.
In the Software Updates and Add-Ons window, click the Available
software tab.
Click Add site.
Provide the Update site details:
Open the Rational Asset Manager web
client, and then click the Help icon and Extensions.
On the Extensions page, in the Eclipse Client Plug-in
section, copy the URL listed next to Update site.
If the Rational Asset Manager server
is only available on an https protocol, the Eclipse client will not
be able to use the update site. To resolve this, refer to the topic Adding
the server public certificate to the Eclipse client.
In Eclipse, in the Add Site window, paste the Update
Site URL into the Location field.
Click OK
Expand the Rational Asset Manager update
site that you just added and select the features to install. Typically,
select all of the features, with the following exceptions:
If the Eclipse client you are using has IBM Rational Team Concert installed,
from the Rational Asset Manager integrations with Rational
Team Concert category, select the version of the Rational
Team Concert Client integration that matches your version of Rational Team Concert.
Do not select more than one.
If the Eclipse client you are using does not have Rational Team Concert installed,
do not select any Rational Asset Manager Eclipse RTC Client
integration feature.
If you are upgrading a Rational Asset Manager v7.2.0.1 or earlier
Eclipse client, select the Required for existing
7.2.0.1 or earlier clients > Rational Asset Manager
Common - Obsolete feature.
If you are installing into a Rational Software Architect v8.0
client, from the Rational Asset Manager Eclipse Client category,
clear the EPF Richtext Feature feature.
If you are installing the Rational Asset Manager Eclipse
client into IBM Rational Team Concert,
you can clear these features, which should already be installed:
IBM Rational common user assistance
IBM Rational common user assistance resources
The above two IBM Rational common user assistance
features have similar names, but they have different content and are
both required for the help system.
After you have selected the features to install, click Install.
In the Install window, review and accept all of the license
agreements and click Next.
Click Finish.
If you see an error that says An error occurred while
collecting items to be installed - Unpack facility not configured,
you must restart Eclipse with a command to use a Java JRE that can
unpack the files at the update site:
Locate a Java JRE on your file system. For
example, C:\Program Files\IBM\Java\jre\bin or C:\Program
Files\Java\jre\bin.
Launch Eclipse with the -vm argument
that points to the location of the JRE. For example, eclipse.exe
-vm C:\Program Files\IBM\Java\jre\bin.
Try the install procedure again, starting at step 2.
When the installation finishes, restart Eclipse.
Results
To verify that the installation was successful, open the Asset
Management perspective; click Window > Open Perspective > Other and then select Asset Management from
the list. Click OK.
Installing Rational Asset
Manager Eclipse client by using Installation Manager
Install the IBM Rational Asset Manager Eclipse
client package by using the IBM Installation
Manager GUI.
Start the Rational Asset Manager launchpad
program (see Installing from the launchpad program)
and select IBM Rational Asset Manager.
If Installation
Manager is
not installed, install it by following the steps in the installation
wizard. The installation wizard opens.
The Installation page of the installation wizard lists
all the packages that Installation
Manager found
in the repositories.
To search for updates to the Rational Asset Manager package,
click Check for updates.
Select the Rational Asset Manager client and
any updates to the package to install. Updates that have dependencies
are automatically selected and cleared together. To continue, click Next.
Note: If you install packages at the same time, all of the
packages install into the same package group.
On the Licenses page, read the license agreement for the
selected package. If you selected more than one package to install,
there might be a license agreement for each package. To display the
license agreement for a package, on the left side of the License page,
click each package version. The package versions that you selected
to install are listed under the package name.
If you agree to the terms of all of the license agreements,
click I accept the terms of the license agreements.
To continue, click Next.
If you install the first package on this computer, then
on the Location page, either type the path for the
shared resources
directory in the Shared Resources Directory field
or accept the default path. The shared resources directory contains
resources that package groups can share. To continue, click Next.
Default paths:
C:\Program
Files\IBM\SDP70Shared
/opt/IBM/SDP70Shared
Important:You can specify the shared resources
directory only the first time that you install a package. To ensure
adequate space for the shared resources of future packages, use your
largest disk for this directory. You cannot change the directory location
unless you uninstall all of the packages.
On the Location page, either choose an existing
package
group to install the Rational Asset Manager Eclipse
client package into, or create a new one. A package group represents
a directory in which packages share resources. To create a package
group:
Click Create a new package group.
Type the path for the installation directory for the
package group. The name for the package group is created
automatically.
Default paths:
C:\Program
Files\IBM\SDP70
/opt/IBM/SDP70
To continue, Click Next.
If an Eclipse IDE is installed on your system,
you can extend its functionality to the packages that you are installing.
If you do not want to extend an existing Eclipse IDE, click Next to
continue.
On the next Location page, select Extend an existing
Eclipse.
In the Eclipse IDE field, type or navigate
to the location of the folder that contains the Eclipse executable
file (eclipse.exe or eclipse.bin). Installation
Manager checks
if the Eclipse IDE version is valid for the package that you are installing.
The Eclipse IDE JVM field displays the Java Virtual Machine (JVM) for the
IDE that you specified.
To continue, click Next.
On the Features page under Languages,
select the languages for the package group. The corresponding national
language translations for the user interface and documentation for
the Rational Asset Manager package
are installed. Your choices apply to all of the packages that are
installed under this package group.
On the next Features page, click Next. You cannot clear the IBM Rational Asset Manager client feature.
On the next Features page, select a method for delivering
the help content. Select one of the available options, and then click Next:
Access help from the web: Connect directly to the public information
center for your help content.
Download help and access the content locally: Download the
help using the Local Help Updater.
Access help from a server on your intranet: Download the help
using the Local Help Updater and allow users to connect to the intranet
server for the help contents. Enter details for the Host, Port, and
Path.
Note:This selection is not applied to the Rational Asset Manager server
installation.
Before you install the Rational Asset Manager package,
review your choices on the Summary page. To change your choices, click Back and
make your changes. When you are satisfied with your installation choices,
click Install to install the package. An indicator shows the progress of the installation.
When the installation process is complete, a message confirms
the success of the process.
Click Finish. The installation
wizard closes and you are returned to the Start page of Installation
Manager.
What to do next
Review the Options for accessing help content and
configure the help content based on the selection you made during
the client installation.
Installing
the Eclipse client by using console mode
You
can use console mode to install the IBM Rational Asset Manager Eclipse
client.
About this task
Console mode is an interactive text-based user
interface
for Installation
Manager. The package includes the installation files for Installation
Manager.
A selected option is indicated by an X [X].
An option that is not selected is indicated by empty brackets [
]. You can press Enter to accept the default entry or specify
a different command. For example, [N] indicates that
the default command is N, or next.
Procedure
Start Installation
Manager in console mode by entering the ram-consoleinst-platform file
that is specific to your operating system on a command line.
Enter 1 to install new software
packages.
Enter the number that is next to
the Rational Asset Manager client.
To view the available versions ofRational Asset Manager,
enter O.
Enter 1 to
choose version 7.5.1.
Enter N.
On the Licenses screen, these options are available:
1: IBM Rational Asset Manager client.
To view a license agreement, enter the number that is next to the
product name.
A: I accept the terms in the license
agreement.
D: I do not accept the terms in the license
agreement. If
you decline the license agreement, the installation stops. To continue
the installation, you must accept the license agreement.
Enter A to
accept the license
agreement.
Enter N.
Choose one of these options:
To select a package group in the Shared Resources
Directory
that is compatible with the Rational Asset Manager package,
enter the number that is next to that package group.
To enter a value for the Shared Resources Directory,
enter M. Enter a new location and press Enter.
To accept the default package group, continue
to the
next step.
Restriction:You
can specify the shared resources
directory only the first time that you install a package. Select a
drive that has enough space so that the shared resources of future
packages will have enough space. You cannot change the location of
the shared resources directory unless you uninstall all of the packages.
Enter N.
On the Translations screen, enter the number that is next
to the language to install.
Enter N.
On the Features screen, enter N.
On the Summary screen, review your selections before
you
install the package.
Enter G to
generate an installation response file. Enter the name of the response
file and use .xml as the file extension. Response files are XML files. You can include a directory location
when you enter the response file name to save the file to a different
location.
Enter I to
install the package.
When the installation
is complete, enter F to
finish.
Adding
the server public certificate to the Eclipse client
If
the IBM Rational Asset Manager server
is only available on an https protocol, the Eclipse client
cannot use the update site. To resolve this, you must add the public
certificate of the server to the Eclipse client.
About this task
These instructions
are for a Windows computer
with a Firefox browser.
Instructions for Linux are
similar.
Procedure
Save the certificate.
Access the Rational Asset Manager web
client using a browser.
Double-click
the security icon in the status bar. The
Security window opens.
Click View
Certificate.
In the Certificate
Viewer, click the Details tab.
On the
Details page, click Export.
In the Save Certificate to File window, select X.509
Certificate (DER) in the Save as Type list.
Click Save.
Optional: Create the keystore.
You can use
an existing keystore or create a new one. To create a new keystore,
run the following command from a command prompt:
Where
drive:\path\to\certificate\ram.keystore is the full path to the ram.keystore
file. Eclipse will start and will trust the connection
with the server.
Backing up
and restoring
You should plan to frequently back up your repository.
With backups of certain parts of your server configuration, file storage,
and databases, you can completely recover your repository.
About this task
See
the topics below for information on backing up and restoring
your IBM Rational Asset Manager repository.
Creating a backup of a Rational Asset
Manager repository
You can create a backup of your IBM Rational Asset Manager repository,
which you can restore later.
Before you begin
To back up your repository, you must have these permissions:
Administrator access to Rational Asset Manager
Full administrative access to the database server
Access to the Persist storage folder for
each application server
Access to configuration files for the application servers and
for the applications
To prevent others from modifying the repository while
you create a backup, you must be able to stop all application servers.
About this task
You do not need to back up every application file. You can
completely recover your repository with the appropriate configuration
files, your databases, and the Persist storage
folder, which holds all asset artifacts.
Procedure
To create a backup of your repository:
Create a backup of your installation directory with the
application files and documentation from the installation media. If you used IBM Installation
Manager, this directory is the install_package_location/ram/ folder.
You do not need these files for most backups; however, if the backup
and restore do not go as planned and you need to completely re-install
and configure the applications, you need the files.
Log in to the Rational Asset Manager web
client as an administrator.
Click Administration > Configuration.
In the Disk Storage section,
note the location of the Persist and Index folders. If you are on an IBM WebSphere Application Server
cluster, there is an Index folder for every node.
Stop the Rational Asset
Manager application. Stopping the application helps prevent data corruption.
For WebSphere Application
Server:
Log in to the WebSphere Application
Server administrative console.
Select the RAM1WebApplication.ear application
and click Stop.
For Tomcat:
Log in to the Manager application.
In the Applications section, find the Rational Asset Manager application. Most
likely, it is /ram.
In the Commands list for the application,
click Stop.
The Rational Asset
Manager application is now offline.
Stop the application servers. Your other
applications are now offline.
On the computer where the database is located, create a
backup of the database for Rational Asset Manager,
which is the database for assets. For instructions, see the
documentation for your database application.
Create a backup of the database for IBM Rational Team Concert,
which is the database for lifecycles. For instructions, see the
documentation for your database application.
Create a backup of the Persist folder
that you noted in step 4.
Create a backup of the Index folder
for every node. Rational Asset Manager can
completely rebuild the Index folder after you
restore the repository. However, for large repositories, if you restore
the Index folders, the search index rebuilds
faster.
Create a backup of your configuration files:
For WebSphere Application
Server:
Run
the backupConfig script for WebSphere Application Server. This script
is located in the websphere_install_directory/bin directory.
Because security is enabled for your server, run the script with the -user administrator_username and -password administrator_password options,
and use the user name and password of the server administrator. By
default, running the script creates a .zip file
of your configuration in the websphere_install_directory/bin directory.
If you are using a WebSphere Application
Server Network Deployment cluster, run the backupConfig script
for every node on your cluster.
On Windows, tomcat_install_directory\bin\startup.bat and tomcat_for_rtc_install_directory\bin\startup.bat.
On Linux, AIX, or Linux for zSeries, tomcat_install_directory/bin/startup.sh and tomcat_for_rtc_install_directory/bin/startup.sh
The server.xml files: tomcat_install_directory/conf/server.xml and tomcat_for_rtc_install_directory/conf/server.xml
The user security configuration file: tomcat_install_directory/conf/tomcat-users.xml and tomcat_for_rtc_install_directory/conf/tomcat-users.xml
The database connection configuration file for Rational Team Concert: rtc_install_dir/jazz/server/conf/ramjazz/teamserver.properties
For Rational Asset Manager releases
earlier than 7.5.1, the database connection configuration for Rational Team Concert is: rtc_install_dir/jazz/server/conf/jazz/teamserver.properties
What to do next
By using the Persist folder and databases,
you can recover your repository. For more information, see Restoring from a backup.
Restoring from a backup
With the databases, the persist folders, and some configuration
files, you can recover your IBM Rational Asset Manager repository
and server configuration.
Access to the directories where you want to store the asset files
(the Persist folder) and, optionally, the search
index files (the Index folder)
Procedure
From your backups, restore both the asset and lifecycle
databases to your database server.
From your backups, restore the Persist disk
storage folder. If you cannot restore the Persist folder
to the same path, you can change the location of the Persist folder.
From your backups, restore the Index disk
storage folder. If you are using an IBM WebSphere Application
Server cluster, you must restore the Index folder
for each node. If you restore the index folders, Rational Asset Manager can
rebuild the search index faster.
From your backups, restore the configuration for your application
server:
For WebSphere Application
Server:
Run the WebSphere Application
Server restoreConfig script, specifying the backup
configuration file that you made.
The restoreConfig script is in the websphere_install_directory/bin directory.
For example, on AIX, the
command might be restoreConfig.sh WebSphereConfig_2010_07_01.zip
If you are using a WebSphere Application
Server cluster, run the restoreConfig script for
every node on your cluster.
The restoreConfig command can completely
restore the configuration and deployed applications for an entire
node. For more information about the restoreConfig command,
see the WebSphere Application
Server documentation.
For Tomcat:
From your backups, restore the startup files for the Tomcat
servers:
On Windows, tomcat_install_directory\bin\startup.bat and tomcat_for_rtc_install_directory\bin\startup.bat.
On Linux, AIX, or Linux for zSeries, tomcat_install_directory/bin/startup.sh and tomcat_for_rtc_install_directory/bin/startup.sh
If necessary, modify the variables in the startup files
to point to the following locations:
The /shared/lib/ Java libraries
The JDBC .jar files for your database server
The location of the IBM Rational Team Concert files
(JAZZ_INSTALL_DIR)
From your backups, restore the server.xml files: tomcat_install_directory/conf/server.xml and tomcat_for_rtc_install_directory/conf/server.xml
If
necessary, modify the <resource name="jdbc/RAM_con"> tag
with the correct location and authorization for the database for Rational Asset Manager.
For
the server for Rational
Team Concert, check the <connector> tag
that contains the secure port. You might need to update that tag with
the location and authorization for the security certificate for the
server.
From your backups, restore the user configuration file: tomcat_install_directory/conf/tomcat-users.xml and tomcat_for_rtc_install_directory/conf/tomcat-users.xml
From your backups, restore the database connection configuration
file for Rational Team Concert: rtc_install_dir/jazz/server/conf/ramjazz/teamserver.properties
Note:If
you restoring a database from a release earlier than Rational Asset Manager 7.5.1, you might
receive an error that the URL http://host:port/jazz is
not valid. You can use the suggested value http://host:port/ramjazz to
the update the URL.
If necessary, modify
the connection properties for the database server.
Start the application servers.
If it is not already started, start the Rational Asset Manager web application.
For WebSphere Application
Server:
Log in to the WebSphere Application
Server administrative console.
Select the RAM1WebApplication.ear application
and click Start.
For Tomcat:
Log in to the Manager application.
In the Applications section, find the Rational Asset Manager application. Most
likely, it is /ram.
In the Commands list for the application,
click Start.
If you cannot restore the Persist and Index folders
to the same location, with the same path to the directories, you can
change the location of the folders.
For WebSphere Application
Server:
Start the application server.
In a web browser, open the server setup application. By default,
the application is at http://host_name:port/ram.setup/.
The Summary page opens.
In the Repository Settings section, find the Disk Storage Settings
property and click Edit.
On the Disk Storage Settings page, update the location of the Persist folder.
Update the location of the Index folder for
each node.
Click Next.
From the server setup application, stop and then restart the application
server by clicking Tools > Restart
the server.
For Tomcat:
Start the application server.
In a web browser, open the Rational Asset
Manager web application.
Log in to the web application as a repository administrator.
Click Applications.
Click Configuration.
In the Disk Storage section, update the locations of the Persist and Index folders
to reflect the restored directories.
Click Save.
Using the Tomcat /manager application, stop
and restart the Rational Asset
Manager web application.
Results
Your repository is restored from the point of your backup.
Depending on the size of your repository and whether you restored
the Index folders, it might take several minutes for the search index
to rebuild.
Uninstalling Rational Asset Manager
You can use the Uninstall option in the IBM Installation Manager to
uninstall packages from a single installation location. You can also
uninstall all the installed packages from every installation location.
Before you begin
Beginning in IBM Rational Asset Manager version
7.2, the default installation process was changed so that Installation
Manager installs
the Rational Asset Manager server
setup application only and the server setup application deploys the Rational Asset Manager application
.ear files. Therefore, to uninstall Rational Asset Manager from
your server, you must remove the Rational Asset Manager application
.ear files using the server setup application and then use the Installation
Manger to remove the Rational Asset Manager server
setup application from the IBM WebSphere Application Server application
and delete Rational Asset Manager folders.
To
uninstall the packages, you must log in to the system using the same
user account that you used to install the product packages.
Note:If you are uninstalling Rational Asset Manager server,
Installation Manager will only remove the files that it installed.
If you installed the Rational Asset Manager server
manually on an application server, then you must uninstall it manually.
Note:If you deployed enterprise or web archive files using
the Rational Asset Manager server
setup application, you must uninstall them manually or through the
server setup application. Installation Manager can only uninstall
applications that it has installed.
Procedure
To uninstall the packages:
Close the programs that you installed using Installation
Manager.
If you are uninstalling Rational Asset Manager server
on embedded WebSphere Application Server,
then stop the server. For example, run the stopServer.bat
server1 from a command prompt in the WAS_PROFILE/bin folder.
On the Start page click Uninstall.
In the Uninstall Packages page, select the Rational Asset Manager product
package that you want to uninstall. Click Next.
In the Summary page, review the list of packages that will
be uninstalled and then click Uninstall. The Complete page is displayed after the packages are
removed.
Click Finish to exit the wizard.
Uninstalling
with the server setup application and Installation
Manager
If you used the IBM Rational Asset Manager server
setup application to deploy Rational Asset Manager applications,
you can use the Server Setup application and the Uninstall wizard
in IBM Installation Manager to
remove some of the applications, but you must manually remove some
settings and configurations.
Procedure
In a web browser,
open the Rational Asset Manager server
setup application and log in as an administrator. Because
the server is configured, the summary page will open.
Click the Deployment step.
Click Next.
For every application that you want to remove, click Uninstall.
If you used Installation
Manager to
deploy the server setup application, you can use the Uninstall wizard
in Installation
Manager to
remove it. Next:
If you used the included IBM WebSphere Application Server, Installation
Manager will
also remove WebSphere Application Server.
You're all done.
If you installed onto an existing WebSphere Application Server there
might be additional files and settings to clean up.
Open the IBM WebSphere Application Server Administrative
Console.
Locate and delete the storage directories
for Rational Asset Manager:
Click Resources > URLs.
Click All
scopes.
You will see many
variables called RAM Persist, RAM
Local, and RAM Index.
Click on every variable and note the values of the variables,
which will be directories.
Delete all
files and folders in those directories. On a WebSphere
Application Server ND environment, the Persist directory
will be a single shared directory, and there will be an Index and Local directory
for every node in the cluster.
After
you have deleted all of the directories, delete
all the variables called RAM Persist, RAM
Local, RAM Index, and RAM CQJRE
Delete
the datasource for Rational
Asset Manager:
Locate
and click the Datasource
with the JNDI name jdbc/RAM_Con
If
you are using a standalone server, you may find it under the
Server scope.
If you are using a network server, you may find
it under the cluster
that Rational Asset Manager was
installed on.
Note the name
of the component-managed authentication
alias that the datasource uses.
Delete
the datasource.
Navigate to Security > Global security > Java Authentication
and Authorization Service > J2C Authentication
Data.
Delete the entry
whose name matches the component-managed authentication alias that
you noted.
If you installed Rational Team
Concert onto your server or cluster, delete the datasource for Rational
Team Concert:
Locate
and click the Datasource
with the JNDI name jdbc/RTC_Con
If
you are using a standalone server, you may find it under the
Server scope.
If you are using a network server, you may find
it under the server
that Rational Team Concert was installed on.
Note the name of the component-managed authentication
alias that the datasource uses.
Delete
the datasource.
Navigate to Security > Global security > Java Authentication
and Authorization Service > J2C Authentication
Data.
Delete the entry
whose name matches the component-managed authentication alias that
you noted.
Optional: If your server
is a network deployment cluster, delete the system integration bus.
Navigate to Service
Integration > Buses.
Delete the bus named RAMBus.
Navigate to Resources > JMS > Connection Factories.
Delete the factory named RAM
Factory. It might be under the scope of the cluster
that Rational Asset Manager was
installed on.
Navigate to Resources > JMS > Topics.
Delete the topic named RAM
Cache. It might be located under the scope of
the cluster that Rational Asset Manager was
installed on.
If necessary, manually
uninstall each enterprise or web
archive to be removed from the application server:
Click Applications > Application types.
Click WebSphere enterprise applications.
Select each of the following applications
that remain:
RAM1WebApplication
com.ibm.ram.repository.setup.web.ear
(Installation Manager might
have removed this application for you)
ramhelp_war (or iehs_war
for Rational Asset Manager 7.5.0.2
or earlier)
ramjazz_war
rmcabdgovernprocess_war
Click Uninstall.
Delete
custom properties for IBM Rational Team Concert:
Click Servers > Server types > WebSphere Application
Servers.
Click
the name of the server where you deployed Rational Team Concert.
Click Java and Process Management.
Click Process Definition.
Click Java Virtual Machine.
Click Custom Properties.
Select the following properties:
JAZZ_HOME (the value of this variable will
be a folder on your hard drive that you will have to delete)
(if you used a Microsoft SQL Server database) SQLSERVER_JDBC
Click Delete.
Stop the
server. On a cluster,
you only need to stop the application server that was running Rational Team Concert.
Navigate to the following directory
on your hard drive: WebSphere_install_directory\profiles\profile_name\temp\server_name\
In the server_name directory,
delete the following directories:
RAM1WebApplication
ramhelp_war (or iehs_war for Rational Asset Manager 7.5.0.2
or earlier)
rmcabdgovernprocess_war
ramjazz_war (In a WebSphere Application Server
ND environment, this folder is only on the computer with the application
server that was running Rational Team Concert
For a WebSphere Application Server Cluster, delete the above
directories on every physical computer in the cell.
Navigate to the following directory
on your hard drive: WebSphere_install_directory\profiles\profile_name\config\cells\cell_name\. On a cluster, this directory will be in a subdirectory of the
profile of the machine where Deployment Manager is installed.
In the cell_name directory,
delete the RTC directories: ram_jdbc and ramSharedLibs.
Uninstalling
from WebSphere Application Server manually
To uninstall IBM Rational Asset Manager manually,
use the following instructions to uninstall the enterprise and web
archives from the application server and remove any other settings
and configurations.
Start the IBM WebSphere Application Server Administrative
Console.
Log in using an administrator user
ID and password.
Delete
the datasource for Rational
Asset Manager:
Locate
and click the Datasource
with the JNDI name jdbc/RAM_Con
If
you are using a standalone server, you may find it under the
Server scope.
If you are using a network server, you may find
it under the cluster
that Rational Asset Manager was
installed on.
Note the name
of the component-managed authentication
alias that the datasource uses.
Delete
the datasource.
Navigate to Security > Global security > Java Authentication
and Authorization Service > J2C Authentication
Data.
Delete the entry
whose name matches the component-managed authentication alias that
you noted.
If you installed Rational Team
Concert onto your server or cluster, delete the datasource for Rational
Team Concert:
Locate
and click the Datasource
with the JNDI name jdbc/RTC_Con
If
you are using a standalone server, you may find it under the
Server scope.
If you are using a network server, you may find
it under the server
that Rational Team Concert was installed on.
Note the name of the component-managed authentication
alias that the datasource uses.
Delete
the datasource.
Navigate to Security > Global security > Java Authentication
and Authorization Service > J2C Authentication
Data.
Delete the entry
whose name matches the component-managed authentication alias that
you noted.
Optional: If your server
is a network deployment cluster, delete the system integration bus.
Navigate to Service
Integration > Buses.
Delete the bus named RAMBus.
Navigate to Resources > JMS > Connection Factories.
Delete the factory named RAM
Factory. It might be under the scope of the cluster
that Rational Asset Manager was
installed on.
Navigate to Resources > JMS > Topics.
Delete the topic named RAM
Cache. It might be located under the scope of
the cluster that Rational Asset Manager was
installed on.
Remove
the applications.
Click Applications > Application types > WebSphere enterprise
applications in the navigation pane.
Check any of the applications that are installed:
RAM1WebApplication
com.ibm.ram.repository.setup.web.ear
ramhelp_war (or iehs_war for Rational Asset Manager 7.5.0.2
or earlier)
rmcabdgovernprocess_war
ramjazz_war (or
jazz_war for Rational Asset Manager 7.5.0.2
or earlier)
Click Uninstall.
Click Save to apply
the changes
to the master configuration.
Locate and delete the storage directories
for Rational Asset Manager:
Click Resources > URLs.
Click All
scopes.
You will see many
variables called RAM Persist, RAM
Local, and RAM Index.
Click on every variable and note the values of the variables,
which will be directories.
Delete all
files and folders in those directories. On a WebSphere
Application Server ND environment, the Persist directory
will be a single shared directory, and there will be an Index and Local directory
for every node in the cluster.
After
you have deleted all of the directories, delete
all the variables called RAM Persist, RAM
Local, RAM Index, and RAM CQJRE
Delete
custom properties for IBM Rational Team Concert:
Click Servers > Server types > WebSphere Application
Servers.
Click
the name of the server where you deployed Rational Team Concert.
Click Java and Process Management.
Click Process Definition.
Click Java Virtual Machine.
Click Custom Properties.
Select the following properties:
JAZZ_HOME (the value of this variable will
be a folder on your hard drive that you will have to delete)
(if you used a Microsoft SQL Server database) SQLSERVER_JDBC
Click Delete.
Delete the shared libraries references
for Rational Asset Manager:
Click Servers > Server types > WebSphere Application
Servers.
Click
the name of the server where you deployed Rational
Asset Manager.
Click Java
and Process Management.
Click Classloader.
Click the Classloader ID.
Click Shared library references.
Select the property that begins with the prefix rlsibmratl. Example: rlsibmratl_812.
Click Delete.
For a WebSphere Application Server Cluster,
repeat these
steps for each application server in the cluster.
Delete the shared libraries for Rational Asset Manager:
Click Environment > Shared libraries.
Select All scopes.
Click Shared library references.
Select all of the shared libraries that begin
with the
prefix rlsibmratl. Example: rlsibmratl_812
Click Delete.
Optional: If Rational Asset Manager was
the only application on the server, remove any environment variables.
Click Environment > WebSphere Variables in the navigation
pane.
Click the name of any environment
variables that were
set up for Rational Asset Manager (for
example, Oracle_JDBC_DRIVER_PATH).
Click Delete.
Click Save to apply
the changes
to the master configuration.
Optional: Re-configure authentication and security
settings. If you configured security specifically for Rational Asset Manager,
then revert any settings to the previous configuration. If the security
settings apply to other applications, do not modify them.
Stop the
server. On a cluster,
you only need to stop the application server that was running Rational Team Concert.
Navigate to the following directory
on your hard drive: WebSphere_install_directory\profiles\profile_name\temp\server_name\
In the server_name directory,
delete the following directories:
RAM1WebApplication
ramhelp_war (or iehs_war for Rational Asset Manager 7.5.0.2
or earlier)
rmcabdgovernprocess_war
ramjazz_war (In a WebSphere Application Server
ND environment, this folder is only on the computer with the application
server that was running Rational Team Concert
For a WebSphere Application Server Cluster, delete the above
directories on every physical computer in the cell.
Navigate to the following directory
on your hard drive: WebSphere_install_directory\profiles\profile_name\config\cells\cell_name\. On a cluster, this directory will be in a subdirectory of the
profile of the machine where Deployment Manager is installed.
In the cell_name directory,
delete the RTC directories: ram_jdbc and ramSharedLibs.
Note to U.S. Government Users Restricted Rights - Use, duplication
or disclosure restricted by GSA ADP Schedule Contract with IBM Corp.
This information was developed for products and services offered
in the U.S.A. IBM may not offer
the products, services, or features discussed in this document in
other countries. Consult your local IBM representative
for information on the products and services currently available in
your area. Any reference to an IBM product,
program, or service is not intended to state or imply that only that IBM product, program, or service
may be used. Any functionally equivalent product, program, or service
that does not infringe any IBM intellectual
property right may be used instead. However, it is the user's responsibility
to evaluate and verify the operation of any non-IBM product, program,
or service.
IBM may have patents or
pending patent applications covering subject matter described in this
document. The furnishing of this document does not grant you any license
to these patents. You can send license inquiries, in writing, to:
IBM Director of Licensing
IBM Corporation
North Castle Drive
Armonk, NY 10504-1785
U.S.A.
For license inquiries regarding double-byte (DBCS) information,
contact the IBM Intellectual
Property Department in your country or send inquiries, in writing,
to:
IBM World Trade Asia Corporation
Licensing
2-31 Roppongi 3-chome, Minato-ku
Tokyo 106, Japan
The following paragraph does not apply to the
United Kingdom or any other country where such provisions are inconsistent
with local law: INTERNATIONAL BUSINESS MACHINES CORPORATION PROVIDES
THIS PUBLICATION "AS IS" WITHOUT WARRANTY OF ANY KIND, EITHER EXPRESS
OR IMPLIED, INCLUDING, BUT NOT LIMITED TO, THE IMPLIED WARRANTIES
OF NON-INFRINGEMENT, MERCHANTABILITY OR FITNESS FOR A PARTICULAR PURPOSE.
Some states do not allow disclaimer of express or implied warranties
in certain transactions, therefore, this statement may not apply to
you.
This information could include technical inaccuracies or typographical
errors. Changes are periodically made to the information herein; these
changes will be incorporated in new editions of the publication. IBM may make improvements and/or
changes in the product(s) and/or the program(s) described in this
publication at any time without notice.
Any references in this information to non-IBM Web sites are provided
for convenience only and do not in any manner serve as an endorsement
of those Web sites. The materials at those Web sites are not part
of the materials for this IBM product
and use of those Web sites is at your own risk.
Licensees of this program who wish to have information about it
for the purpose of enabling: (i) the exchange of information between
independently created programs and other programs (including this
one) and (ii) the mutual use of the information which has been exchanged,
should contact:
Intellectual Property Dept. for Rational Software
IBM Corporation
20 Maguire Road
Lexington, Massachusetts 02421-3112
U.S.A.
Such information may be available, subject to appropriate terms
and conditions, including in some cases, payment of a fee.
The licensed program described in this Documentation and all licensed
material available for it are provided by IBM under terms of the IBM Customer
Agreement, IBM International
Program License Agreement or any equivalent agreement between us.
Information concerning non-IBM products was obtained from the suppliers
of those products, their published announcements or other publicly
available sources. IBM has not
tested those products and cannot confirm the accuracy of performance,
compatibility or any other claims related to non-IBM products. Questions
on the capabilities of non-IBM products should be addressed to the
suppliers of those products.
Trademarks and service marks
IBM, the IBM logo, and ibm.com® are
trademarks or registered trademarks of International Business Machines
Corp., registered in many jurisdictions worldwide. Other product and
service names might be trademarks of IBM or
other companies. A current list of IBM trademarks
is available on the Web at www.ibm.com/legal/copytrade.html.
Adobe is a registered trademark
of Adobe Systems Incorporated
in the United States, and/or other countries.
Intel and Pentium are trademarks or registered
trademarks of Intel Corporation
or its subsidiaries in the United States and other countries.
Java and all Java-based trademarks
are trademarks of Sun Microsystems, Inc. in the United States, other
countries, or both.
Linux is a trademark of
Linus Torvalds in the United States, other countries, or both.
Microsoft and Windows are trademarks of Microsoft Corporation in the
United States, other countries, or both.
UNIX is a registered trademark
of The Open Group in the United States and other countries.
Other company, product or service names, may be trademarks or service
marks of others.


 Configure the server environment
settings.
Configure the server environment
settings.
 Configure the application security and authentication settings
for WebSphere Application Server:
Configure the application security and authentication settings
for WebSphere Application Server:
 If you are using Oracle, copy the
additional JDBC .jar files to the WebSphere_install_directory/profiles/profile_name/config/cells/cell_name/ram_jdbc directory
for your application server:
If you are using Oracle, copy the
additional JDBC .jar files to the WebSphere_install_directory/profiles/profile_name/config/cells/cell_name/ram_jdbc directory
for your application server:

 For DB2:
The server setup application can create the database for you:
For DB2:
The server setup application can create the database for you:
 For Oracle or SQL Server: To create
the database manually, see
For Oracle or SQL Server: To create
the database manually, see 

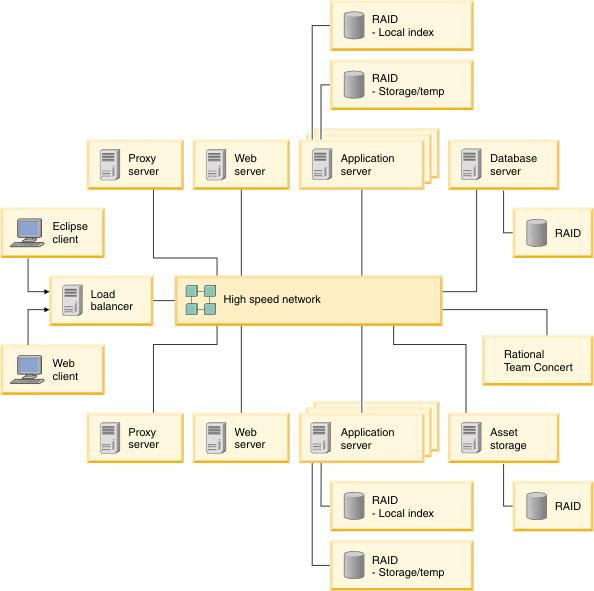
 . A list of your current changes
will be displayed at the bottom of your browser view.
. A list of your current changes
will be displayed at the bottom of your browser view. .
.