Installation and User's Guide
The
storage unit requires 3U (5.25 in) of Electronic Industries Association
(EIA) rack-mounting space.
Attention: Static electricity, though harmless to you, can
seriously damage storage unit components or options. See Handling electrostatic discharge-sensitive devices for details.
Important: Review the documentation that comes with your
rack enclosure for safety and cabling considerations. When installing
your storage unit in a rack, take the following precautions:
- Read "Removing CRUs" about making the storage unit easier to handle.
- Install the storage unit in a maximum 35 degree C environment.
- To ensure proper air flow, do not block the air vents; usually 15 cm
(6 inches) of air space is sufficient.
- Note:
- Because of the limited space in some racks, it might be easier to connect and
route cables before you install the mounting brackets and hardware
devices.
- To ensure stability, take precautions to prevent uneven loading of the
rack. Loading of the rack should begin at the bottom.
- Turn off the power to your rack.
- When multiple components are installed in a rack, take precautions to
prevent overloading of the power outlets.
- The storage unit should always be connected to a properly grounded
outlet.
- Refer to the rack documentation for instructions on removing the rack
enclosure doors and side panels.
Use the rack-mounting template and installation instructions that come with
the storage unit to locate the rack-mounting holes and to install the unit in
a rack cabinet. If you do not have the template and instructions, you
can use the following steps to install your storage unit:
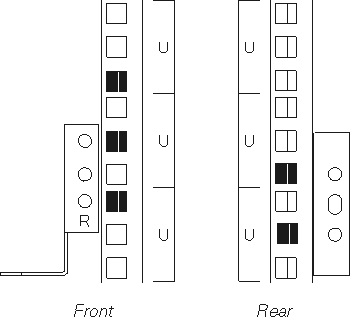
- Use the following illustration of the front and rear rack mounting flanges
to determine the appropriate rack-mounting holes for installing cage nuts or
clip nuts to secure the storage unit rails. From left to right, the
illustration shows the front and rear flanges respectively.

- Note:
- Use clip nuts if your rack has holes. If your rack has square holes,
you can use the rack-insertion tool or a flat-blade screwdriver to install
cage nuts.
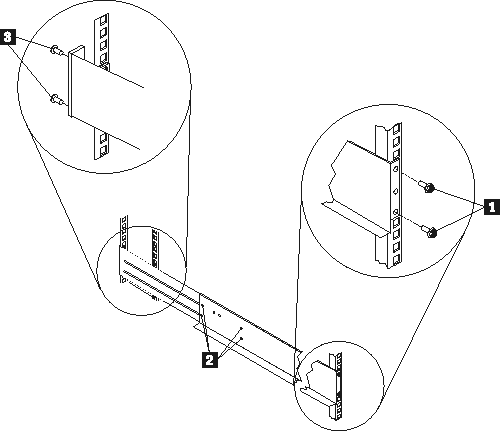
- On the rail marked R, loosen the four
screws(2).
- Hold the rail against the outside of the right rack-mounting flange, and
loosely insert the two front M6 screws (1).
- Extend the rail outside of the rear rack-mounting flange; then,
install and tighten two rear M6 screws (3).
- Tighten the two front screws (1); then, tighten the four
screws (2).
Repeat step 2 through step 5 to install the rail marked L on the
left side of the rack.

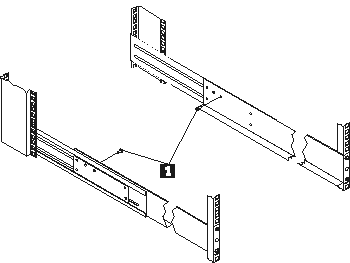
- Loosely insert one M5 screw (1) into each rail.

| Statement 4
|
|
|

|
|
|

>=18 kg (37 lb)
|

>=32 kg (70.5 lb)
|

>=55 kg (121.2 lb)
|
|
Caution:
Use safe practices when lifting.
|
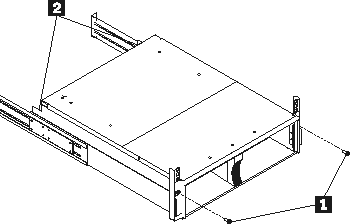
- Slide the storage unit into the rack, and insert the M6 screws
(1). Do not overtighten the M6 (1) screws.

- Tighten the rear screws (2).
- Verify that option switches 1 and 2 (inside the switch card) are set to
Off. See "Setting the interface options and ID settings" for more information.
- Install hard disk drives and power supplies in the storage unit according
to "Installing and replacing devices"; then, return here to complete the installation.
- Continue with "Completing the installation".
[ Top of Page | Previous Page | Next Page | Table of Contents | Index ]