Service Guide
Figure 1, Figure 2, Figure 3,
and Figure 4 illustrate the various controls and indicators on the
appliance models.
| Note: | The Model 100 is also known as the tower model. The Model 200 is also
known as the rack model.
|
Figure 1. Model 100 front view
- (1)
- Operator Information panel
- (2)
- Hard Drive Status LED
- (3)
- Hard Drive Activity LED
- (4)
- Serial Number
- (5)
- Cover Release Latch
- (6)
- Reset Button
- (7)
- Power Control Button
- (8)
- Power Control Button Shield (if installed)
Figure 2. Model 200 front view

- (1)
- Cover-release latch
- (2)
- Serial Number
- (3)
- Hard Drive Status LED
- (4)
- Hard Drive Activity LED
- (5)
- Reset Button
- (6)
- Power Control Button
- (7)
- Power Control Button Shield (if installed)
- (8)
- Operator Information panel
- Reset Button
- Press this button to reset the appliance and run the power-on self test
(POST).
Attention: Press this button only when the appliance is
hung. Pressing this button when the appliance is booting up or
operating may make the appliance non-operational or corrupt the drives.
- Operator Information panel
- The LEDs on this panel give status information for your appliance.
See "Operator information panel" for more information.
- Hard Drive Status LED
- Each of the hot-swap drives has a Hard Drive Status LED. When this
amber LED is on continuously, the drive has failed. When the LED
flashes slowly (one flash per second), the drive is being rebuilt. When
the LED flashes rapidly (three flashes per second), the controller is
identifying the drive.
- Hard Drive Activity LED
- Each of the hot-swap drives has a Hard Drive Activity LED. When
this green LED is flashing, the controller is accessing the drive.
Figure 3. Model 100 rear view

- (1)
- AC Power LED
This LED provides status information about the power supply. During
normal operation, both the AC and DC Power LEDs are on.
- (2)
- DC Power LED
This LED provides status information about the power supply. During
normal operation, both the AC and DC Power LEDs are on.
- (3)
- Serial Port A
- (4)
- Mouse
- (5)
- Keyboard
- (6)
- Service Ethernet port
- (7)
- Video
- (8)
- Management
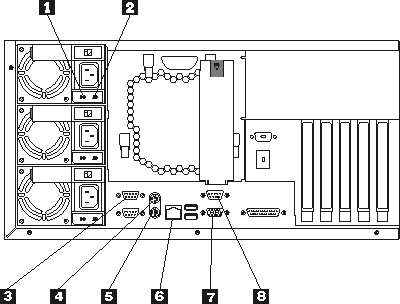
Figure 4. Model 200 rear view
- (1)
- AC Power LED
This LED provides status information about the power supply. During
normal operation, both the AC and DC Power LEDs are on.
- (2)
- DC Power LED
This LED provides status information about the power supply. During
normal operation, both the AC and DC Power LEDs are on.
- (3)
- Serial Port A
- (4)
- Mouse
- (5)
- Keyboard
- (6)
- Service Ethernet port
- (7)
- Video
- (8)
- Management
[ Top of Page | Previous Page | Next Page | Table of Contents | Index ]