This section provides basic troubleshooting information for the ServeRAID controllers. It also provides instructions on using the diagnostics diskette.
| Note: | The diagnostics diskette is available at www.ibm.com/storage/support/nas. |
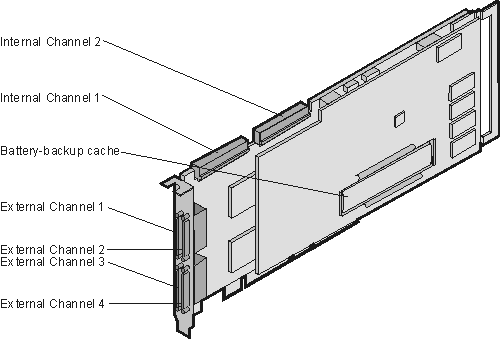
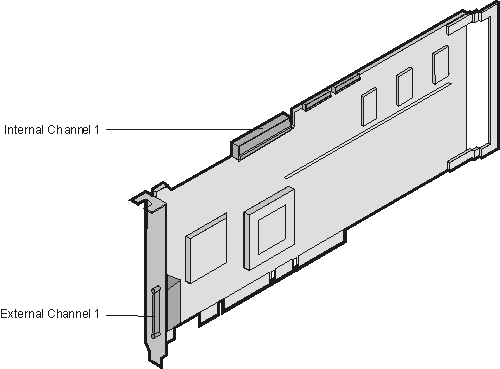
Figure 9 shows the ServeRAID-4H controller. Figure 10 shows the ServeRAID-4L controller.
Figure 9. The ServeRAID-4H controller
|
Figure 10. The ServeRAID-4L controller
 |
| Note: | You must connect a keyboard and monitor to the appliance to see the controller messages. |
This section lists the ServeRAID messages that might appear during system startup. The ServeRAID controllers provide a Device Event Log that collects statistics on the number and types of events that occur on a selected physical drive. After correcting a problem with the disk array, clear the log so that you can identify any subsequent errors quickly.
All physical drives contain unique identifiers, such as the drive serial number and manufacturer. During configuration, the ServeRAID controller stores this information.
Following are messages associated with the ServeRAID subsystem in
alphabetical order.
Table 4. ServeRAID controller messages
| Message | Explanation | Action | ||||
|---|---|---|---|---|---|---|
| A new drive was installed. | When the ServeRAID controller detects a new drive that is not part of the current configuration, the following message appears:x new Ready drives found where x is the number of Ready drives found. | This is an information message. No action is required. | ||||
| Auto rearrange. | Auto rearrange is enabled or disabled. | This is an information message. No action is required. | ||||
| Battery-backup cache not responding. | BIOS code detected a bad or failed battery-backup cache. | Press F9 to remove the battery-backup cache from the configuration, or press F10 to exit without change. | ||||
| Battery-backup cache replacement. | The ServeRAID controller detects that the battery-backup cache is defective. | Press F8 if you replaced the battery-backup cache, or press F10 if you have not replaced the battery-backup cache. | ||||
| Configured drives are missing. | When the ServeRAID controller detects that a previously configured drive
is missing, the following message appears:
x Online drives not responding where x is the number of drives not responding. Example of a possible message: Online Drive on Channel 3 SCSI ID 3 is not responding. | Press one of the following keys:
F2 Detailed description. Press this key for a detailed description of the problem. F4 Retry. Press this key after correcting a problem. For example, press F4 after you switch on the external storage enclosure that contains the physical drive. F5 Change the configuration and set the drives to defunct. Press this key to accept the new state that the ServeRAID controller will assign to the drive. For example, the ServeRAID controller will assign the drive a state of defunct or empty. You can also press F5 when you must remove a drive. RAID level-1 and RAID level-5 logical drives are present, and performance in a degraded mode is acceptable. The ServeRAID controller will assign the drive a state of defunct, but the server can complete startup. However, the array will remain in Critical mode and the potential for data loss will exist until you replace and rebuild the defunct drive. To prevent the loss of data, replace and rebuild the defunct drive in a timely manner.
F10 Continue starting without changing the configuration. Press this key to continue without change to the configuration. | ||||
| Configured drives are not in the configured location. | When the ServeRAID controller detects that a previously configured drive
is present, but the drive is in a new location, the following message
appears:
x Online drive has been rearranged where x is the number of drives that have been rearranged. For example: Online Drive on Channel 3 SCSI ID 4 moved to Channel 3 SCSI ID 3. | Press one of the following keys:
F2 Detailed description. Press this key for a detailed description of the problem. F4 Retry. Press this key after correcting a problem. For example, press F4 after you move the physical drive to its previously assigned location. F5 Change the configuration and set the drive to defunct. Press this key to accept the new state that the ServeRAID controller assigns to the drive. For example, the ServeRAID controller will assign the drive a state of defunct or empty.
F5 Change the configuration and accept the rearrangement. Press this key to change the configuration to match the current drive location. You might remove the hot-swap drives from the server for security or maintenance reasons. If you replace the drives but install them in different drive bays, you can press F6 to accept the new locations, and the ServeRAID controller will update the configuration. F10 Continue startup without changing the configuration. Press this key to continue without change to the configuration. | ||||
| Controller is not responding to commands. No logical drives are installed. | The ServeRAID controller is not operational. | Service the appliance. | ||||
| New controller installed in a configured server or drives are imported. | When the ServeRAID controller detects that the identifiers of the drives do not match the controller configuration information, the following message appears: x Online drive(s) found with mismatch configuration | Press one of the following keys:
F2 Detailed description. Press this key for a detailed description of the problem, such as the example messages above. F4 Retry. Press this key after correcting the problem. For example, press F4 after you move the physical drive to its previously assigned location, or after you install the original physical drives back in the server. F5 Change the configuration and set the drive to defunct. Press this key to accept the new state that the ServeRAID controller will assign to the drive. For example, the ServeRAID controller will assign the drive a state of defunct or empty.
F7 Import configuration information from drive. Press this key to restart the server. Press this key to import the configuration information from the drive and to update the configuration information for the ServeRAID controller. This choice is useful when you replace the ServeRAID controller in an existing ServeRAID subsystem. You also might press F7 if you replace a whole set of drives with drives that were configured in another server with a ServeRAID controller.
| ||||
| Recoverable configuration error. | The configuration data stored in NVRAM does not match the configuration data stored in the EEPROM. |
| ||||
| Unrecoverable configuration error. | The configuration data stored in NVRAM does not match the configuration data stored in the EEPROM. |
| ||||
| WARNING: n logical drives are critical; n logical drives are offline. | One or more physical drives have failed. | Replace the defunct drives as soon as possible to prevent data loss. | ||||
| Your server has an error due to a Blocked Logical Drive. | One or more logical drives are blocked. A blocked logical drive cannot be accessed. | Press F4 to unblock the logical drive, or press F5 to continue without unblocking. |
This section describes the ISPR, BCS, and ECS POST error codes. See Table 5 for ISPR codes and Table 6 for BCS and ECS codes.
| Note: |
|
Table 5 contains information on ISPR codes.
Table 5. ISPR (Interrupt Status Port Register) codes
| Code | Explanation | Action |
|---|---|---|
| 1xxx to 7xxx | The POST detected an internal error. | Correct any problems. |
| 2601 to 260B | The POST detected an error with the ServeRAID subsystem. | Correct any problems. |
| 2610 | The POST detected an error with the ServeRAID controller hardware. | Correct any problems. |
| 2620 | The POST detected that a ServeRAID configuration or hard disk error occurred. | View the existing device and configuration information for your ServeRAID subsystem. Correct any problems. |
| 8xxx to Bxxx | The POST detected an error with the SCSI interface. | Verify that the SCSI cables are correctly connected and the SCSI termination is set properly for each installed SCSI device. Correct any problems. |
Table 6 contains BCS and ECS codes.
| BCS | ECS | Explanation and possible recovery action |
|---|---|---|
| Code not in table | Code not in table | Explanation: The ServeRAID controller is not functioning
properly.
Action:Correct any problems. |
| 00 | 01 | Explanation:Invalid flash configuration.
Action: Run the ServeRAID BIOS configuration diskette and follow the onscreen prompts. If no instructions appear or if the problem persists, correct any problems. |
| 00 | 02 | Explanation: Invalid flash and NVRAM
configuration.
Action: Run the ServeRAID BIOS configuration diskette and follow the onscreen prompts. If no instructions appear or if the problem persists, correct any problems. |
| 00 | 03 | Explanation: Invalid flash and NVRAM
configuration.
Action: Run the ServeRAID BIOS configuration diskette and follow the onscreen prompts. If no instructions appear or if the problem persists, correct any problems. |
| 01 | 08 | Explanation: No configuration was found in drives, or
Online/Rebuild drives are not responding.
Action: Press F4, F5, F7, or F10. |
| 01 | 18 | Explanation: No configuration was found in drives, or
Online/rebuild and Hot-Spare/Standy Hot-Spare drives are not
responding.
Action: Press F4, F5, F7, or F10. |
| 01 | 28 | Explanation: No configuration was found in drives, or
Online/Rebuild and Ready/Standby drives are not responding.
Action: Press F4, F5, F7, or F10. |
| 01 | 38 | Explanation: No configuration was found in drives, or
Online/Rebuild, Hot-Spare/Standby Hot-Spare drives are not responding.
Action: Press F4, F5, F7, or F10. |
| 01 | 48 | Explanation: No configuration was found in drives, or
Online/Rebuild drives are not responding and unidentified drives were
found.
Action: Press F4, F5, F7, or F10. |
| 01 | 58 | Explanation: No configuration was found in drives, or
Online/Rebuild and Hot-Spare/Standy Hot-Spare drive are not responding and
unidentified drives were found.
Action: Press F4, F5, F7, or F10. |
| 01 | 68 | Explanation: No configuration was found in drives, or
Online/Rebuild and Ready/Standby drives are not responding and unidentified
drives were found.
Action: Press F4, F5, F7, or F10. |
| 01 | 78 | Explanation: No configuration was found in drives, or
Online/Rebuild, Hot-Spare/Standby Hot-Spare, and Ready/Standby drives are not
responding and unidentified drives were found.
Action: Press F4, F5, F7, or F10. |
| 03 | 88 | Explanation: A drive was imported from another server
and it has valid configuration, and Online/Rebuild drives are not
responding.
Action: Press F4, F5, F7, or F10. |
| 03 | 98 | Explanation: A drive was imported from another server
and it has valid configuration, and Online/Rebuild and Hot Spare/Standby
Hot-Spare drives are not responding.
Action: Press F4, F5, F7, or F10. |
| 03 | A8 | Explanation: A drive was imported from another server
and it has valid configuration, and Online/Rebuild and Ready/Standby drives
are not responding.
Action: Press F4, F5, F7, or F10. |
| 03 | B8 | Explanation: A drive was imported from another server
and it has valid configuration, and Online/Rebuild, Hot-Spare/Standby
Hot-Spare, and Ready/Standby drives are not responding.
Action: Press F4, F5, F7, or F10. |
| 03 | C8 | Explanation: A drive was imported from another server
and it has valid configuration, and Online/Rebuild drives are not responding
and unidentified drives were found.
Action: Press F4, F5, F7, or F10. |
| 03 | D8 | Explanation: A drive was imported from another server
and it has valid configuration, and Online/Rebuild and Hot-Spare/Standby
Hot-Spare drives are not responding and unidentified drives were found.
Action: Press F4, F5, F7, or F10. |
| 03 | E8 | Explanation: A drive was imported from another server
and it has valid configuration, and Online/Rebuild and Ready/Standby drives
are not responding and unidentified drives were found.
Action: Press F4, F5, F7, or F10. |
| 03 | F8 | Explanation: A drive was imported from another server
and it has valid configuration, and Online/Rebuild, Hot-Spare/Standby
Hot-Spare, and Ready/Standby drives are not responding and unidentified drives
were found.
Action: Press F4, F5, F7, or F10. |
| 07 | 00 | Explanation: The specified drive is not
responding.
Action:
|
| 07 | 08 | Explanation: The specified drives are not
responding.
Action: To correct the problem:
|
| 07 | 0C | Explanation: Online/Rebuild drives are not responding,
and a drive was found at the incorrect SCSI ID.
Action: Press F4, F5, F6, or F10. |
| 07 | 18 | Explanation: Online/Rebuild and Hot-Spare/Standby
Hot-Spare drives are not responding.
Action: Press F4, F5, or F10. |
| 07 | 1C | Explanation: Online/Rebuild and Hot Spare/Standby
Hot-Spare drives are not responding, and a drive was found at the incorrect
SCSI ID.
Action: Press F4, F5, F6, or F10. |
| 07 | 28 | Explanation: Online/Rebuild and Ready/Standby drives are
not responding.
Action: Press F4, F5, or F10. |
| 07 | 2C | Explanation: Online/Rebuild and Ready/Standby drives are
not responding, and a drive was found at the incorrect SCSI ID.
Action: Press F4, F5, F6, or F10. |
| 07 | 38 | Explanation: Online/Rebuild, Ready/Standby, and
Hot-Spare/Standby Hot-Spare drives are not responding.
Action: Press F4, F5, or F10. |
| 07 | 3C | Explanation: Online/Rebuild, Ready/Standby, and
Hot-Spare/Standby Hot-Spare drives are not responding, and a drive was found
at the incorrect SCSI ID.
Action: Press F4, F5, F6, or F10. |
| 07 | 48 | Explanation: Online/Rebuild drives are not responding,
and unidentified drives were found.
Action: Press F4, F5, or F10. |
| 07 | 4C | Explanation: Online/Rebuild drives are not responding,
and a drive was found at the incorrect SCSI ID, and unidentified drives were
found.
Action: Press F4, F5, F6, or F10. |
| 07 | 58 | Explanation: Online/Rebuild and Hot Spare/Standby
Hot-Spare drives are not responding, and unidentified drives were
found.
Action: Press F4, F5, or F10. |
| 07 | 5C | Explanation:Online/Rebuild and Hot Spare/Standby
Hot-Spare drives are not responding, a drive was found at the incorrect SCSI
ID, and unidentified drives were found.
Action: Press F4, F5, F6, or F10. |
| 07 | 68 | Explanation: Online/Rebuild and Ready/Standby drives are
not responding, and unidentified drives were found.
Action: Press F4, F5, or F10. |
| 07 | 6C | Explanation: Online/Rebuild and Ready/Standby drives are
not responding, a drive was found at the incorrect SCSI ID, and unidentified
drives were found.
Action: Press F4, F5, F6, or F10. |
| 07 | 78 | Explanation: Online/Rebuild, Ready/Standby, and
Hot-Spare/Standby Hot-Spare drives are not responding, and unidentified drives
were found.
Action: Press F4, F5, or F10. |
| 07 | 7C | Explanation: Online/Rebuild, Ready/Standby, and
Hot-Spare/Standby Hot-Spare drives are not responding, a drive was found at
the incorrect SCSI ID, and unidentified drives were found.
Action: Press F4, F5, F6, or F10. |
| 09 | 00 | Explanation:No error occurred.
Action: No action is required. |
| 09 | 10 | Explanation: Hot-Spare/Standby Hot-Spare drives are not
responding.
Action: Press F4, F5, or F10. |
| 09 | 20 | Explanation: Ready/Standby drives are not
responding.
Action: Press F4, F5, or F10. |
| 09 | 30 | Explanation: Hot-Spare/Standby Hot-Spare and
Ready/Standby drives are not responding.
Action: Press F4, F5, or F10. |
| 0F | 00 | Explanation: No error occurred.
Action: No action is required. |
| 0F | 10 | Explanation: Hot-Spare/Standby Hot-Spare drives are not
responding.
Action: Press F4, F5, or F10. |
| 0F | 20 | Explanation: Ready/Standby drives are not
responding.
Action: Press F4, F5, or F10. |
| 0F | 30 | Explanation: Hot-Spare/Standby Hot-Spare and
Ready/Standby drives are not responding.
Action: Press F4, F5, or F10. |
| Note: | The diagnostics diskette is available at www.ibm.com/storage/support/nas. |
You can use the diagnostics diskette to detect problems with the appliance's ServeRAID adapter. To use this diskette:
| Note: | If a faulty adapter is found, replace the adapter and rerun the diagnostics to ensure that the new adapter is operating correctly. |