Installation and User's Guide
Two hot-swap power supplies with built-in fans and two environmental
services monitor (ESM) boards are accessible from the back of the storage
unit. These components contain several user
indicators and connectors.
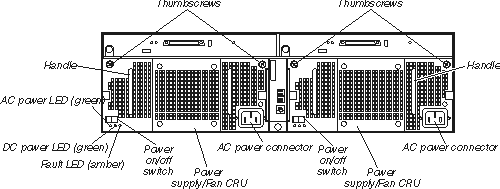
The following is a list of the controls, indicators, and connectors at back
of the storage unit. A description of each item is included:
|
- Thumbscrews
- Loosen the
thumbscrews to remove or install a power supply.
- AC power connector
- The
power cord for the power supply connects here.
- Power-supply/Fan CRU
- The two
hot-swap power supplies with built-in fans are located on the back of the
storage unit.
Attention: The storage unit comes with two power-supply/fan
units installed. When one power supply fails, the power-supply unit
must be replaced to re-establish redundancy. When replacing the failed
unit with the new power supply unit, ensure that this operation is performed
in less than 10 minutes to prevent any overheating.
The fan that is visible from the rear of the power supply is an auxiliary
fan that is normally off. This fan turns on only when the main fan
within the power supply fails.
- Power on/off switch
- Use this
switch to turn the power supply on and off.
- Fault LED (amber)
- When completely lit, this amber
fault LED indicates a power supply failure or that a redundant power supply is
not on. This LED also flashes when the built-in fan fails.
- DC power LED (green)
- This green LED is lit when the storage unit is turned on and is supplying
both 5 V and 12 V
dc power.
- AC power LED (green)
- This green LED is lit when the storage unit is receiving
ac power.
- Handles
- The two handles are used for installing and removing the power
supply.
Two environmental services monitor (ESM) boards are accessible from the
back of the storage unit. These components contain several user
controls, indicators, and connectors.
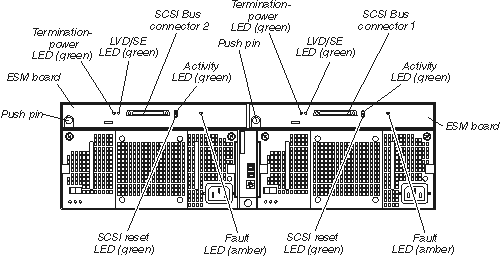
|
- ESM board
- The
environmental services monitor (ESM) boards contain the SCSI controls, LEDs,
and connectors.
- Fault LED (amber)
- When lit, this amber
LED indicates an ESM board failure.
- SCSI reset LED
- When lit, this green LED indicates a
SCSI bus reset.
- Push pins
- Each ESM board has an orange push pin at the lower left of the
board. Use the orange
push pin and lever to remove and insert the ESM board.
- Termination-power LED (green)
- When lit, this green LED indicates that termination power is
present. When a
termination-power LED is lit, it indicates that the other end of the cable is
connected to a powered-on controller. Each external bus has a separate
termination-power LED.
- LVD/SE LED (green)
- When lit, this green LED indicates that the external host bus is in low
voltage differential (LVD) mode. When this LED is off, this indicates
that the external host bus is in single-ended (SE) mode. Each external
bus has a separate
LVD/SE LED. Only LVD host bus controllers are supported.
- SCSI bus connector
- The 68-pin Very High Density Connector Interface (VHDCI) connectors are
for attaching your
SCSI cables to SCSI bus 1 and SCSI bus 2.
- Activity LED (green)
- When lit, this green LED indicates there is activity on the external SCSI
bus. Each external bus has a separate
activity LED.
[ Top of Page | Previous Page | Next Page | Table of Contents | Index ]